X2 Advanced Features
X2 Firmware Upgrade with USB Stick
I will send you later via wetransfer.com an USB stick image having the latest FW.
The archive contains a 4GB USB stick image having HF filesystem and FW 30.0 beta.
Please use Disk Imager (https://sourceforge.net/projects/win32diskimager/?source=typ_redirect) to write the image on a > 4 GB stick.
In order to upgrade the camera please turn the camera off (OFF - OFF),
insert the USB stick then turn the ignition on. The camera starts on RED - RED than shortly should go on flashing GREEN-GREEN. The installation is complete once both LEDs goes OFF, then you can pull the stick out.
The process rewrites the entire OS filesystem without affecting the camera settings. Please note that the maintenance module (Factory tools) is not present yet on this version.
New Control Center Features
From Radu Email 3/20/2018
Control Center 3.5.5
Hello all, In a few days we hope to make an internal release for our new amazing firmware...There are a lot of new cool stuffs and I think that you guys (especially US team) should be familiarized in advanced with them. In this email I would like to show you how these new features are reflected in Control Center.
CC (3.5.5)or higher required in Idrive Downloads section.
also a new Idrive Player (3.5.10) to play a new format of our existing events + 3 new types of events:
New Event Types:
- face recognized event (extension .137) (the face recognized event is trigger when a driver is recognized by camera)
- face unrecognized event (.136) (face unrecognized event is triggered when the camera is unable to recognize the driver for an amount of time)
- (the face unrecognized event is not implemented yet in the firmware and it will be available in a future version)
- safe distance warning event (.135) (the safe distance warning event is triggered when the vehicle is following too close other vehicle (the front vehicle))
Facial Recognition
Facial Recognition - Control Center
Below is a small description about how the facial recognition is implemented from the Control Center's point of view. In a future email I will explain in detail how the camera is making the recognition (with some help from Idrive Cloud).
From the CC perspective the facial recognition is very similar with the driver key identification. The corespondent of the driver key is a global unique identification field (I will name it "guid") automatically generated by CC when a driver is added in the system (the existing drivers have this field). As you can imagine, this field is synced together with the other driver's fields, so Idrive Cloud (this is a better term for Global Center or GC) also knows the guid for each driver.
If you want to learn more about guid (or uuid), take a look at: https://en.wikipedia.org/wiki/Universally_unique_identifier
During the facial recognition process, the Idrive Cloud is sending the guid of the recognized driver to the camera. The camera is triggering the "face recognized" event and it is also placing the guid in all next events and in the gps file (just as it does with the driver key).
The recognition process in CC is also similar with the driver key identification: during the transfer, the CC is searching the guid field in all events / gps files and placing the recognized driver, like below:
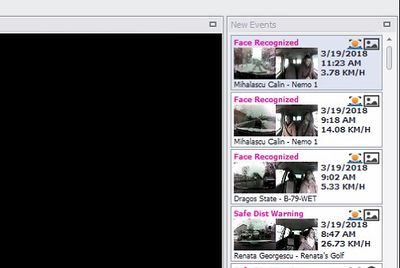
Events & Reviews:
(the yellow icon notify the user that the driver has been identified during the facial recognition process).
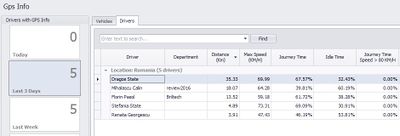
Gps data and the map:
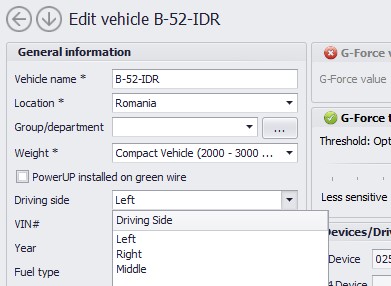
There is also a small change in Fleet Manager (see the driving side field from the image below):
The driving side field is uploaded on the camera during the Wi-Fi transfer and it is used by the camera in order to identify the position of the driver. "Middle" option should be used for inter-modal clients when only one person can appear in the image (usually a small vehicle or a cabin).
And now the cool stuff:
Play Event
Take a look at the attached event. You have 2 options to play it:
- with Idrive Player (not recommended): when the event is loaded, click on the video->click on "Face recognition info"
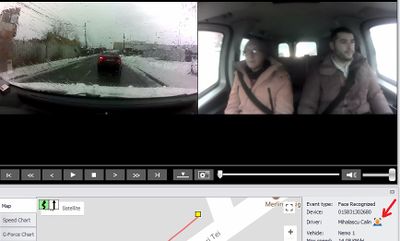
- with CC (recommended): make sure that your location belongs to Idrive Inc Company (not Demo Idrive or other), use Import Viewer->Browse and Import immediately; go to Events&Reviews section, play the event and click on the face pictogram (see below)
Facial Recognition - Firmware Functionality
The face recognition process requires a cooperation from the fleet managers until the system learns all drivers faces but is does NOT require cooperation from the drivers.
Driver Face Detection
Driving Side Settings
The detection of the driver face is based on the "driving side" field from CC->Fleet Manager->Edit Vehicle
Left driving side (considered default).
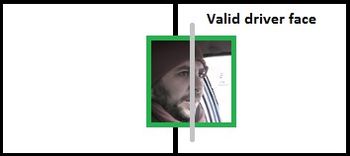
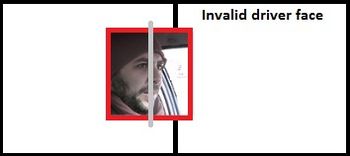
Camera will perform a face detection over the whole image and will analyze the face most on the right side of the image.
That face is considered driver face if the median of the face is placed in the right portion of image (see below)
Right driving side. This is an opposite case and the camera will analyze the face most on the left side of the image. On the above example the second image will be considered the valid driver face.
Middle In this particular case the camera will consider the first detected face as the driver face.
Triggering Facial Recognition
The face recognition will be performed in the following circumstances:
- At Ignition ON
- When someone makes a request from the LTI Interface
- When the speed becomes higher than a threshold
- the vehicle is parked (with engine ON) for an amount of time (this feature is not implemented yet)
When the driver is recognized, camera will trigger a "face recognized" event (see previous email) and the LTI will show the driver in the LTI interface.
Face image captured and uploaded to cloud
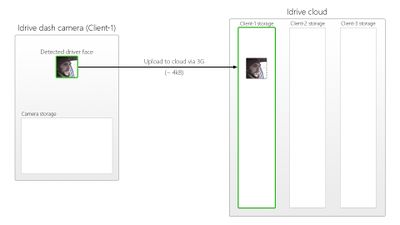
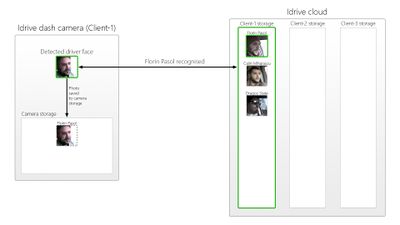
During a session (Ignition On / Ignition Off) the camera will upload 3 detected face images to the in Idrive Cloud (GC).
Facial Recognition - Global Center Interface
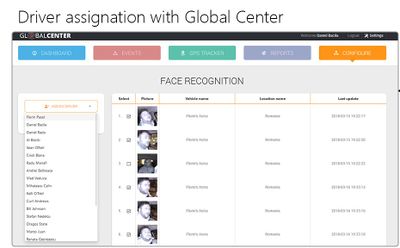
The managers will have an interface in the new Global Center where they will be able to assign each face to a driver:
At the next request, the cloud will be able to recognize the driver. The camera will not upload the face anymore; instead will add the detected face in the camera storage together with the driver information obtained from cloud.
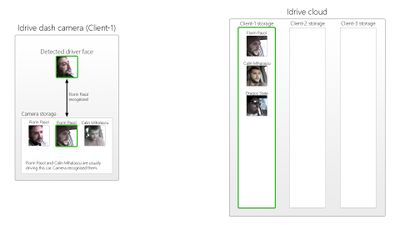
At the next ignition ON, the camera will try to recognize itself the driver by using the faces from the local storage (Idrive Cloud will become the second option). Based on this mechanism, each camera will be able to recognize all persons that are usually driving the car (in different conditions) and the cloud will not be used anymore.
From some technical reasons, the first firmware release will not include the recognition on the camera (only the recognition on the cloud will be performed). However, the system has been successfully tested with all people from Idrive RO in both environment (local + cloud). I expect less drivers in a car than people in RO, so the camera should be fine to perform recognition itself.
Licenses
Individual License Provider
The facial recognition process is using a third part component provided by http://www.neurotechnology.com
These guys are the only company that are providing APIs usable for our camera. They have also a good reputation http://www.neurotechnology.com/cgi-bin/customers.cgi
Server License Provider
The facial recognition in Idrive Cloud involves a face recognition matching server (http://www.neurotechnology.com/cgi-bin/biometric-components.cgi?ref=vl&component=NServer)
This server is already installed in one of our Amazon machines and does not require a future license.
Enabling Facial Recognition on our Camera
we have to use 2 licenses on every camera where we want to use this feature (ONLY column 2 + 3).
http://www.neurotechnology.com/prices-verilook.html
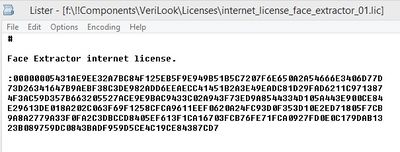
A license is a small text (400-500 bytes) like below:
and these guys are sending the licenses via email.
License Management
We have developed a license manager in Admin Center. Settings > Licenses
https://admincenter.idriveglobal.com/?Module=Support&Action=Licences&trace=Settings
I'm not sure if has been released yet but Stefan will give you more information about it soon... In order to use the Face Recognition APIs, camera will need a pair license (one face extractor + one face matcher). These licenses will be uploaded on camera via 3G (by Server) or via Wi-Fi (by CC).
That's it !
Regards, Radu
From Radu 3/30
Q -Are we going to buy in bulk and enable them as we do with SIM cards? Buy them as needed?
A- I think so. We purchased the licenses directly from their site (not a very easy procedure), and I think we can talk with them and find a way to simplify the procedure. Also we need to be very careful with what are they sending. Most likely, the persons who are generating the licenses are not technical and sometimes make mistakes. Today they sent first time Android licenses instead of ARM Linux licenses. Fortunately I found "android" word in each file name and I notified them !
Q- How do we enter the licenses into AC etc.
Q- Is there a term period for a licenses (expire need renewal)?
A- No, the license will never expire !
Q- Can a license be move to a different device?
A- Yes. You can find more details at http://www.neurotechnology.com/licensing_verilook.html We are using "Internet Activation" (dongle is not an option and serial number is not suitable for Linux-Arm).
Safe Distance Warning
From Vlad on 3/21/2018
Hi guys,
SDW (safe distance warning) is a feature that will be available on the new firmware. The applicability goes beyond having another event type, soon the reports algorithm will take into considerations SDW events for calculating scores We are using computer vision and artificial intelligence techniques to make this feature available directly on our X2 camera device (without any extra external add-ons devices or cloud processing)
Quick Description
The main steps of how this feature works are:
1. SDW algorithm is scanning the road ahead and is detecting the locations of other cars
2. Due to the calibration procedure we are accurately detecting which of the detected cars are in a frontal position related to your car (on the same lane) and filter out cars placed on other lanes.
3. We approximate the distance to the closest car in front of you into 4 categories: extremely close frontal vehicle, close frontal vehicle, midrange frontal vehicle, far-mid range frontal vehicle.
4. Knowing your car current speed (from GPS) and distance to the closest car in front we can determine if you are keeping a safe distance to the car in front or not.
Trigger Conditions
Most of the data regarding speed and safe distance in the literature are highly exaggerated to be applied in a real traffic environment (most of them consider that the vehicle in front will suddenly freeze and calculate the distance that you have to keep considering your speed so that your braking time will be enough (driver reaction time + maximum braking distance). Also, there can be taken into account many car characteristics like cars mass, braking system, tire type, tire conditions, state of the road (icy, wet, dry, etc.). In the future we can implement a system that will use multiple parameters to calculate the speed-distance condition. Now we are using a trigger system based on real-life tests. The beta release of the firmware will allow us to improve the distance-speed conditions so we can optimize the trigger threshold.
| Distance class Category | Distance in m and feet | Speed threshold on your car for making a SDW event |
|---|---|---|
| Extremely close frontal vehicle | 0-3 m (0 feet -9 feet and 10) | 40 km / h (24.8 mph) |
| Close frontal vehicle | 3-6 m (9 feet and 10 - 19 feet and 8) | 60 km / h (37.2 mph) |
| Midrange frontal vehicle | 6-10 m (19 feet and 8- 32 feet and 9) | 80 km / h (49.7 mph) |
| Far-mid range frontal vehicle | 10-15 m (32 feet and 9 - 49 feet and 2) | 100 km / h (62.1 mph) |
Calibration Procedure
The calibration procedure is mandatory (!!!) in order to have this feature available. Because the X2 camera can be mounted in any place on the windshield or even at different inclination angles and each car has its own characteristics (height, windshield inclination, windshield-front of the car distance, etc.), the designed algorithm will need to be calibrated to that specifically position of the camera mounted on car. After the calibration is done, the X2 camera should not be moved from that specific location and orientation. If the movement of the camera is necessary (RMA, moving the camera to another car, etc..) the calibration will need to be done again. Our calibration system allows us to do a very quickly and non-invasive calibration comparative with the other companies that are having this feature. Want we need for calibration is that the car that we want to be calibrated to be put between two traffic lanes (lanes width aprox 3.7 m (12 feet)). Considering that it will be a nightmare to put the cars in a road in order to calibrate them or to start drawing lanes in garages or parking lots, we are designing a roll-up carpet that is simulating the lanes. The only thing necessary is to unfold the roll-up carpet and put it in front of the vehicle, wherever the vehicle is placed. More details about this roll-up carpet will be given as soon as we will have some prototypes.
Calibration Interface
There are a few easy steps which need to be adhered to in order to successfully calibrate a device:
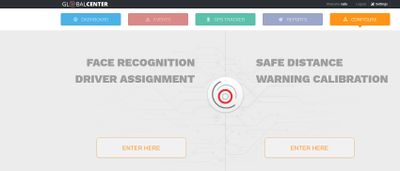
1.Open the new Globalcenter 3 interface, on the Configure tab;
2.Click on the Safe Distance Warning Calibration ‘Enter here’ button
3.Select the location and the vehicle to be calibrated. Only compatible online vehicles will be shown in the list. (You can alternatively scan the barcode on the device or upload a picture of the barcode to identify the device – useful on mobile devices if the client has a lot of online devices)
4. Click on ‘Start calibration’. A photo will be fetched real-time from the device, showing the guidelines (the image is from our calibration studio improvised in our garage 😊 , you can notice the 2 white lanes)
5. Click on ‘Start’ and place the calibration points as instructed (top and bottom of each visible line, they are 4 total points, the left lane first visible starting point (lower) and last point (upper) and the right lane first visible starting point(lower) and the last one (upper))
6. After placing the 4 interest points, the vanishing point triangle will be shown in green.
You can zoom in on the picture using the mouse wheel (or pinch-zoom on mobile) to adjust the position of the points. If there are errors, the triangle will be red and the submit button will be disabled.
7. If the vanishing point triangle is green, a valid configuration can be sent to the device (via the ‘Submit’ button). Configuration will be sent and applied on the device in real-time.
How to view the SDW events
The SDW events are having a .135 extension.
For this kind of events in the Control Center and also on the IdrivePlayer when you right click on the image you will have a Safe Distance Warning info box.
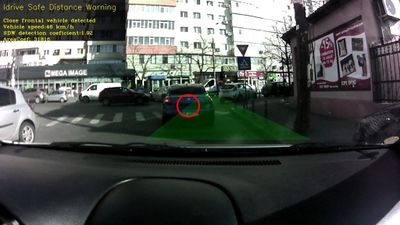
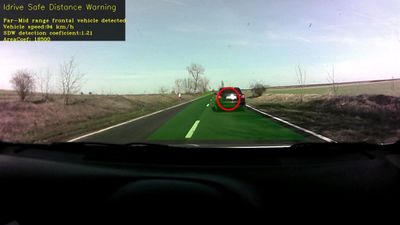
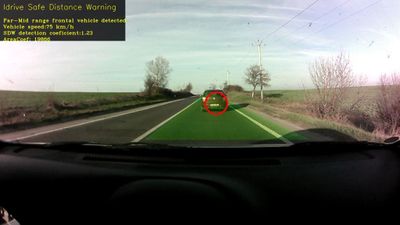
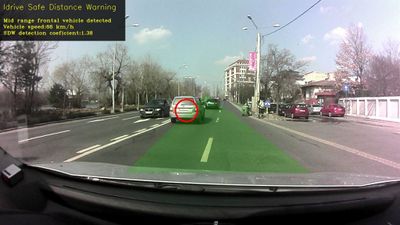
When you click on it, it will open a pop-up image with the event details. With the red circle is marked the car that you were too close to, with green are projected the lanes in front of your car. Also in the top left corner will be information’s like the distance to the other car, your speed and the detection coefficient (the graphical interface will be improved).
I will come back with information’s and updates regarding the speed-distance threshold and the calibration. I attached a SDW event to this e-mail (the speeds triggers were custom made very low for tests) and also a pdf file with the text written here
Vlad
Lane Departure Warning
How it works:
The lanes from calibration are helping me to have a perspective about what pixels from the image are in front of the car and which are not (wherever the driver is mounting the camera and under what inclination). Practically I am not detecting cars between that particular calibration lanes, but I detect cars in front of your car. I use a coefficient from the database (can be described as how far from a vertical line starting at the center of your car an other car can be in order to be in front of you) which I am tuning now in the tests for optimum results.
Regarding the bicyclist,motorcycles and any other traffic participants, for now we are not detecting them. Of course the system won't be perfect and it's subjected to errors but we are above the average performance in industry. What I care most about is to avoid false positive (give SDW warnings when is not the case) but I do it, knowing that this tuning can make the system miss some real SDW events.
So, getting back to the calibration, is important to make it at 12ft 1.6" so that will be a standard for all calibration. If we will make the calibration at different lane width sizes, I will mess up the coefficient that I am trying to tune in these tests.
I have attached several pictures from the tests here in Bucharest, in picture SDW4 you can see that the detected car is not exactly on the same lane, I am detecting it because it is in front of your car if you keep that direction of movement (our car is just switching lanes)
