RB Groove Configuration
About the Groove and SXT Products
Modify Document for reflect the GrooveA. We had to change because the old Groove was only available in OS Level 3 that does not work for us
The Groove and RB GrooveA are made by Microtik. It has many more features than the Ubiquity bullet which is at end of life for the G only version. The groove can be a direct replacement for the bullets in our current wireless environment and will facilitate our transition to 802.11n and 802.11an (5Ghz)band. License level 4 required
The MicroTik Groove product line has been split into to models. Either one can be used so long as it has License Level 4. RBGroove is hard to find with the Level 4 License but the RBGrooveA always has it. Slightly more expensive because it has more memory as well as the correct license.
The SXT products are directional and only available in either 2.4Ghz or 5.8Ghz bands but not both.
SXTG-2HnD is a 2.4Ghz 60 degree device. - Tested APPROVED Mark 9/9/14
SXT G-5HnD is a 5.8Ghz 60 degree device. - Need to ID actual unit
Sources & Component notes
RB/GrooveA-52HPn (Omnidirectional AP)
- 2.4 or 5.8Ghz Operation
- Level 4 RouterOS license (Required for AP mode)
http://www.invictuswireless.com/SearchResults.asp?Search=Rbgroovea-52hpn
http://www.balticnetworks.com/mikrotik-groovea-52hpn-2-4ghz-or-5-875ghz-access-point.html
https://www.ispsupplies.com/MikroTik-RouterBOARD-RBGrooveGA-52HPacn-US
Also will require:
- Dual Band (4.5dBi@2.4GHz, 7dBi@5.8GHz) omni Antenna
http://www.balticnetworks.com/maxxwave-2-4-5ghz-7dbi-indoor-outdoor-antenna-n-female-connector.html
- POE adaptor (one supplied will not work well outdoors) here is an example.
http://www.titanwirelessonline.com/MikroMAX-24V-PoE-with-LED-p/pe-24vs-max.htm
- Tape to seal Antenna coupling
RB/SXTG-2HnD (Directional AP)
- 2.4GHz only (10dBi, 60 degrees directional, supports 802.11n)
http://www.balticnetworks.com/mikrotik-rb-sxt-gigabit-10dbi-2-4ghz-dual-polarity-cpe.html
- MT-NANO SXT 2 -RF Elements NanoBracket
http://www.balticnetworks.com/rf-elements-nanobracketr-sxt-2-0-for-mikrotik-rb-sxt.html
- POE adaptor (one supplied will not work well outdoors) here is an example.
http://www.titanwirelessonline.com/MikroMAX-24V-PoE-with-LED-p/pe-24vs-max.htm
<br\><br\>
Initial Configuration Setup
Set up Groove Router for initial configuration
Document the "E and W;" MAC addresses from the back of the unit. To be logged in Admin Center under the customer location.
The E is the Ethernet MAC address; the W is the Wireless MAC address
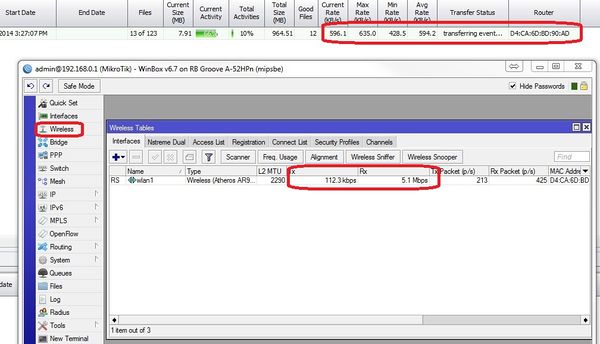
In the Control Center under Settings>Router Settings the W MAC address will show up in as the connected WiFi device that is transferring the events from the cameras
Connect to power (use either supplied AC Adapt or POE injector)
Connect cat 5 cable from Groove to PoE; then from PoE to the Idrive Wireless NIC in the computer
- Change settings for Idrive wireless NIC on your computer to:
- -192.168.88.10
<br\><br\>
Connect using Winbox or Web browser
V 3.11 1/15/18
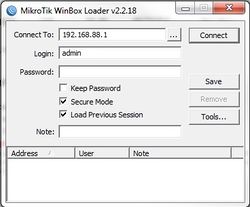
Download and install Winbox Configuration tool for RouterOS.
Run Winbox.exe or double click the icon on the desktop
- Enter the Default "Connect To" IP Address: 192.168.88.1
- Login: admin
- password: blank
- Click "Connect"
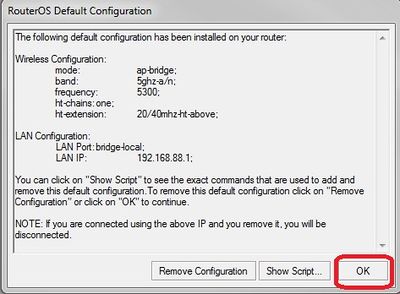
Upon initial log in the "RouterOS Default Configuration" pop-up window will appear. Choose "OK". We are not concerned about the default settings because they will be overwritten with the idrive default configuration file.
<br\><br\>
Upgrade OS and Firmware
- As of 8/14/17 new units generally have sufficient firmware versions and this step can be skipped.
Download the current approved firmware below.
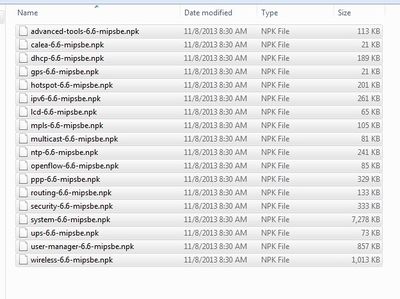
- Extract all of the files from zip package
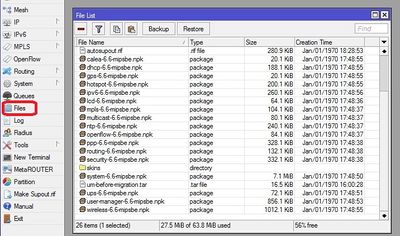
- Copy the files from your computer to the Router Board by dragging and dropping all of the files into the files list in the WinBox window
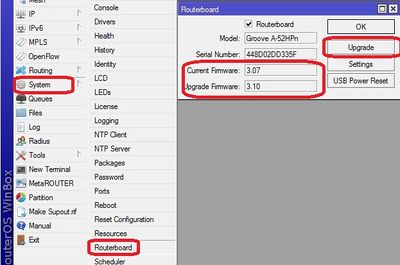
- Update the firmware System> Routerboard : Upgrade
- Restart the router and log back into the router and confirm that WinBox shows the new version of RouterOS and Firmware
NOTE: the attached zip All Packages should now be Current Firmware 3.24
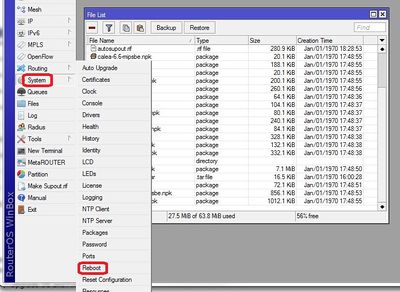
Note: you may have to perform the upgrade a second time verifying that current version and the Upgrade Version are both the highest value. If it does not match the highest value on both, then go to System>reboot then sign back in and verify highest value in both locations for the Routerboard.
<br\><br\>
Load the default Idrive configuration to setup the device as an Access Point
This is an Auto configuration file that loads when the system is reset!
1. Download the appropriate file for that specific device type and configuration from the Admin Center
- RB Groove file 2.4GHz rbg_2ghz_122917.zip
- RB Groove file 5.8GHz rbg_5ghz-122914 (Not created as of yet)
- SXT 2.4GHz file sxt-24g-090914
- SXT 5.8GHzGHz file tbd (Not created as of yet)
2. Uncompress the zipped file
3. Select Files in Winbox and drag the configuration.rsc file to the files holder on the RB Groove
4. IMPORTANT! Go to Bridge and make sure the bridge is named "bridge-local". Under the Ports tab, there should be two connections named "ether1" (designated port) and "wlan1" (disabled port).
- With the updated Routerboard
- Open Winbox and reconnect to Groove (should still be 192.168.88.1, no password)
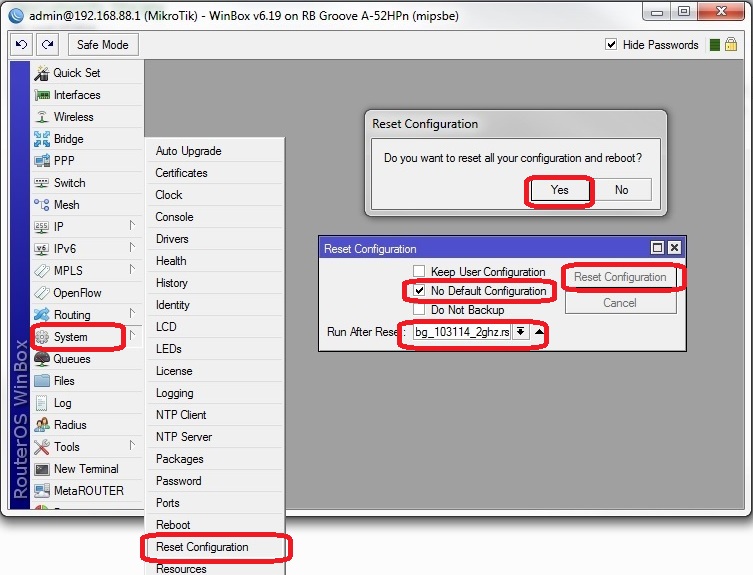
- Select System>Reset Configuration
- Select No Default Configuration
- “Run After Reboot” select the config file name “configuration.rsc”
- Click the button "Reset Configuration"
NOTE: If this method bricks the device, reset to 192.168.88.1 via the button next to the ethernet port (With the device unplugged, hold the button and then plug in the ethernet. When all of the lights on the groove start to flash at once, release the button and let it finish booting.) and follow the alternate PuTTY config reset below.
- Open PuTTY and connect to 192.168.88.1
- Enter credentials (Username: admin, no password)
- At the prompt, enter the command 'import'
- Copy paste the filename “configuration.rsc”
- The prompt should return a blank line and freeze. Close and continue in Winbox.
After the system restarts (will not restart if using PuTTY config)
Verify Configuration
- Change the Idrive Wireless NIC to 192.168.0.10
- Log in and check system at 192.168.0.7
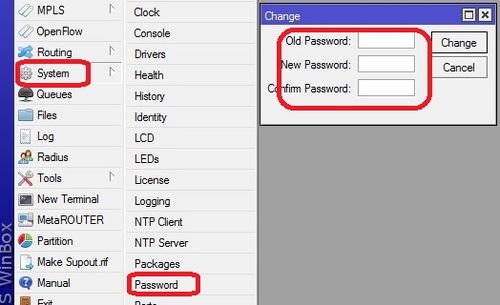
- Go to System>Password and set the password to "idrive#" SHOULD BE ALL LOWERCASE > CHECK CAPS LOCK
- Close winbox and log back in
- Verify that the password is needed
- Verify that the config took
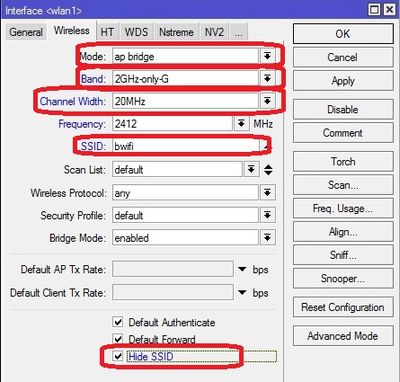
- One thing to look for: SSID should be "bwifi"
<br\><br\>
Modify Idrive Default Configuration
Do not use Quick Set
<br\><br\>
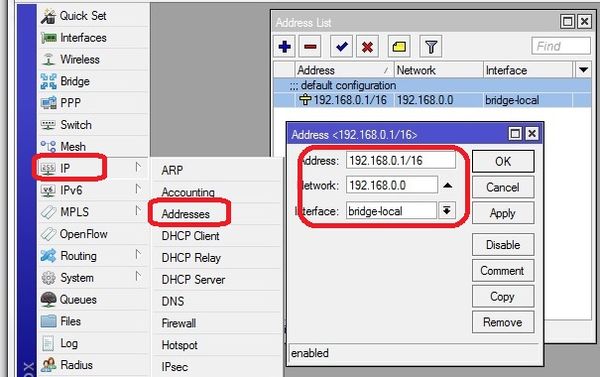
Change the IP address from 192.168.0.7
Do not delete or change the 192.168.0.7 default address before adding the new one or you will need to factory reset
Necessary if adding another AP or if a custom environment
IP>ADDRESS
ADD the new IP address example 192.168.0.x/16 by clicking on the plus sign Interface is the bridge (see 192.168.0.7 as an example)
DELETE the original Address 192.168.0.7/16 by highlighting it and then click on the minus sign
The reason for this is that the device is configured in bridge mode with the bridges Preferred Source set to the 192.168.0.7. Unless the Bridge has the new address added to it it will become a bridge to nowhere.
Winbox will log out because you just deleted the IP address you are logged in with.
Log back in with the new IP address and verify
<br\><br\>
Dual Band antenna identification in the field
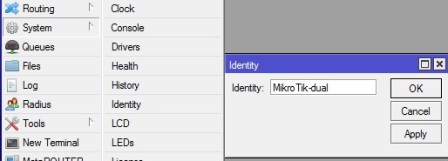
As of 7/30/14 all MicroTik Grooves will be shipped with a dual band antenna to facilitate X2 transition. To find out if a unit has the dual band antenna look at the "Identity" by logging into the Groove. Skip this step for the directional SXT series devices.
System>Identity
"Micro Tik-dual" > Dual band
"Micro Tik" > 2.4GHz antenna
<br\><br\>
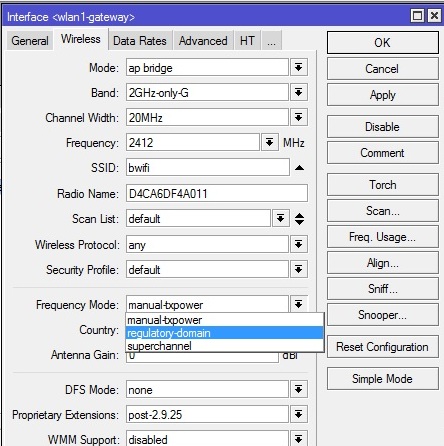
Set Country if AP is to be exported
Return on "Interface List" double-click "wlan1", select "Wireless" tab and Click on Advance mode
set Frequency mode to regulatory-domain
set Country to customer location (US is the default in the config file)
<br\><br\>
IF YOU HAVE NOT ALREADY SET THE PASSWORD TO "idrive#" YOU MUST MANUALLY SET IT. THE PASSWORD IS NOT INCLUDED IN THE RSC CONFIG FILE
**STOP HERE** below are manual configurations; not necessary after rsc file is loaded
- Go to system>password and enter the new password as "idrive#" (all lower case, mind your caps lock on your keyboard)
- sign out and back in with Winbox using the user and new password to verify
About RouterOS Configurations
The router board OS can support the traditional Idrive access point configuration:
- SSID Bwifi
- IP address and Network Mask
- 802.11g only
The Router OS also can support more advance features that are coming with the Idrive X2 and Merge products:
- 2.4 or 5.8GHz bands
- Encryption
- multiple SSIDs that will allow encrypted and non encrypted channels
Make sure you are selecting the correct default configuration file for the correct environment.
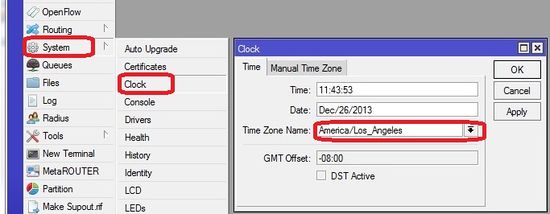
Set Timezone for customer location
Set the timezone. The Date and time will be set by NTP (Network Time Protocol) when connected to the internet
<br\><br\>
Advanced Configuration (no config file)
<br\><br\>
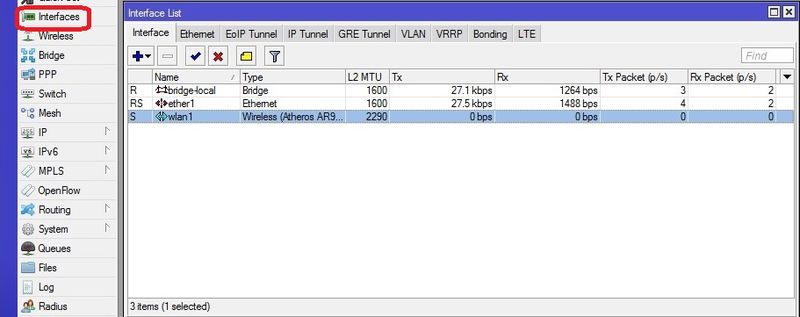
Interfaces configuration
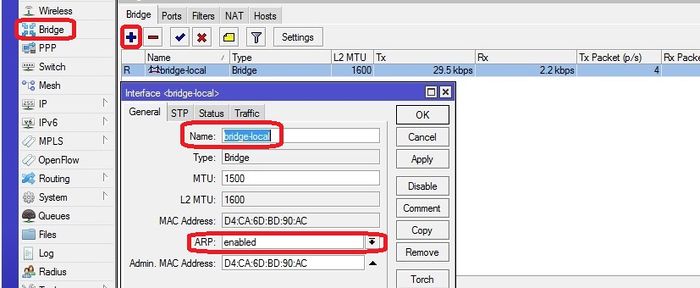
bridge-local makes the ether1 and wlan1 interfaces work as one
<br\><br\>
WLAN configuration for 2.4GHz (X1P environments)
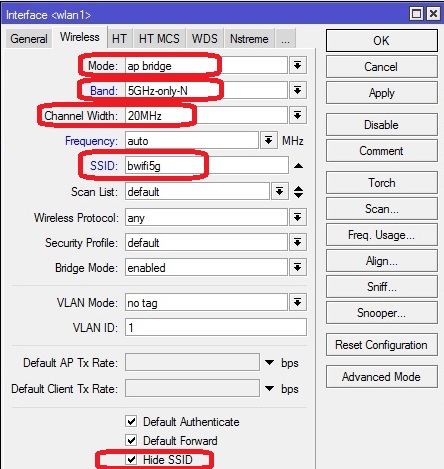
Click on "Interface List" double-click "wlan1", select "Wireless" tab and complete the fields.
Click on Advance mode
set Frequency mode to regulatory-domain
set Country to customer location (US is the default in the config file)
<br\><br\>
WLAN configuration for 5.8GHz (X2 environments)
Click on "Interface List" double-click "wlan1", select "Wireless" tab and complete the fields.
Click on Advance mode
set Frequency mode to regulatory-domain
set Country to customer location (US is the default in the config file)
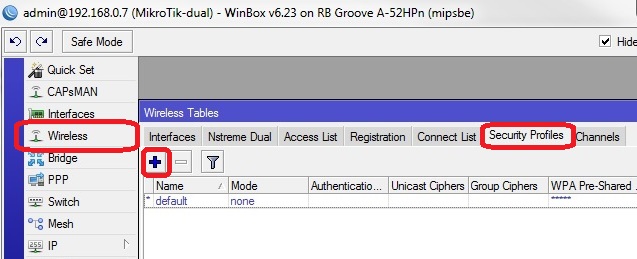
Configure Security Profile
<br\><br\>
Bridges configuration
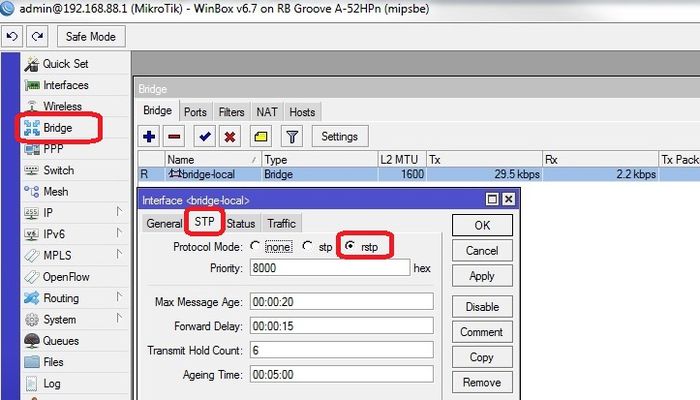
Select "Bridge" from the left menu and add new bridge. Configure the bridge as shown.
select "Ports" tab and add interfaces to the proper bridge as shown
<br\><br\>
Addresses configuration
New Default has been changed to 192.168.0.7 from 192.168.0.1. Picture out of date.
<br\><br\>
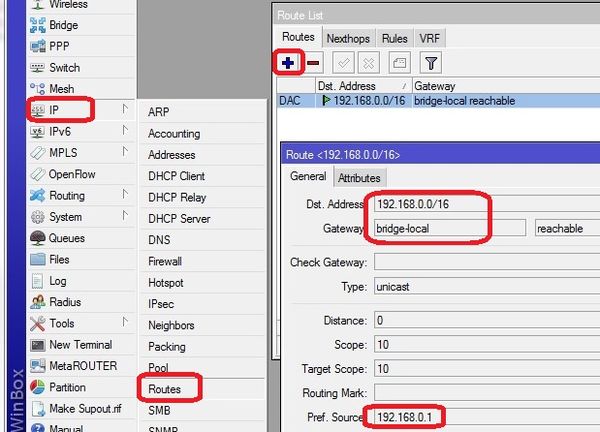
Routes configuration
Add/Modify the route
Pref source changed from 192.168.0.1 to 192.168.0.7. Picture out of date.
route <192.168.0.0/16> - routes 192.168.x.x (events) traffic through the tunnel to the base station.
<br\><br\>
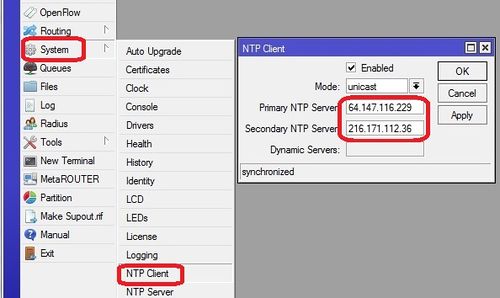
NTP configuration
Network Time Protocol - keeps the time syncronized
<br\><br\>
Set Password
Set the password to idrive#
<br\><br\>
Troubleshooting / Monitoring
<br\><br\>
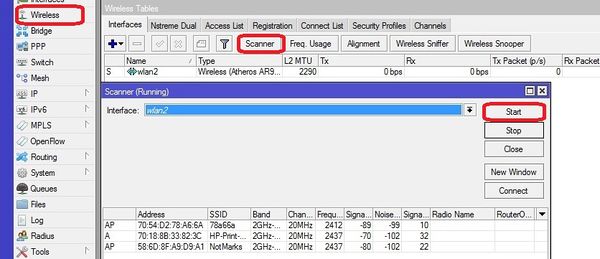
Wifi tools / channel selection
View transfer activity
View other Wifi in the area
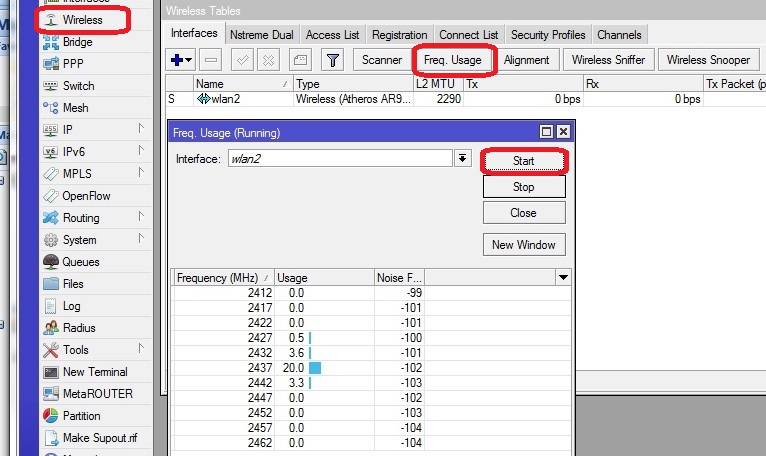
Note: Channel 1, 6 and 11 are now referred to by their frequency as follows:
Channel 1 = 2.412 - RB Groove Channel reference is 0
Channel 6 = 2.437 - RB Groove Channel reference is 5
Channel 11= 2.462 - RB Groove Channel reference is 10
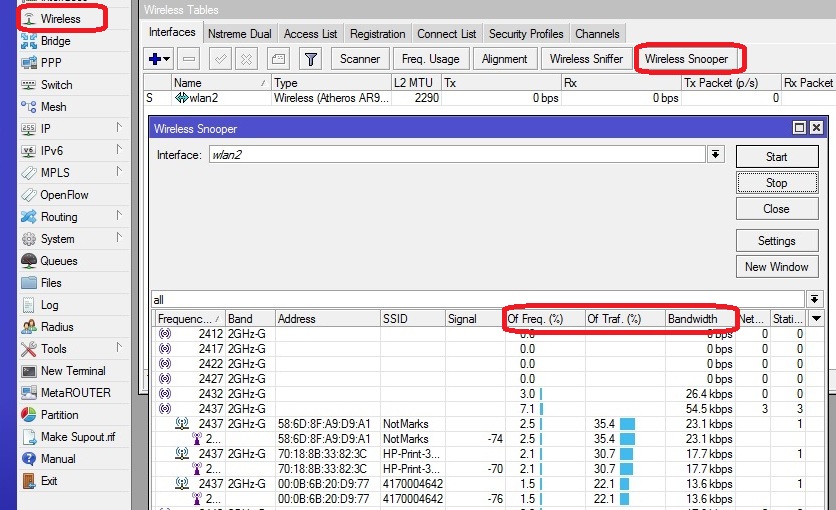
View the amount of traffic on each channel
View registered clients
Here is how you can check the registered clients on Groove AP using Putty
Log into Groove (Telnet)
Terminal -> /interface/wireless/registration-table/print
You can be sure about one thing in this case … The other tools(sniffer and snooper), from what I see shows information from the entire wireless environment and I’m not sure if is that accurate in this case.
System Health
<br\><br\><br\><br\>
Configuration Files Notes
Bricked routerboard after config
If the config file has a syntax error it will stop processing the directives at that point and may leave the RB in a state where you cannot contact it by IP address.
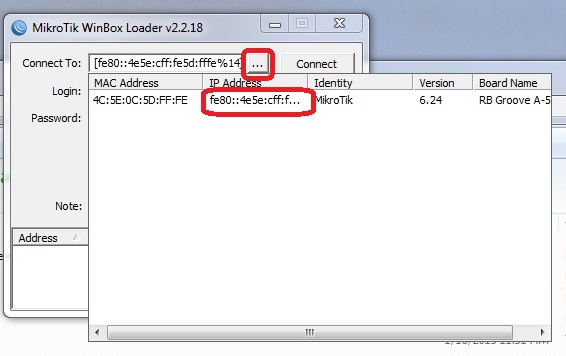
Use Winbox and connect via the IPv6 mac address to login.
Config file creation notes
Set everything! Partial configuration seems flakey
Use System > Scripts to syntax check the config file. Running the file does not throw an error.
- login with terminal
- type sys (changes directory to system)
- type scr (changes directory to scripts)
- type pri (print the scripts to terminal)Look for syntax errors
Configuration file creation with Putty
1)Log into the device with Putty. IP Address/Telnet
2)export file=<model><band><date> example SXT-24g-090914 or SXT-58g-090914 rbg_2ghz-122914.rsc or rbg_5ghz-122914.rsc (rbg = Router Board Groove)
3)drag a copy of the config from files to your desktop
export v file=name for verbose
<br\><br\>
Import config in putty
Import filename.rsc
Notes to self, when loading the config file after previously configuring the load fails.
Remove bridge config and then fails on incompatible channel width. Evidently setting G only does not change the channel width?! added channel-width=20mhz to config file. Test!
Also you need to remove the 192.168.88.1 IP address
Discussion here about migration plan to encryption & 802.11n
X2 Camera Wifi notes collected from MArk
X2 installation and operations in a new location
The plan is for an Idrive X2 in a new customer location to operate in the 5.8 GHz (802.11an) band so as to take advantage if more channels and less activity from other noise sources improving wireless speed and coverage. (Other wifi networks, cordless phones, microwaves, M2M devices etc). To facilitate communication with the Idrive base station the APs will need to support 5.8 GHz which is not a problem because there will be no legacy support issues and we just ship them the correct equipment. Maximum theoretical bandwidth 150Mbits/second.
X2 support for a legacy (X1) environment
The X1 cameras operate in the 2.4GHz Band so an X2 introduced into this environment will need to support this. The X2 camera will therefore require a Dual Band (2.4GHz & 5.8GHz) wifi module as well as a dual band antenna. With this the X2 will have the versatility to support all wifi environments. We can discuss the various transition options to add functionality and improve the operation environment. Base Station Wifi equipment
- For new customer locations with no existing Idrive wifi network we will ship Microtik Groves with a Dual Band antenna (equipment justification and selection later in this document). This will support the X2 in a pure X2 environment (802.11n, Encryption, 5.8GHz).
-In fact effective immediately we will ship this AP configuration for all new omni-directional APs ordered from now on so that maximum flexibility is available. (2.4GHz or 5.8GHz support) at no additional cost. Also it can support conversion of X1 & X2s to WAP2 encryption via Virtual Access Points (VAP) which allows for multiple SSIDs each with different settings (but not Band. IE all 2.4GHz or 5.8GHz)
http://www.balticnetworks.com/mikrotik-groove-52hpn-2-4ghz-or-5-875ghz-cpe.html
http://www.balticnetworks.com/maxxwave-2-4-5ghz-7dbi-indoor-outdoor-antenna-n-female-connector.html
- At all existing locations the X2 will be able to use the installed wifi infrastructure although this MAY not allow for implementing more advanced wifi features such as 802.11n or encryption (depending on if Ubiquity or Microtik APs are in place). X2 would just use all of the same settings as the X1 devices (bwifi, no encryption, 802.11G only) and would work fine but only allowing 54Mbit/sec transfers. Initially this will be the most common scenario as we sell individual X2 to existing X1 customer base.
Migration of existing locations to support all X2 wifi features.
It is highly desirable to add capability to leverage the wifi improvements that the X2 can provide. The X1 & X1P will not be able to support 802.11n or 5.8GHz without replacing the internal Wifi module with a dual band version) so this is why a second network should be considered.
Base Station options for locations with existing Idrive wifi networks
- Customers may be hesitant to invest in a new or duplicate wifi network to support 5.8 GHz. All idrive locations can support this configuration because nothing has changed.
-Dual separate Wifi networks. Add separate 5.8GHz APs to the existing location and have them run side by side with the old wifi network. This will enable support for more advanced X2 function (802.11n for faster downloads, encryption,?). Does not really help facilitate encryption in X1.
-Swap out existing APs an outdoor AP that can support both 2.4GHz and 5.8GHz bands simultaneously. These are very expensive off the shelf $1000 - $3000. I spent a few days investigation a Microtik solution with two radios in it that might be in the $200 range.
http://www.balticnetworks.com/mikrotik-routerboard-912uag-2hpnd.html
http://i.mt.lv/routerboard/files/R11e-131021163912.pdf
http://www.streakwave.com/itemdesc.asp?ic=SBX-S-CC
There is concern about noise between the radios within the unit itself causing problems. Also this configuration is geared towards MIMO which will do our camera no good as it cannot support it.
We have 2 type of wifi equipment we have supplied to customers up to this point:
Ubiquity Bullets/NanoStation -We were shipping these products up until December and although they work great they do not provide us with much flexibility in changing the environment at existing customer locations. (2.4 GHz only, single SSID) To do anything other than support the existing X1 modes we will need to upgrade/change these APs.
Microtik Groove- We have been shipping these since ~December 2013 (with 2.4 GHz only antenna). The RouterOS for these units allow us great flexibility so we can tailor the environment to support many configurations but not all.
Groove detailed features-
The wifi module can be switched between 2.4GHz and 5.8 GHz but cannot do both at the same time. – For simultaneous support of both frequencies a second wifi network will be required or an AP that can do both needs to be identified (more on my research into this later)
Support for Virtual Access Point (VAP) – this allows the one access point to look like many access points with different settings. For example we can have one set for an SSID of bwifi with no encryption (existing settings) and a second VAP with a different SSID that is set to WAP2 encryption. This setting can allow us to set encryption on X1 devices and still be able to talk to unencrypted X1s until the transition is complete (assuming that the firmware supports this). Bottom line is that the AP will support it as soon as the camera is able to.
Mixed installation (existing customers) (X1, X1P, X2)
IF Wifi migrated to MicroTik from Ubiquity - No encryption 2.4GHz (X1 & X1P existing environment with X2 added)
- Config the X2 as if it is an X1 (same SSID, 2.4GHz, No encryption, G only)
- Add second SSID for X2 change X2 Settings (Different SSID, 2.4GHz, Encryption,G-Only)
- Second SSID can be used to migrate X1 to encryption
- Add separate 2.4GHz AP for X2 only for 802.11N support? - -Probably affects other G-only APs - not preferred
- Install new 5.8GHz wifi network for X2 only - Leave X1 2.4GHz wifi in place
New X2 Only installations
- 5ghz band to eliminate conflict with 802.11g 2.4ghz devices - (X1 & XiP VNT9271 does not support 5Ghz)
- change SSID to bwifi5g,
- Encryption
- 802.11AN
802.11a/n only locations
Good primers on 802.11n
http://www.inscapedata.com/pdf/80211n%20Technology.pdf
http://www.wildpackets.com/resources/compendium/wireless_lan/802_11n
Groove is the best choice. Cameras will not support MIMO so max xfer rate will be 150Mbits/sec
-can support multiple SSID, Dual Band
- MIMO (Multiple Input, Multiple Output)-VNT9271 does not support - X2 will not support this.
- 5Ghz Band (less clutter)-VNT9271 does not support
- 40mhz channel width (Channel Bonding)
- encryption
- Change bwifi
- more stuff
- more stuff
Virtual AP with Groove
http://wiki.mikrotik.com/images/5/5f/Create_Virtual_AP_for_Campus.pdf
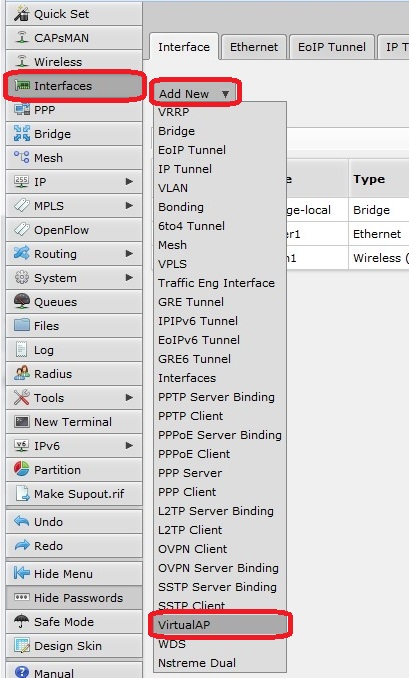
Interfaces>Add New>Virtual AP
