D4 Initial Configuration and Setup
Jump to navigation
Jump to search
Process steps for configuration of Idrive D4 for Customers. (Firmware Update, Idrive Default Configuration, Install Hard Drive)
Check Firmware version to verify that this main board has the NOR_FLASH "S8R15" installed
The firmware for old DVRs with NAND-FLASH starts with S5R16 or S7R15, while that for NOR-FLASH starts with S8R15.
- This is the easiest way to identify old (with NAND-FLASH) or new (NOR-FLASH) DVRs. DVRs with NAND-FLASH firmware should have their main board replaced.
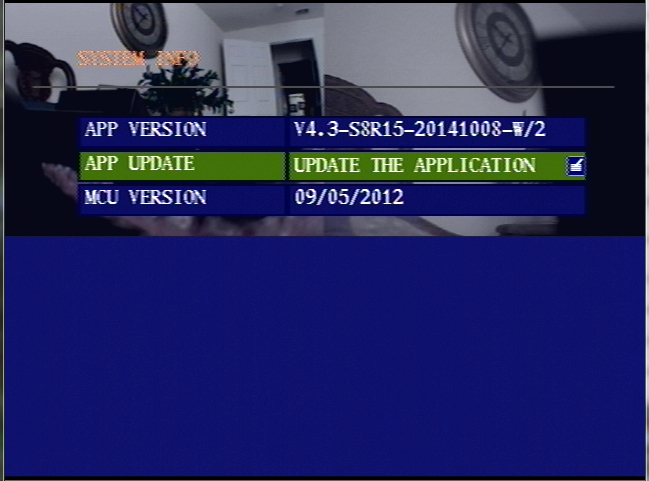
- The firmware version can be checked by accessing the D4 menu>system>system info with the remote.
Note: The latest firmware can be downloaded from the downloads section of Admin Center

THIS VERSION OF FIRMWARE UPDATED NOV 2014 INCLUDES THE BACKING CAM DISPLAYED AS FULL SCREEN WHEN ALARM WIRE A01 IS TRIGGERED WITH 12VDC+
Download the latest FW version (Nov 2014) S8R15_141015_KH1824.tar and install prior to loading the
latest config (Nov 2014) EZ config XML file having the idrive configuration for Backing Cam trigger
Enter the serial number and Board Version into Admin Center
- Get the Serial Number from sticker on the back of the unit. (MDRxxxxxxx type number)
- Enter it into Admin Center. Also record in MENU>MOTOR>LICENSE ID
- -Support/Devices/New D4-DVR Click on ADD and enter the S/N
- -Set the Board Version to "NAND_FLASH" (assuming it is) (it should be)

Install Hard Drive into the Hard Drive carriage
- step1
- Step 2
- Do not reinstall the Hard Drive carriage into the D4-DVR until after configuration steps are completed
Setup the D4 for configuration
- Plug in the Power Cable
- Plug in the Monitor Cable
- Plug in the Camera Cable
- Turn power supply on
- Insert the firmware and configuration SD Card into the unit
- Turn the Key on ( wait ~40 Seconds for video and ~25 seconds for “Loading Disk”)
- Press STOP on Remote Control to stop recording.
Confirm Application version is the latest
- Check for NOR-FLASH Version to verify DVR is the updated type (NOR-FLASH starts with S8R15)
- Using the Remote - MENU>SYSTEM>SYSTEM INFO>
(S8R15_130701_Defezdvr_en_NTSC)[See FirmeWare upgrade above]
- Using the Remote - MENU>SYSTEM>SYSTEM INFO>
- Compare the installed version to the latest version. If different update it to the current release.
- Update firmware MENU>SYSTEM>SYSTEM INFO>APP UPDATE
(S8R15_130701_Defezdvr_en_NTSC.tar)[See FirmeWare upgrade above]
- Update firmware MENU>SYSTEM>SYSTEM INFO>APP UPDATE
- Note - This file is located on the SDcard that you have inserted in the D4
Install the Idrive standard configuration
- Read the configuration file EZ config XML from the SD card MENU>SYSTEM>CONFIG SETUP>CONFIG IMPORT> the UNIT will restart the App
- Note - This file is located on the SD card that you have inserted in the D4, if the application freezes with blank green fields, turn the power key OFF and back ON
- Press STOP on Remote Control to stop recording.
- Confirm the config MENU>LIVE>BACKGROUND = SEMI TRANSPARENT? If not the config did not get set.
- Confirm the Alarm Configuration appears like the image below LIVE>ALARM

- Confirm the Alarm Wire A01 (Grey wire below the purple wire on the black Molex plug) triggers Cam Ch#2 to full screen when connecting the Grey wire to 12VDC

- Enter the serial number for the D4-DVR into the “LICENSE ID” MENU>MOTOR>LICENSE ID
- Set the CUSTOMER's Time Zone MENU>SYSTEM.
- Set the CUSTOMER's Time MENU>SYSTEM.
- NOTE: time is in military format.
- In MENU>PERIPHERALS, change the Baudrate to 9600… then Esc>Save
- Turn Key OFF
- Remove SD Card
Final configuration and Test
- Install the hard drive carriage into the DVR
- Turn the key ON
- Format the hard drive MENU>STORAGE>FORMAT
- Push record and verify that it can write to the hard drive.
- Push stop
- Test all camera ports with a working camera to ensure that they all work.
- Turn the Key and Power supply off.
- Box up unit with serial number on the outside of the box