Base Station Configuration Guide
General Guideline for Basic Base Station configuration with either MikroTik Groove, NanoStation2 or Ubiquity Bullet (3/17/14)
<br\><br\>
Basic Computer Documentation
Unpack computer and document the following information so it can be tracked in the future. An example Dell system is shown and this information is available from the labels on the computer case.
- Model Number: Dell Optiplex
- SVCTAG: F8S2KL1
- Express service code: 33182613685
- Operating System: Windows 7 Professional
- Windows code: CTRB2-38DT4-QGJCK-DHHPH-FHH3G
<br\><br\>
Basic Computer setup
(Local person Required)
Set up and turn on the system.
Basic initial system identification
The particular order and questions will vary depending on the system.
- Computer Name: Idrive_base
- User Name: Idriveadm
- Password: 111111
(password hint: six 1’s)
- Set windows to install updates automatically
- The computer should eventually come to a point where you can log in as Idriveadm
- Log on and verify internet connectivity
Idrive Base Station Setup
Install The Dell updates (you will be prompted for this the first time the system comes up).
Set Power settings so the computer will not shutdown on its own:
Start>Control Panel>System and Security>Power Options , Form the “Dell Plan” select change plan setting and under “Plugged In” set the “Put the computer to sleep” option to never. Select save changes
Set User Account Control (UAC) – Control Panel> System and Security>Action Center>Change User Account Control , Set track to “Never Notify” ( This is so the Idrive Transfer Tool will automatically start)
Set the Workgroup to IDRIVE Control panel> System >change settings
Reboot system ( after Dell updates complete)
Install Teamviewer Go to Teamviewer website http://www.teamviewer.com/en/download/dyngate.aspx#version5 download teamviewer version 5.1.13999(multilanguage). Select Run, once downloaded select Install (Default) and click Next, Select personal /non-commercial use and click Next, accept license agreement and click Next, select Start Automatically with Windows, create a strong password and confirm it (#Idrv79p for example and keep it because it must be entered in the Idrive Admin Center) then click Next, select Full access and click Next, The program installs and click on Finish. The program will launch. In the window that comes up there is an ID number under “Wait for Session” (example 123 456 789). Enter the ID and Password into the AdminCenter as well as the idrive support Teamviewer account.
Activate Teamviewer License- At the top of teamviewer select Extras>Activate License. The license number is 09-31004-216139-269687
Set windows logon Allowed for administrators – Extras> Options> Security
Set Customer’s Time zone -
Start>Control Panel> Clock, Language, Region>Date and Time>Change Time zone
Networks - One of the network connections will be for the Internet and the other for the idrive Wireless Connection. The Silver port should be used for internet, the black for wireless network.A label should be applied to the back of the system to identify each network connection
Internet connection should be set to automatically get its network addresses (DHCP). This should be good by default. Rename the connection “Internet Connection” Start>Control Panel>Network and Internet>Network and Sharing Center>Change adaptor settings, Right Click on the connection and select rename
Idrive Wireless Connection Start>Control Panel>Network and Internet>Network and Sharing Center>Change adaptor settings , Right Click on the connection and select rename. The Wifi router connection should be renamed to “Idrive Wireless Connection” . Done
Start>Control Panel>Network and Internet>Network and Sharing Center>Change adaptor settings, Right Click on the Idrive Connection and select properties, select “Internet Protocol Version 4(TCP/IPv4)”, select properties
Set up the IP address to 192.168.0.10, Network mask 255.255.0.0 , default gateway Blank and DNS servers to NOT automatic and blank settings.
Label each network adaptor on the back of the machine so the customer will know which connection is which. (“idrive wireless connection” “internet connection”)
Set Network Order – Ensure that the Internet network and not the Idrive network is accessed for the internet. Start>Network, select Network and Sharing Center, select Change Adaptor Settings, press ALT to make the advanced tab at the top appear, select advanced settings, in the connections window ensure that the internet connection is on top and the idrive wireless connection is second, click OK
Disk Partitions/ Raid configuration – Check to make sure the RAID 1 set is working. Intel raid manager icon in lower right corner
run Windows Update:
Start>All Programs>Windows Update, Accept the agreement, check the boxes for: Recommended updates, Who can install updates, Microsoft updates. When finished restart system
Install Microsoft Security Essentials http://www.microsoft.com/Security_Essentials , select download, select run, select finish and an update will download and the system will be scanned. Set to full scan, Saturday
Show hidden icons in the Taskbar Click on the arrow, select customize, Click show all icons checkbox.
Install Acrobat Reader - http://get.adobe.com/reader uncheck install google toolbar/chrome etc, select download at the bottom, Close download manager when done.
Set default web page to Idriveglobal.com – Launch Internet Explorer, depress the alt key to display tools, from tools select Internet Options, Set Home page to www.idriveglobal.com
Install VLC Media Player - </nowiki>http://www.videolan.org/vlc/index.html</nowiki>
Install the Idrive desktop logo. Logo 1.png – this is for the background for the desktop of the base stations. Copy it to a known location on the system. Right click on the desktop and pick Personalize, select Desktop background and browse to where you placed the Logo
Change account user picture to Idrive logo - Start>Control Panel>User Accounts>User Accounts>Change Account picture and browse to where you placed the Logo
(From Here down it is customer specific)
*For Demo Unit, Uninstall Any Pre-existing Idrive Software – for a returned demo unit, the software must be removed and re-installed to ensure the latest versions/updates.
Start>Programs>idrive>uninstall and click finish to safely remove software. Then go to control panel>hard drive>program files(86x)>idrive folder and delete the entire folder. Any setup or informational data in this file will be reloaded onto computer when control center is re-installed
Uninstall Microsoft SQL Server 2005 – Control panel> Programs> uninstall
Install Microsoft SQL server 2008R2 –
Click on “New Installation”
Defaults for all questions EXCEPT for “Database Engine Configuration”. Set it to “Mixed Mode” and the password to idrive2# .
Install Latest Version of Idrive 2.0 Control Center - Before this can be run to conclusion you will require a Validation Serial Number (License). This is generated in the Idrive Admin Center. To install the Control Center double click download-file-idrive.zip\idrive\setup.exe click next, enter Validation Serial Number click Done.
Create Shortcuts to the 3 Idrive manuals on the desktop –
Base Station installation Guide http://wiki.idrive.pro/index.php?title=Idrive_Base_Station_Installation_Guide
Idrive Control Center 2.0 User’s Guide http://wiki.idrive.pro/index.php?title=Idrive_Control_Center_2.0_User%E2%80%99s_Guide
Idrive X1 Installation and Operation Guide http://wiki.idrive.pro/index.php?title=Idrive_X1_Installation_and_Operation_Guide
Organize Icons from left to right near bottom of desktop screen.
Copy The Idrive idrive.cert file to The desktop – Place it next to the manual shortcuts on the Desktop
Transfer ownership of the system to the customer –
Remove previous shipping labels from the Boxes.
WiFi Equipment Setup
MikroTik Groove Setup
Use the default configuration files for configuration. Detailed configuration instructions are available Here
<br\><br\>
Upgrade OS and Firmware
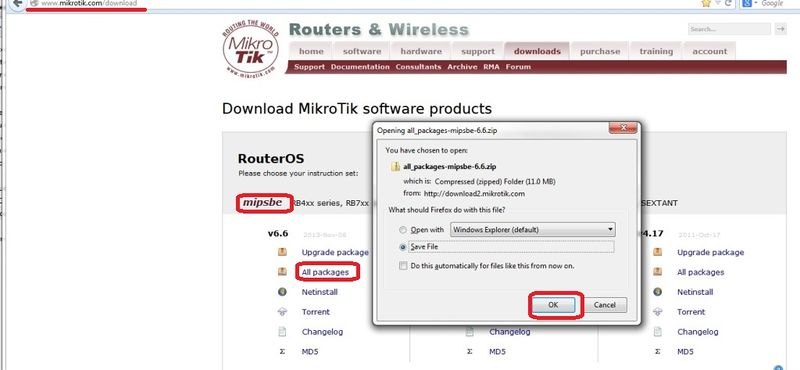
Obtain the latest versions (V6.x) from the MicroTik [|download] site
Click on the correct link for the hardware architecture (mipsbe for RB Groove)
Click on "All Packages" and click Save
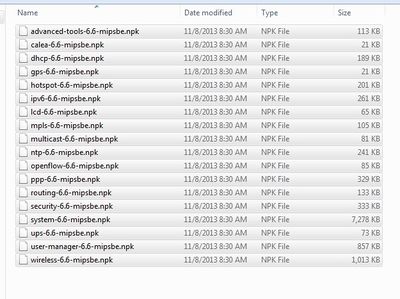
Extract all of the files from zip package
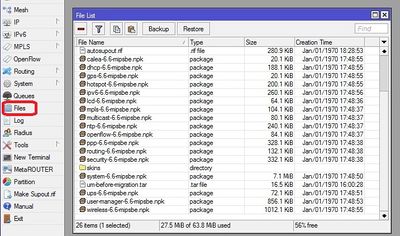
Copy the files from your computer to the Router Board by dragging and dropping all of the files into the files list in the WinBox window
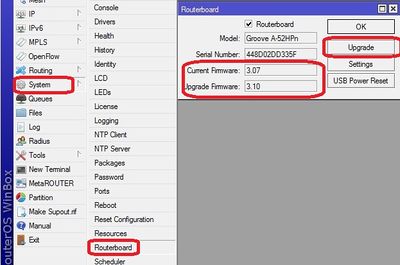
Update the firmware System> Routerboard : Upgrade
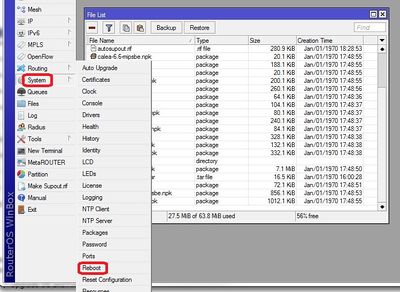
Restart the router and log back into the router and confirm that WinBox shows the new version of RouterOS and Firmware
<br\><br\>
Load Idrive Standard configuration
For simplicity and consistency it is better to set the routers configuration using the RouterOS backup/restore function. This "restores" the standard idrive configuration from a .backup file. This will leave only a few custom settings that are specific to the customer location(s).
- Download the most current .backup file from Admin Center
- Unzip the file to the Desktop on your computer
- In WinBox select “Files” from the left menu to open the Files List window.
- Use the mouse to drag and drop the configuration file from the Desktop into the Files List (uploads the file to the Router)
- Highlight the config file and click on "Restore"
The router will reboot with the new configuration. You will need to use the new IP address and password
- -The new IP address will be 192.168.0.1
- -Change the IP address on your NIC to 192.168.0.10
Reconnect to the Router with the "Connect to" address of 192.168.0.1, password idrive#
<br\><br\><br\><br\><br\><br\>
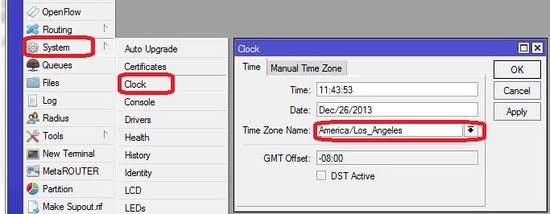
Set Timezone for customer location
Set the timezone. The Date and time will be set by NTP (Network Time Protocol) when connected to the internet
<br\><br\>
BulletHP2 Setup
connections
Attach the Antenna to the Bullet prior to powering on the unit!
The Ubiquity BulletHP2 is receives its power over the shielded ethernet cable (POE).
Plug a regular cat5 cable from the ”Idrive Wireless Connection” network port of the computer into the Lan port of the POE injector.
Plug the “FTP” (Foil Wrapped Twisted Pair) cable from the POE port of the Power injector to the NanoStation.
Plug in the POE adaptor into a wall outlet.
Verify there are lights on the unit.
Network connectivity
The factory default IP address for the Bullet is 192.168.1.20 . The idrive wireless connection interface subnet must be changed to for the initial configuration of the NanoStation
Start>Control Panel>Network and Internet>Network and Sharing Center>Change adaptor settings, Right Click on the Idrive Wireless Connection and select properties, select “Internet Protocol Version 4(TCP/IPv4)” ,select properties
Set up the IP address to 192.168.1.10
When Windows 7 detects the new network (wireless router) it will ask for the network type. Chose “Public”
configuration
Launch internet explorer and enter the address http://192.168.1.20
Login as ubnt with a password of ubnt
Network Tab
Network> Network Mode: Bridge
Network> Bridge IP Address: Static
Network>Set the IP address to 192.168.0.1
Network>Set the network Mask to 255.255.0.0
Network>Set the Default Gateway to 192.168.0.1
Network>Set The Primary DNS Server to 192.168.0.1
Network> Auto IP Aliasing unchecked
Click Change
Click Apply Changes
Change Idrive Wireless Connection settings back:
Start>Control Panel>Network and Internet>Network and Sharing Center>Change adaptor settings, Right Click on the Idrive Connection and select properties, select “Internet Protocol Version 4(TCP/IPv4)” ,select properties
Set up the IP address to 192.168.0.10
Launch internet explorer and enter the address http://192.168.0.1
Login as ubnt with a password of ubnt
Wireless> Wireless Mode: Access Point
Wireless> SSID: bwifi (these are case sensitive)
Wireless> check Hide SSID
Wireless> Country Code: (Default is USA)
Wireless >IEEE 802.11 Mode: G mode Only
Wireless> Channel Width: 20Mhz
Wireless> Channel Shifting: Disabled
Wireless> Output Power: 20DBM
Wireless> Antenna Gain: 9dB
Click Change
Click Apply Changes
System> Administrator Username: admin
System Password : idrive#
Click Change
Click Apply Changes
Log back into the Ubiquity Bullet with the new password
Test download from a unit.
NanoStation 2 Setup
http://www.ubnt.com/wiki/AirOS-Quick_Setup_Guide
connections
The NanoStation is receives its power over the shielded ethernet cable (POE).
Plug a regular cat5 cable from the ”Idrive Wireless Connection” network port of the computer into the Lan port of the POE injector.
Plug the “FTP” (Foil Wrapped Twisted Pair) cable from the POE port of the Power injector to the NanoStation.
Plug in the POE adaptor into a wall outlet.
connectivity
The factory default IP address for the NanoStation2 is 192.168.1.20 . The idrive wireless connection interface settings must be changed to for the initial configuration of the NanoStation
Start>Control Panel>Network and Internet>Network and Sharing Center>Change adaptor settings, Right Click on the Idrive Connection and select properties, select “Internet Protocol Version 4(TCP/IPv4)” ,select properties
Set up the IP address to 192.168.1.10
When Windows 7 detects the new network (wireless router) it will ask for the network type. Chose “Public”
*If configuring a Nanostation2 that has been returned in a demo kit, reset the device by holding down the reset button for ~10 seconds, before adjusting Idrive connection properties*
configuration
Launch internet explorer and enter the address http://192.168.1.20
Login as ubnt with a password of ubnt
Network Tab
Network> Network Mode: Bridge
Network> Bridge IP Address: Static
Network>Set the IP address to 192.168.0.1
Network>Set the network Mask to 255.255.0.0
Network>Set the Default Gateway to 192.168.0.1
Network>Set The Primary DNS Server to 192.168.0.1
Click Change
Click Apply Changes
Change Idrive Wireless Connection settings back:
Start>Control Panel>Network and Internet>Network and Sharing Center>Change adaptor settings, Right Click on the Idrive Connection and select properties, select “Internet Protocol Version 4(TCP/IPv4)” ,select properties
Set up the IP address to 192.168.0.10
Launch internet explorer and enter the address http://192.168.0.1
Login as ubnt with a password of ubnt
Link Setup> Wireless Mode: Access Point
Link Setup> ESSID: bwifi (these are case sensitive)
Link Setup> Country Code: (Default is USA)
Link Setup >IEEE 802.11 Mode: G only
Link Setup> Output Power: 26DBM, check “Obey Regulatory Power”
20Mhz width
No Channel Switching
Click Change
Click Apply Changes
System> Administrator Username: admin
Current password: ubnt
System Password : idrive#
Confirm password
Log back into the router with the new password
Test download from a unit.
