Difference between revisions of "Stonkam D8 Installation Guide"
Jump to navigation
Jump to search
| Line 69: | Line 69: | ||
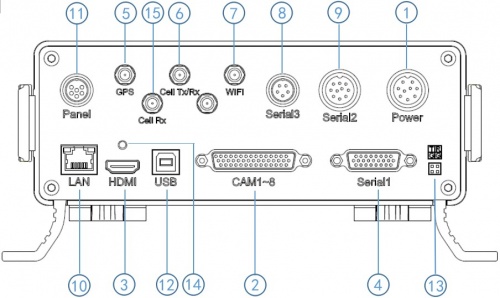
====Back Panel Diagram==== | ====Back Panel Diagram==== | ||
| − | [[File:stkm_back_panel_diragram.jpg| | + | [[File:stkm_back_panel_diragram.jpg|500px|]] |
{| class="wikitable" | {| class="wikitable" | ||
|- | |- | ||
| − | ! | + | !Back Panel Connections || |
|- | |- | ||
|'''1)''' Power input (12-32V) || '''9)''' Panic button, external GPS module connector | |'''1)''' Power input (12-32V) || '''9)''' Panic button, external GPS module connector | ||
Revision as of 22:28, 28 July 2017
Stonkam D8 Installation Guide
Packaging
All components for a specific individual vehicle will be in one box. This way the DVR will be set up for the exact vehicle and configuration.
Components
DVR
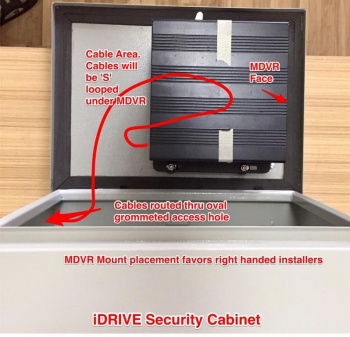
Security Box
Cables
Cameras
4 Channel Video Splitter (Cranes only)
Idrive D8 DVR
- DVR with SSD & SIM card installed and configured
- Power cable and Fuse
- *Camera cables - fix this
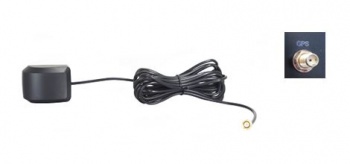
- External GPS Module
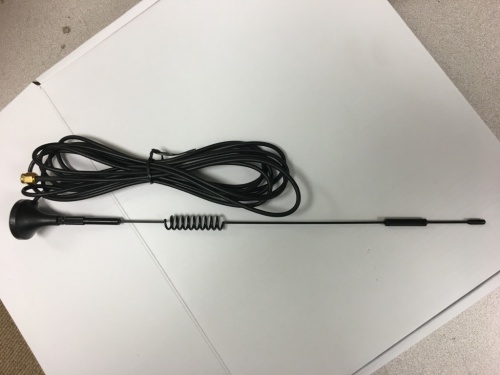
- 3G/4G Antenna
- define/confirm for Stonkam *Video Monitor Cable
- Keys
- Remote Control (Batteries Installed)
Video Splitter (4 channels)
For use in Cranes only to route the video from the existing 4 camera monitor system to the DVR.
- Video Splitter (4 Channels)
- Four 3 meter cables (from Splitter to DVR)
Camera Types
- Waterproof
- Dome (No Audio)
- CAM8165 - what is this?
Connections
Before Installations on cranes verify that the existing installed equipment is functioning. Idrive is not responsible for the 4 installed cameras or monitor system on cranes.
Back Panel Diagram
| Back Panel Connections | |
|---|---|
| 1) Power input (12-32V) | 9) Panic button, external GPS module connector |
| 2) Camera cable input | 10) Ethernet(RJ45) |
| 3) HDMI output | 11) 6pin CVBS video monitor output |
| 4) Alarm input/output | 12) USB 2.0 input |
| 5) GPS Connector | 13) debug |
| 6) Cellular Connector, TX/RX | 14) HDMI cable fixing hole |
| 7) Wifi Connector | 15) Cellular Diversity Connector, Rx |
| 8) Can input/output, External temp.sensor input |
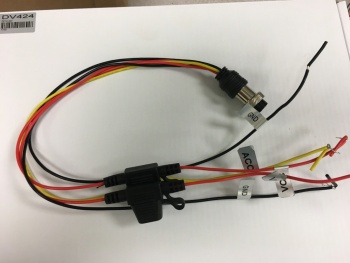
Power Cable
- *Red +12volts
- *Black GROUND
- *Yellow Ignition
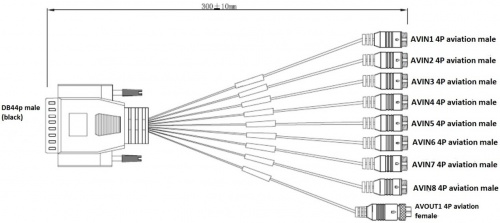
44 Pin Cameras Cable
- Camera #1 Input AVIN1 4PIN Aviation male
- Camera #2 Input AVIN2 4PIN Aviation male
- Camera #3 Input AVIN3 4PIN Aviation male
- Camera #4 Input AVIN4 4PIN Aviation male
- Camera #5 Input AVIN5 4PIN Aviation male
- Camera #6 Input AVIN6 4PIN Aviation male
- Camera #7 Input AVIN7 4PIN Aviation male
- Camera #8 Input AVIN8 4PIN Aviation male
- Monitor Output AVOUT1 4PIN Aviation female
Camera Connections
| Camera Connections | Cam#/Type/Cable | ||
|---|---|---|---|
| Connector | Side Loader | Chassis Handler | Crane |
| AVIN1 | #1 /Dome/ 5m | #1 /Dome/ 5m | #1/Dome/5m |
| AVIN2 | #2 /WP/ 10m | #2 /WP/5m or 10m? | #2/WP/10m |
| AVIN3 | #3 /WP/ 10m | #3 /WP/ 10m | #3/WP/10m |
| AVIN4 | #4 /WP/ 10m | #4 /WP/ 10m | #4/8165CAM/65m |
| AVIN5 | N/A | N/A | #5 /Splitter CH1/ 3m |
| AVIN6 | N/A | N/A | #6 /Splitter CH2/ 3m |
| AVIN7 | N/A | N/A | #7 /Splitter CH3/ 3m |
| AVIN8 | N/A | N/A | #8 /Splitter CH4/ 3m |
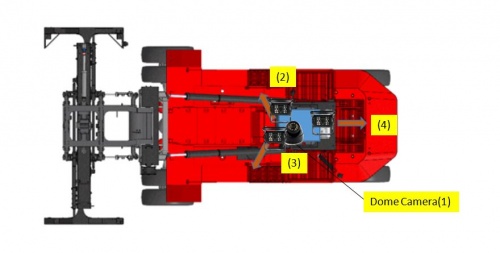
Side loader Camera Locations & Mounting
- #1 Dome Cam mounted above and to the Left of driver
- #2 Waterproof Cam mounted where
- #3 Waterproof Cam mounted where
- #4 Waterproof Cam mounted where
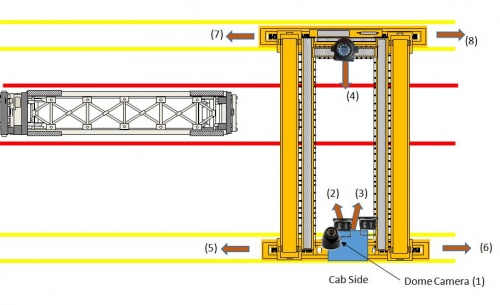
Crane Camera Locations & Mounting
- #1 Dome Cam mounted above and to the Left of driver
- #2 Waterproof Cam mounted where
- #3 Waterproof Cam mounted where
- #4 8165 Cam mounted where
- #5 - #8 Existing installed cameras
GPS Puck
- *Mounting location instructions here
3G/4G Antenna
Mounting location instructions here
Anti-Tamper Security Box
Install it
Functional Test and Sign Off
- Connect Monitor to system
- Power On system
- Verify video for all channels is working (4 channels for loaders, 8 channels for cranes)
- Contact Idrive Support 805-273-4196 to confirm the DVR is registered on the server
- Verify GPS
- Verify Cellular conection
- Verify Video Loss Alarm
- Disconnect one camera to verify Alarms emails are working. Reconnect camera
- Turn Keys and Remote control over to terminal manager
- Manager sign off sheet for installation complete We need to create one.
