Difference between revisions of "RB Groove Configuration"
| Line 256: | Line 256: | ||
[[File:rb751_wifi_Scanner.jpg|600px|]] | [[File:rb751_wifi_Scanner.jpg|600px|]] | ||
| + | '''Note:''' Channel 1, 6 and 11 are now referred to by their frequency as follows: | ||
| + | |||
| + | Channel 1 = 2.412 - RB Groove Channel reference is 0 | ||
| + | Channel 6 = 2.437 - RB Groove Channel reference is 5 | ||
| + | Channel 11= 2.462 - RB Groove Channel reference is 10 | ||
====View the amount of traffic on each channel==== | ====View the amount of traffic on each channel==== | ||
Revision as of 21:56, 27 March 2014
About the Groove Product
The Groove is made by Microtik. It has many more features than the Ubiquity bullet which is at end of life for the G only version. The groove can be a direct replacement for the bullets in our current wireless environment and will facilitate our transition to 802.11n and perhaps 5Ghz (provided an embedded Dual Band Wifi module can be identified for the X1P/X2/Merge products). See discussion section at the end of this wiki.
Sources & Component notes
RB/GrooveA-52HPn
- 2.4 or 5.8Ghz Operation
- Level 4 RouterOS license
- 6dBi 2.4GHz omni
Also will require:
- POE adaptor (one supplied will not work well outdoors) here is an example.
http://www.titanwirelessonline.com/MikroMAX-24V-PoE-with-LED-p/pe-24vs-max.htm
- Tape to seal Antenna coupling
- 5.8Ghz antenna for operation in that band. Looking for combo 2.4/5.8 anttenna
http://www.balticnetworks.com/mikrotik-groovea-52hpn-2-4ghz-or-5-875ghz-access-point.html
Initial Configuration Setup
Set up Groove Router for initial configuration
Document the "W;" MAC address from the back of the unit. To be logged in Admin Center under the customer location.
Connect to power (use either supplied AC Adapt or or POE injector)
Connect cat 5 cable from Groove to the Idrive Wireless NIC in the computer
- Change settings for wireless NIC on your computer to:
- -192.168.88.10
- -255.255.255.0
<br\><br\>
Connect using Winbox
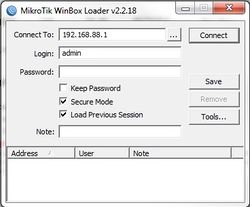
Download and install Winbox Configuration tool for RouterOS.
Run Winbox.exe or double click the icon on the desktop
- Enter the Default "Connect To" IP Address: 192.168.88.1
- Login: admin
- password: blank
- Click "Connect"
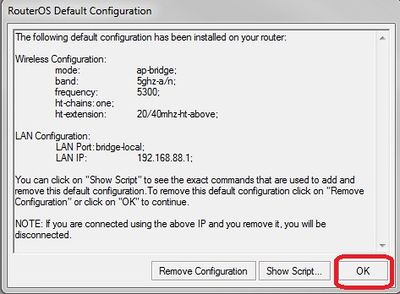
Upon initial log in the "RouterOS Default Configuration" pop-up window will appear. Choose "OK". We are not concerned about the default settings because they will be overwritten with the idrive default configuration file.
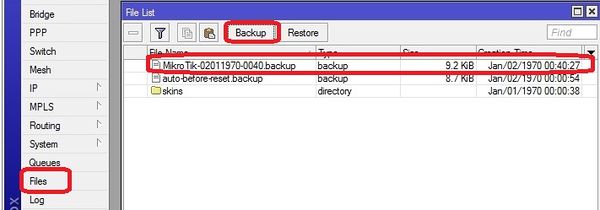
Create a backup of the default configuration just in case
Files >Backup
<br\><br\><br\><br\>
Upgrade OS and Firmware
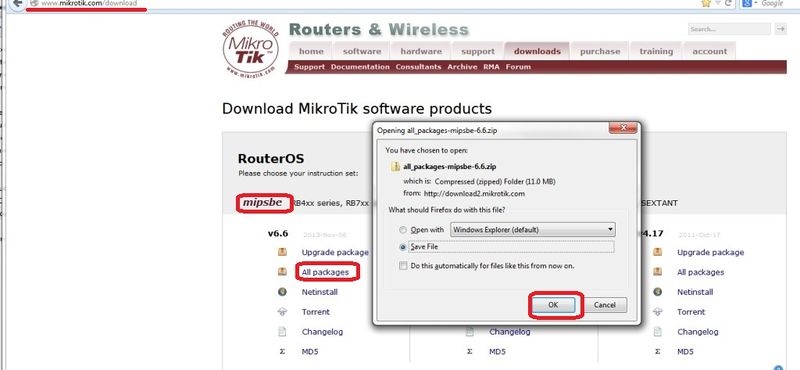
Obtain the latest versions (V6.x) from the MicroTik [|download] site
Click on the correct link for the hardware architecture (mipsbe for RB Groove)
Click on "All Packages" and click Save
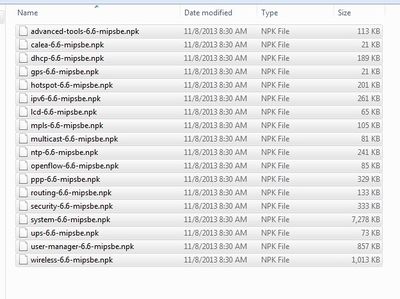
Extract all of the files from zip package
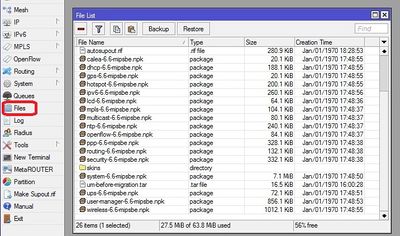
Copy the files from your computer to the Router Board by dragging and dropping all of the files into the files list in the WinBox window
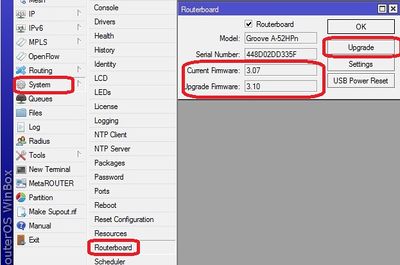
Update the firmware System> Routerboard : Upgrade
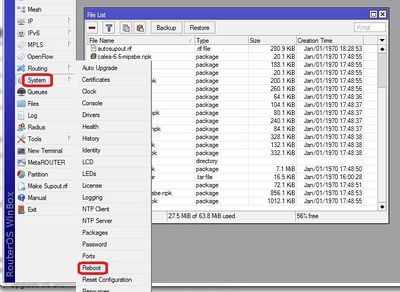
Restart the router and log back into the router and confirm that WinBox shows the new version of RouterOS and Firmware
<br\><br\>
Setup using Restore configuration file (Recommended)
About RouterOS Configurations
The router board OS can support the traditional Idrive access point configuration:
- SSID Bwifi
- IP address and Network Mask
- 802.11g only
The Router OS also can support more advance features that are coming with the Idrive X2 and Merge products:
- 802.11n
- Encryption
- 5Ghz band support???
Make sure you are selecting the correct default configuration file for the correct environment.
Load Idrive Standard configuration
For simplicity and consistency it is better to set the routers configuration using the RouterOS backup/restore function. This "restores" the standard idrive configuration from a .backup file. This will leave only a few custom settings that are specific to the customer location(s).
- Download the most current .backup file from Admin Center
- Unzip the file to the Desktop on your computer
- In WinBox select “Files” from the left menu to open the Files List window.
- Use the mouse to drag and drop the configuration file from the Desktop into the Files List (uploads the file to the Router)
- Highlight the config file and click on "Restore"
The router will reboot with the new configuration. You will need to use the new IP address and password
- -The new IP address will be 192.168.0.1
- -Change the IP address on your NIC to 192.168.0.10
Reconnect to the Router with the "Connect to" address of 192.168.0.1, password idrive#
<br\><br\><br\><br\><br\><br\>
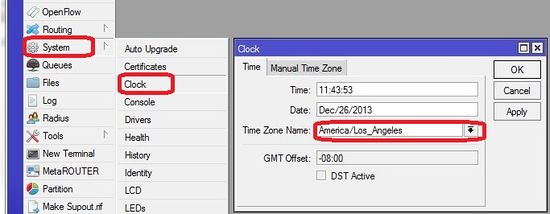
Set Timezone for customer location
Set the timezone. The Date and time will be set by NTP (Network Time Protocol) when connected to the internet
<br\><br\>
Advanced Configuration (no config file)
<br\><br\>
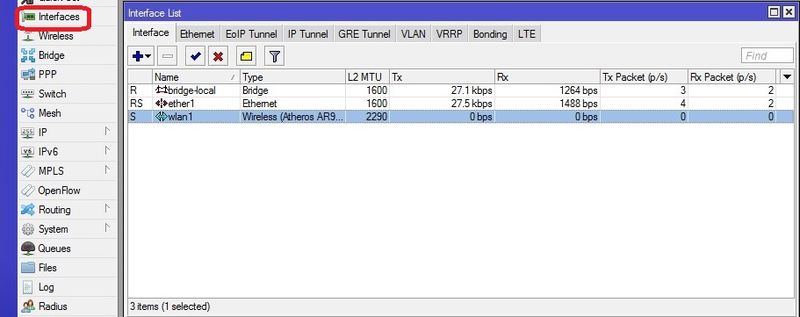
Interfaces configuration
bridge-local makes the ether1 and wlan1 interfaces work as one
<br\><br\>
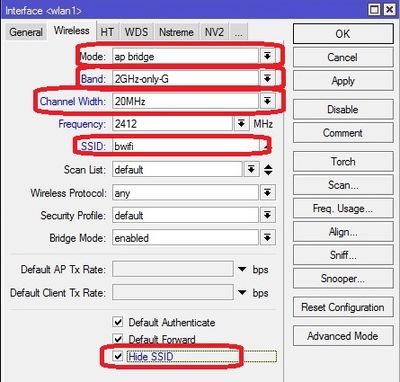
WLAN configuration
Return on "Interface List" double-click "wlan1", select "Wireless" tab and complete the fields as in picture.
<br\><br\>
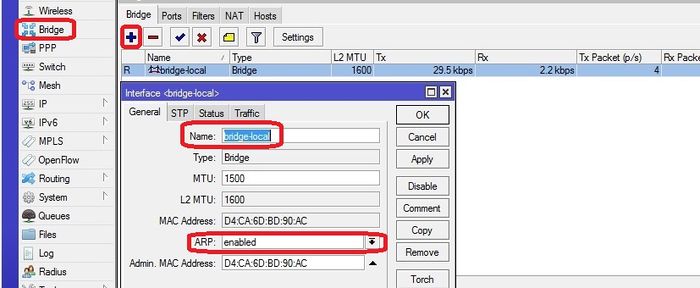
Bridges configuration
Select "Bridge" from the left menu and add new bridge. Configure the two bridges as shown.
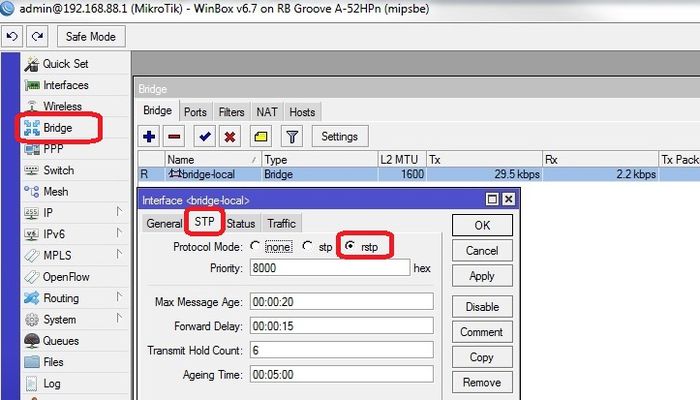
for "bridge_tunnel" Make sure the "ARP" is disabled and enter the MAC Address: 00:00:5E:80:01:01 then select "STP" tab and check "Protocol Mode: rstp".
select "Ports" tab and add interfaces to the proper bridge as shown
<br\><br\>
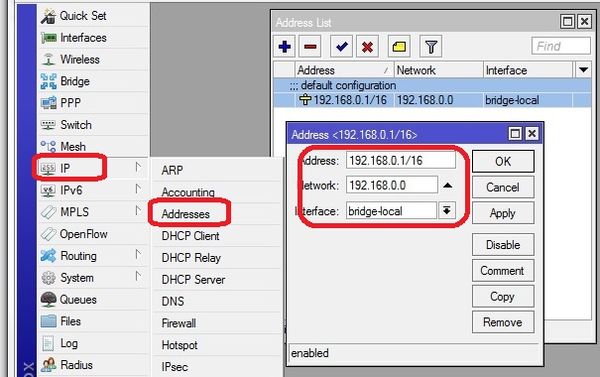
Addresses configuration
<br\><br\>
Routes configuration
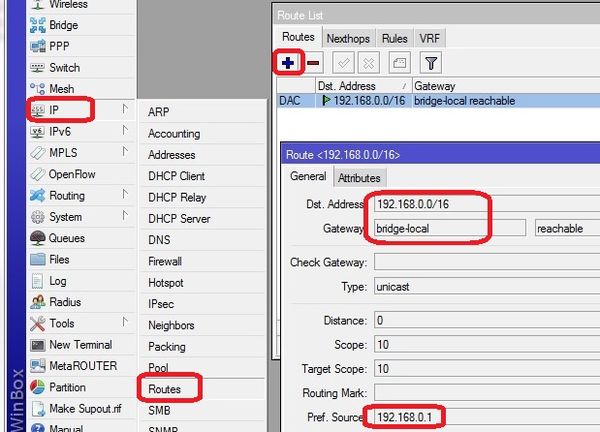
Add/Modify the route
route <192.168.0.0/16> - routes 192.168.x.x (events) traffic through the tunnel to the base station.
<br\><br\>
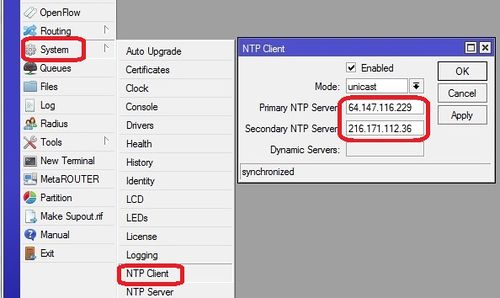
NTP configuration
Network Time Protocol - keeps the time syncronized
<br\><br\>
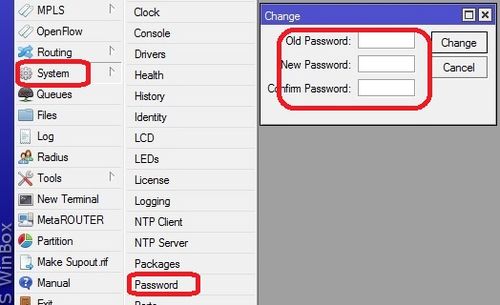
Set Password
Set the password to idrive#
<br\><br\>
Troubleshooting / Monitoring
<br\><br\>
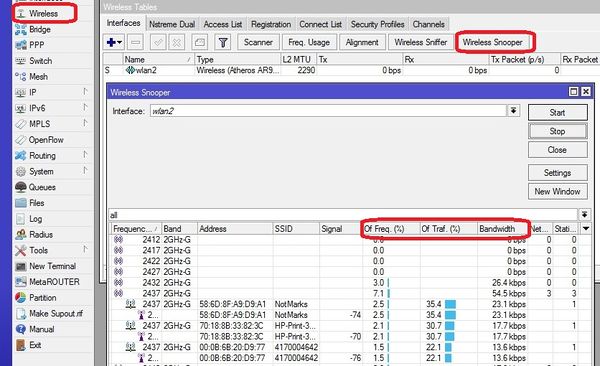
Wifi tools / channel selection
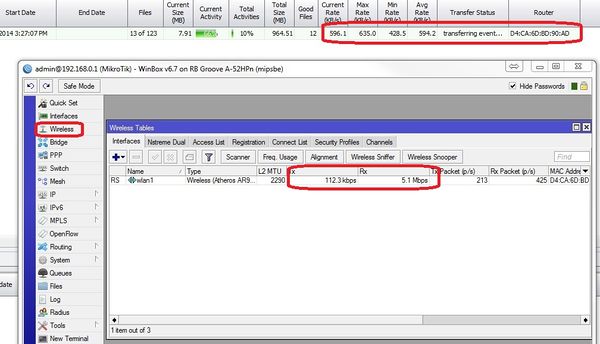
View transfer activity
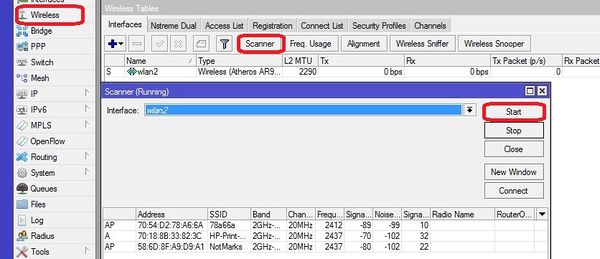
View other Wifi in the area
Note: Channel 1, 6 and 11 are now referred to by their frequency as follows:
Channel 1 = 2.412 - RB Groove Channel reference is 0 Channel 6 = 2.437 - RB Groove Channel reference is 5 Channel 11= 2.462 - RB Groove Channel reference is 10
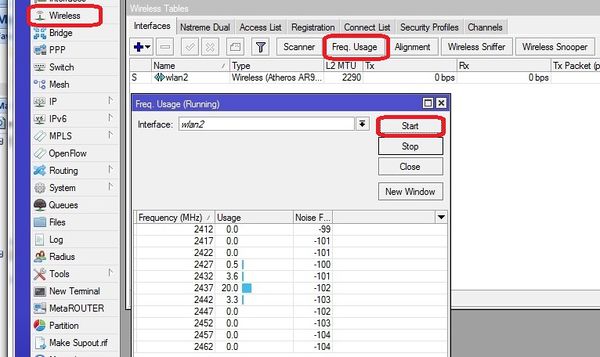
View the amount of traffic on each channel
System Health
<br\><br\><br\><br\>
Discussion here about migration plan to encryption & 802.11n.
Modules
VNT9271B6050 Specifications
the one we currently plan on using
1T1R only
No support for 5Ghz
Operating Temp 0C - 55C (32F - 131F)
Humidity 10% - 90% non-condensing
802.11 n single band modules
Ralink RT3572 (2T2R)
http://www.alibaba.com/product-detail/802-11a-b-g-n-USB_135218952.html
Ogenray
EWM-W129P (2T2R)
http://www.advantech.com/products/EWM-W129P/mod_DC9EE11C-7FFA-4311-8F37-184934465E02.aspx
Dual Band Possibilities?
EWM-W149P01E - Ralink RT5572 2T2R
http://www.advantech.com/products/EWM-W149P/mod_0A352CDE-CDEB-4F99-8146-C543E8140AC1.aspx
WUBR-506N - Sparklan - End of Life per Sparklan
Please refer to below quotation for WUBR-508N(M4W),
Sample price: USD30 each/ under 100pcs
USD21 @101~499pcs
USD18.5 @500~999pcs
USD17 @1K per shipping lot
5.8Ghz only Possibilities?
Migration Plan to 802.11n
Existing installations
-configure the Grove in the same way as the bullets (G-only etc)
Mixed installation (X1, X1P, X1P with new Wifi, X2)
Basically adding an entire second wifi network with no overlap for existing customers adding X2 to their fleets
- keep existing 802.11g APs and add separate 802.11n APs
- Groove in 802.11n Only
- 5ghz band to eliminate conflict with 802.11g 2.4ghz devices - VNT9271 does not support 5Ghz
- also change SSID away from bwifi
- Encryption
802.11a/n only locations
Full on 802.11a/n with all of the tricks (Greenfield Deployment)
http://www.wildpackets.com/resources/compendium/wireless_lan/802_11n
Groove is probable not the best choice. Look into :
http://www.amazon.com/Mikrotik-Wireless-Outdoor-OMN5HND-802-11a/dp/B006K26ZFG
- MIMO (Multiple Input, Multiple Output)-VNT9271 does not support
- 5Ghz Band (less clutter)-VNT9271 does not support
- 40mhz channel width (Channel Bonding)
- encryption
- Change bwifi
- more stuff
- more stuff
