ICV D8 Initial Configuration and Setup
ICARvisions D8 Initial Configuration
Configure/Document Hardware
Document Model Number, Serial number, SIM Card number
Record them where? A/C, AWS, Pod systems - need RO support for this.
Hard Drive Installation/Configuration
Install SSD in in the D8 tray and secure with the 4 supplied screws
Format Hard drive EXT3 (Linux filesystem)
- Format the hard drive in the D8 Tools>Format (an unformatted HDD will show 0MB capacity)
500GB drive formats in less than 3 minutes
Install Batteries (not included) in the remote control
- requires 2 AAA batteries
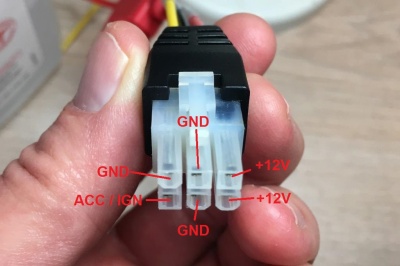
Plug in the power supply harness
Power connector's plastic is keyed the same as Easystorage(D4)as well as the VisionMaster D8 and but the pinouts are different!
Connect a monitor or Computer
Plug supplied Monitor cable into the front of the D8
Connect Monitor cable to either:
- External Monitor (Connect Yellow for video and black for monitor power)
- For Laptop connection use StarTech USB to Svideo Video adapter with AMCAP Capture software (Connect yellow video connector requires Male to Male RCA adatpter)
- plug Cat5 cable into device,Use Web browser - navigate to 192.168.0.250 ( need to verify if this is default with a new D8)
Remove Sensor Cable and other unused options
The cable will not be used by BNSF. Remove it and keep at Idrive in case needed in the future
System Configuration
Power up the device
Logging into D8 System
Notes:
- when you login recording will stop
- If you disconnect AMCAP or Monitor the user remains logged in so it will not record until the session times out.
Press the "Login" Button on the remote.
Default login: Admin user default passwd 888888
For Configuration: User name and Passwords limited to 6 letters/numbers max
*I propose we change "Admin" user to "Idrive" with a password of "805805" . This login would be used by Idrive Support only.
*Create a user called BNSF for the location manager to use. This will not have full admin permissions, only what we would allow them to do what they need to. We need to identify what they need and how to set the permissions. - Mark
- View, Copy videos
- Next item
- Next item
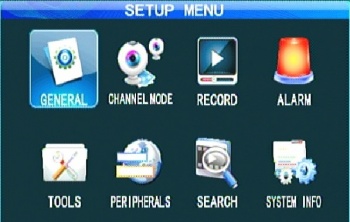
Setup Menu
The Setup Menu has 8 options
*General - Basic info for: Device, Vehicle, User, Network, Display, OCD
*Record - Recording Settings
*Alarm - Alarm Settings
*Tools -
*Peripherals - PTZ, Cellular, Wifi setup
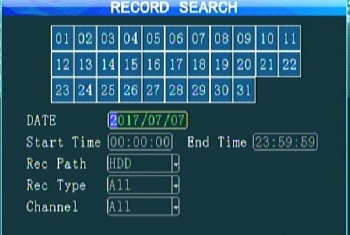
*Search - Search for videos by Date/Time Etc.
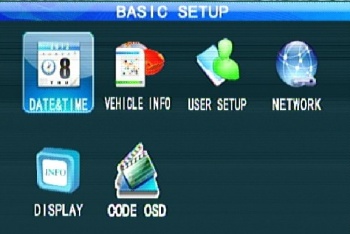
General
The Basic setup menu has 6 options
*Date & Time - Date, Time, Daylight Savings, Timezone, Power Modes Etc.
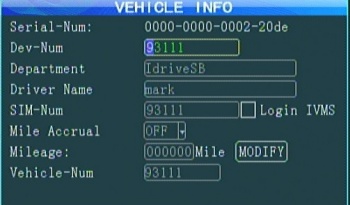
*Vehicle Info - Serial Number, Device_Number SIM- Number, Vehicle Number
*User Setup - User Management
*Network - Network and server settings
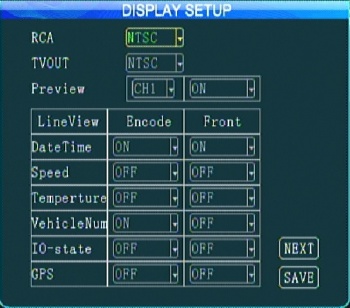
*Display - On screen display, video out settings
*Code OSD - Per channel screen/video display
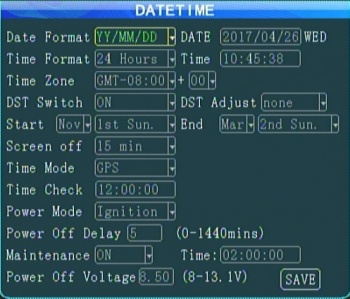
General>Date & Time
- Date Format
- Time Format
- Timezone
- Daylight Savings Settings
- Time Mode - GPS
- Power Mode - Ignition
- Screen Off - logoff session (5minutes?)
General>Vehicle Info
Serial number of Device (Hex so not suitable for device number) Example 0000-0000-0002-20de
*Dev-Num - must be 5 digits to integrate with server
- Department - Optional
- Driver Name - Optional
*SIM-Num - field is only 12 digits long but SIM cards are 19 digits long. - figure it out
- Login IVMS check box - must Un-Check to use SIM Card
- Mile Accrual - N/a
- Mileage - N/A
*Vehicle-Num - vehicle name. can take letters as well as numbers. Set on server?
General>User Setup
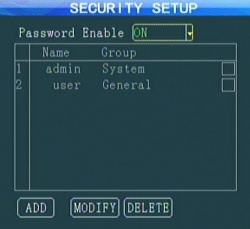
Add/Modify/Remove users. Only the Admin User exists in the received device.
Passwords are 6 numbers only.
To change a password us "-" button to delete character and re-add new password
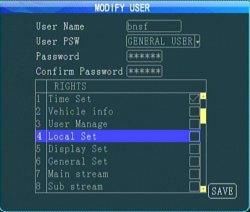
* change "Admin" user to "Idrive" User, Password 805805, "System User", "All Rights" (permissions)
*Setup a BNSF User, Password 249249, "General User", "Selected Rights" (permissions)
- What rights should BNSF have/need? Determine and place in the configuration file
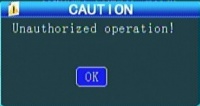
All menu options can be viewed but if the user is not authorized they get this message
General>Network
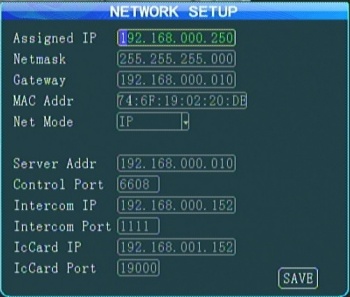
For Wired Cat5 connection ONLY:
- IP Address
- Netmask
- Gateway
- MAC Address
For Wired, Wireless and Cellular connections:
- Net Mode - search for Server by IP address or DNS
- Server Address - either IP Address or DNS Ex: dvr.idriveglobal.com
- Control Port - Must match the port of the "Gateway Server"
Other Options: Intercom & IcCard - N/A
General>Display
General>Code OSD
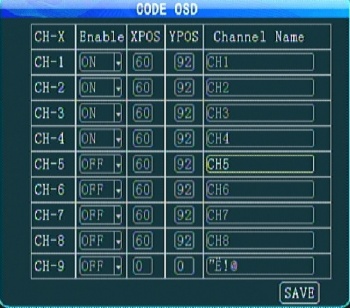
Controls the text shown on screen/recordings
This does not work! If you change something there are funky non-letters in the field(s)
For BNSF each vehicle type will have different settings:
- *SideHandler - 4 channels
- *Chassis Handler - 4 channels
- *Crane - 8 channels
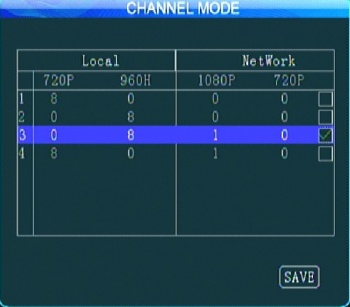
Channel Mode
Channel Mode Settings
Record Settings
Question, can we record all channels into a single video file? Is this what we want?
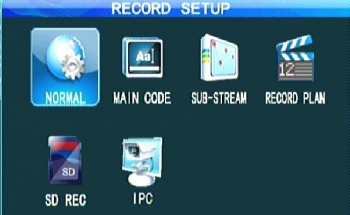
*Normal - Recording Basic Setup
*Main Code -Channels setup
*Record Plan- Timed recording schedule
*SD Rec - Set backup to SD Card?
*IPC - IP Camera Settings
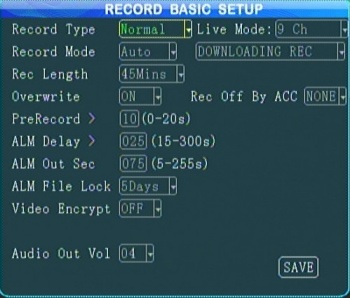
Record>Normal
*Record Type - Normal or "I-Frame"
*Record Mode- Auto, Timer, Alarm (use Auto to record on power on)
*Record Length - amount of time in each file 15/30/45/60 Minutes 30 minutes Discuss preference
*Overwrite - record over old videos when <2GB left on hard drive ON
Rec Off By ACC -
*PreRecord - add video before alarm into alarm record. 0-20 seconds 10
*ALM Delay - after alarm clears how much time recorded into alarm record. 15-300 seconds 25
*ALM Out Sec - continuous output time for alarm wire - N/A
*ALM File Lock - lock alarm file from deletion for 1/3/5/7/10/15/30/45 days 5
*Video Encrypt - requires a password be used when playing back a file on the player OFF
*Audio Out Vol - output volume N/A
*Live Mode - Number of channels shown on screen 9 for Cranes, 6 for Handlers/Chassis
"Downloading Rec" - sort it out...
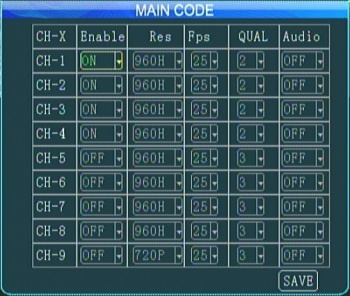
Record>Main Code
Enable only the channels for the number of cameras in the vehicle. (3 config files for BNSF)
Input needed on Res/Qual selection. Al?
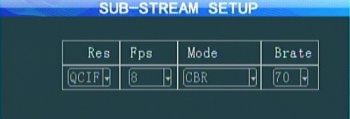
Record>Sub-Stream
Crank these down so minimum data sent to server.
Record>Record Plan
Timed recording. We do not care about this.
Record>SD Rec
Record>IPC
IP Camera setup. N/A at this time
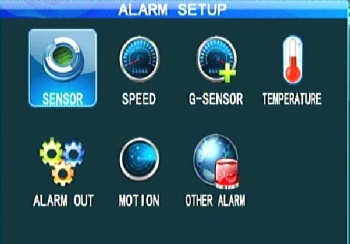
Alarm Settings
*Sensor - Configure & Assign input for wired alarms
*Speed - Configure speed alarms
*G-Sensor - Configure accelerometer alarms
*Temperature - Configure temperature alarms
*Alarm Out - Configure & Assign output for wired alarms
*Motion - Configure motion sensor alarms
*Other Alarms - Configure stationary or Fatigue alarms
Alarm>Sensor
Maps I/O alarm wire to video channel and what action to take. N/A for us
Alarm>Speed
N/A
Alarm>G-Sensor
N/A
Alarm>Temperature
N/A
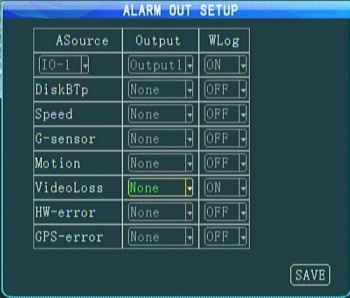
Alarm>Alarm Out
Enable Alarm type?
Output1 & 2 are wires?
Confirm that ALL alarms enable are sent to the server
Alarm>Motion
N/A
Alarm>Other Alarm
N/A
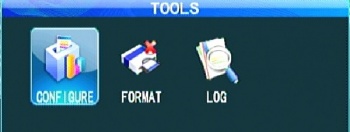
Tools Settings
*Configure - Import, Export, Default Config, Upgrade Logo
*Format - Format media
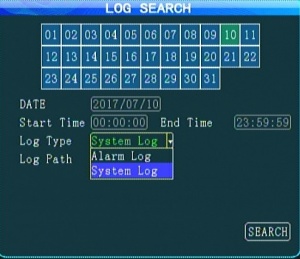
*Log Search - Search System/Alarm Logs
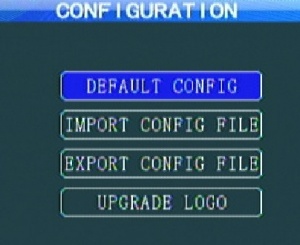
Tools>Configure
*Default Config - restore all settings to factory default
*Import Config File - Import configuration Settings From USB Stick
- Insert USB Stick with config file and Import (parameter.conf file is not ASCII)
*Export Config File - Export Configuration Settings
- Insert USB Stick and export.
- If no USB Stick the file is exported to the hard drive
*Upgrade Logo - Import Logo (Boot Logo & Upgrading Logo)
- Each Logo needs an Image size of 720x576 pix, Smaller than 256k, jpg format
- required names: loading.jpg & upgrading.jpg
- If images are on the USB stick at configuration time they should load
Tools>Format
500MB drive formatted in 2:45
Tools>Log Search
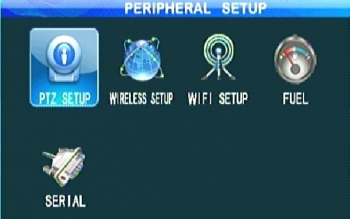
Peripherals Settings
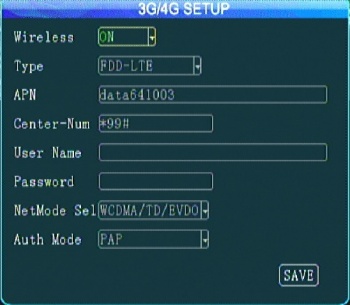
*Wireless Setup - 3G/4G Setup
*Wifi Setup - Wifi Setup
*Fuel -
*Serial - Com Port setup
Peripherals>PTZ Setup
Peripherals>Wireless Setup
Peripherals>Wifi Setup
Peripherals>Fuel
Peripherals>Serial
Search Settings
System Info
Configure
Firmware upgrade with USB Stick
1.Device must switch off power disconnect the power source before upgrading;
2.Extract the rar file, copy the .crc file to a USB flash memory FAT32 format, insert the flash memory to the MDVR USB port.
3.Power on the MDVR(connect the power), it will update automatically once the MDVR starts up. and the monitor will display "upgrading..."
4.Device will automatically restart when the upgrade is complete.
Attention: Upgrade will need about 3-5 minutes. Make sure power connecting all the time during upgrading
Firmware upgrade with SD Card
1.Device must switch off power;
2.Decompress the rar file, copy the .crc file to a SD card, and insert the SD card to the MDVR SD card port.
3.Power on the MDVR, it will update automatically once the MDVR starts up. and the monitor will display "upgrading..."
4.Device will automatically restart when the upgrade is complete.
Note: upgrade will need about 3 minutes. Make sure power connecting all the time during upgrading.
