ICV D8 Initial Configuration and Setup
ICARvisions D8 Initial Configuration
Configure/Document Hardware
Document Model Number, Serial number, SIM Card number
Record them where? A/C, AWS, Pod systems - need RO support for this.
Hard Drive Installation/Configuration
Install SSD in in the D8 tray ans secure with the 4 supplied screws
Format Hard drive EXT3 (Linux filesystem)
- Format the hard drive in the D8 Tools>Format (an unformatted HDD will show 0MB capacity)
or
- Format the hard drive in a Linux system (use VMware/Ubuntu)
- Launch VMWare - Ubuntu
- Plug hard drive into USB with adaptor
- Click Player>Removable Devices>Sunplus Inovation USB to Serial-ATA Bridge and Disconnect from host
Install Batteries (not included)in the remote control
- requires 2 AAA batteries
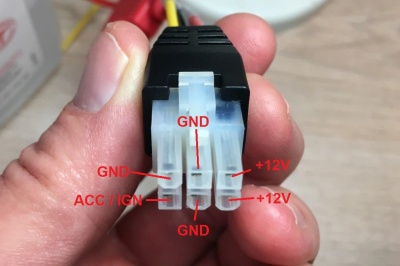
Plug in the power supply harness
Power connector's plastic is keyed the same as Easystorage(D4)as well as the VisionMaster D8 and but the pinouts are different!
Connect a monitor or Computer
Plug supplied Monitor cable into the front of the D8
Connect Monitor cable to either:
- External Monitor (Connect Yellow for video and black for monitor power)
- For Laptop connection use StarTech USB to Svideo Video adapter with AMCAP Capture software (Connect yellow video connector requires Male to Male RCA adatpter)
- plug Cat5 cable into device,Use Web browser - navigate to 192.168.0.250 ( need to verify if this is default with a new D8)
System Configuration
Power up the device
Login D8 System
Press the "Login" Button on the remote.
Default login: Admin user default passwd 888888
For Configuration:
*I propose we rename "Admin" to "Idriveadm" and change the password to "idrd8adm" . This login would be used by Idrive Support only.
*Create a user called BNSF for the location manager to use. This will not have full admin permissions, only what we would allow them to do what they need to. We need to identify what they need and how to set the permissions. - Mark
- View, Copy videos
- Next item
- Next item
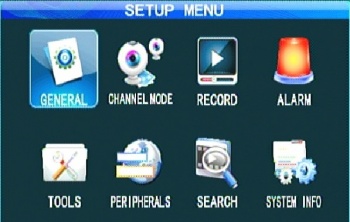
Setup Menu
The Setup Menu has 8 options
*General - Basic info for: Device, Vehicle, User, Network, Display, OCD
*Record - Recording Settings
*Alarm - Alarm Settings
*Tools -
*Peripherals - PTZ, Cellular, Wifi setup
*Search - Search for videos by Date/Time Etc.
General
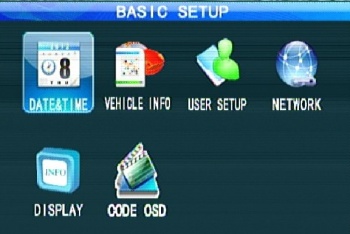
The Basic setup menu has 6 options
*Date & Time Click Here
*Vehicle Info Click Here
*User Setup Click Here
*Network Click Here
*Display Click Here
*Code OSD Click Here
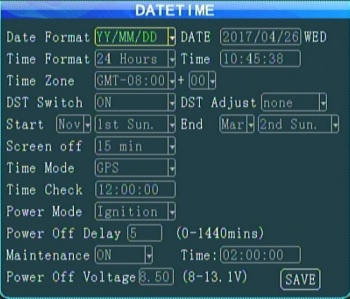
Date & Time
- Date Format
- Time Format
- Daylight Savings Settings
- Time Mode - GPS
- Power Mode - Ignition
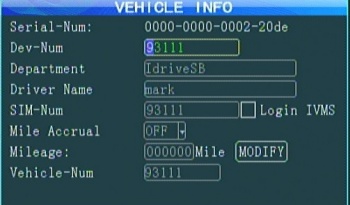
Vehicle Info
Serial number of Device (Hex so not suitable for device number) Example 0000-0000-0002-20de
- Dev-Num - must be 5 digits to integrate with server
- Department - Optional
- Driver Name - Optional
- SIM-Num - field is only 12 digits long but SIM cards are 19 digits long. - figure it out
- Login IVMS check box - must Un-Check to use SIM Card
- Mile Accrual - N/a
- Mileage - N/A
- Vehicle-Num - vehicle name. can take letters as well as numbers. Set on server?
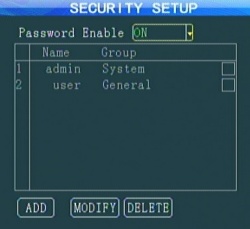
User Setup
Add/Remove users. Only the Admin User exists in the received device.
- Setup a BNSF User.
- change "Admin" to "Idrive" and non-defaut password?
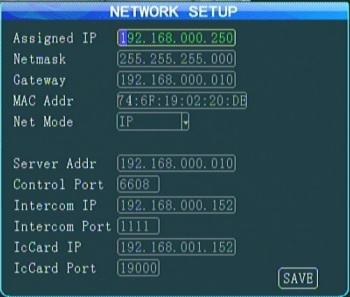
Network
For Wired Cat5 connection ONLY:
- IP Address
- Netmask
- Gateway
- MAC Address
For Wired, Wireless and Cellular connections:
I have been able to connect using IP address but Domain connection did not work. Some DNS issue.
- Net Mode - search for Server by IP address or DNS
- Server Address - either IP Address of DNS Ex: dvr.idriveglobal.com
- Control Port - Must match the port of the "Gateway Server"
Other Options: Intercom & IcCard - N/A
Display
Code OSD
Controls the text shown on screen/recordings
For BNSF each vehicle type will have different settings:
- SideHandler
- Chassis Hndler
- Crane
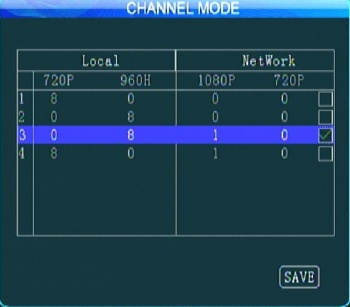
Channel Mode
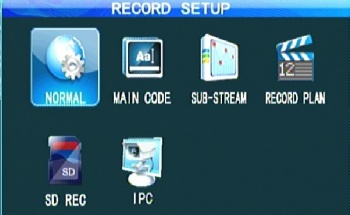
Record Settings
*Normal - Recording Basic Setup
*Main Code -Channels setup
*Record Plan- Timed recording schedule
*SD Rec - Set backup to SD Card?
*IPC - IP Camera Settings
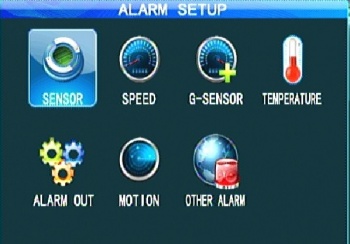
Alarm Settings
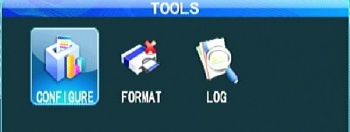
Tools Settings
Peripherals Settings
Search Settings
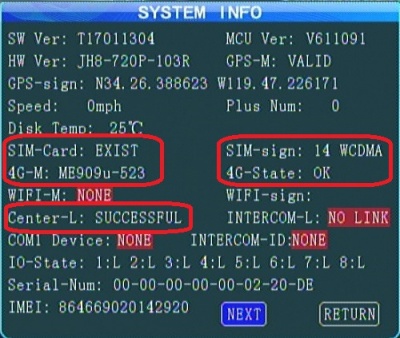
System Info
Configure
Load default config
Import Config File
Export Config File
Upgrade Logo
Format
Format HDD
Logs
Search for System or Alarm logs by date & time
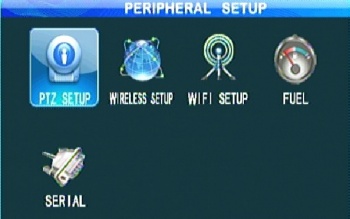
Peripherals Settings
PTZ Setup
N/A
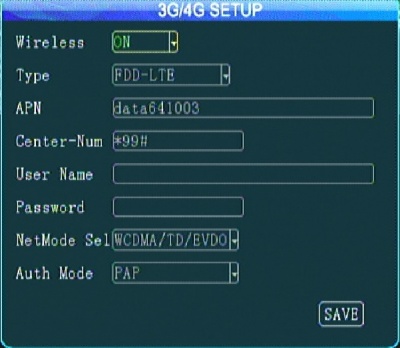
Wireless Setup (3g/4g Cellular)
3g/4g setup
Connected via cellular
Wifi Setup
not working yet - we plan on ordering a model that does not have Wifi
Fuel
N/A
Serial
N/A
Search
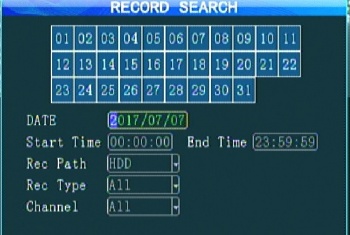
Search for recordings by Date/Time
System Info
Firmware upgrade with USB Stick
1.Device must switch off power disconnect the power source before upgrading;
2.Extract the rar file, copy the .crc file to a USB flash memory FAT32 format, insert the flash memory to the MDVR USB port.
3.Power on the MDVR(connect the power), it will update automatically once the MDVR starts up. and the monitor will display "upgrading..."
4.Device will automatically restart when the upgrade is complete.
Attention: Upgrade will need about 3-5 minutes. Make sure power connecting all the time during upgrading
Firmware upgrade with SD Card
1.Device must switch off power;
2.Decompress the rar file, copy the .crc file to a SD card, and insert the SD card to the MDVR SD card port.
3.Power on the MDVR, it will update automatically once the MDVR starts up. and the monitor will display "upgrading..."
4.Device will automatically restart when the upgrade is complete.
Note: upgrade will need about 3 minutes. Make sure power connecting all the time during upgrading.
