ICV D8 Initial Configuration and Setup
ICARvisions
Setup
Install the Hard Drive
- Remove tray
- secure hard drive with the 4 supplied screws
- Insert the tray back into the DVR and turn the DVR on with the Key
- Format the hard drive Tools > Format (an unformatted HDD will show 0MB capacity)
- DVR reboots
Install Batteries (not included)in the remote control
- requires 2 AAA batteries
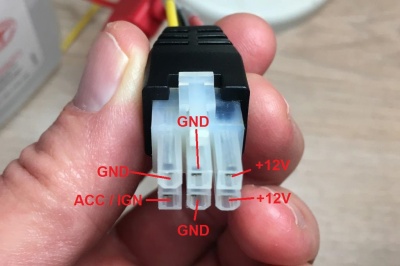
Plug in the power supply harness
Power connector's plastic is keyed the same as Easystorage(D4)as well as the VisionMaster D8 and but the pinouts are different!
Connect a monitor
No monitor connection on the device we have
Use StarTech USB Video adapter with AMCAP Capture software or
Use Web browser - plug Cat5 cable into device, navigate to 192.168.0.250
Basic Setup
Power up the device
Press the "Login" Button on the remote
Admin user default passwd 888888
The setup menu has 8 options
General Settings
Date & Time
- Date Format
- Time Format
- Daylight Savings Settings
- Time Mode - GPS
- Power Mode - Ignition
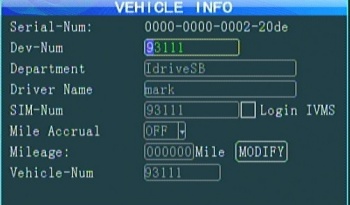
Vehicle Info
Serial number of Device (Hex so not suitable for device number) Example 0000-0000-0002-20de
- Dev-Num - must be 5 digits to integrate with server
- Department - Optional
- Driver Name - Optional
- SIM-Num - field is only 12 digits long but SIM cards are 19 digits long. - figure it out
- Login IVMS check box - not sure, device checks into server without this with cat5 cable.
- Mile Accrual - N/a
- Mileage - N/A
- Vehicle-Num - vehicle name. can take letters as well as numbers. Set on server?
Channel Mode
Record Settings
Alarm Settings
Tools Settings
Configure
Load default config
Import Config File
Export Config File
Upgrade Logo
Format
Format HDD
Logs
Search for System or Alarm logs by date & time
Peripherals Settings
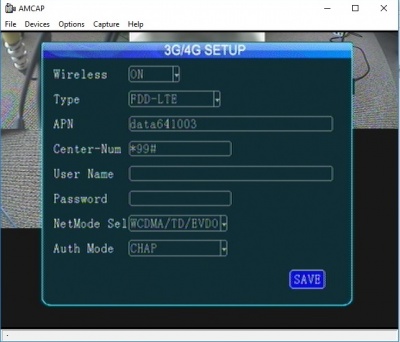
3g/4g setup
Search
System Info
Firmware upgrade with USB Stick
1.Device must switch off power disconnect the power source before upgrading;
2.Extract the rar file, copy the .crc file to a USB flash memory FAT32 format, insert the flash memory to the MDVR USB port.
3.Power on the MDVR(connect the power), it will update automatically once the MDVR starts up. and the monitor will display "upgrading..."
4.Device will automatically restart when the upgrade is complete.
Attention: Upgrade will need about 3-5 minutes. Make sure power connecting all the time during upgrading
Firmware upgrade with SD Card
1.Device must switch off power;
2.Decompress the rar file, copy the .crc file to a SD card, and insert the SD card to the MDVR SD card port.
3.Power on the MDVR, it will update automatically once the MDVR starts up. and the monitor will display "upgrading..."
4.Device will automatically restart when the upgrade is complete.
Note: upgrade will need about 3 minutes. Make sure power connecting all the time during upgrading.


