X1 V7 Series Device Manufacturing and Programming Admin Documentation
Factory - New Devices - Auto
Default application in Production Environment
<br\><br\>
Factory - New Devices - Manual
password protected. the password is: idrive2man (no # like in the others passwords)
<br\><br\>
Factory Tool RMA
password protected. the password is: idrive2#rma
Enter the serial number for the device and press enter
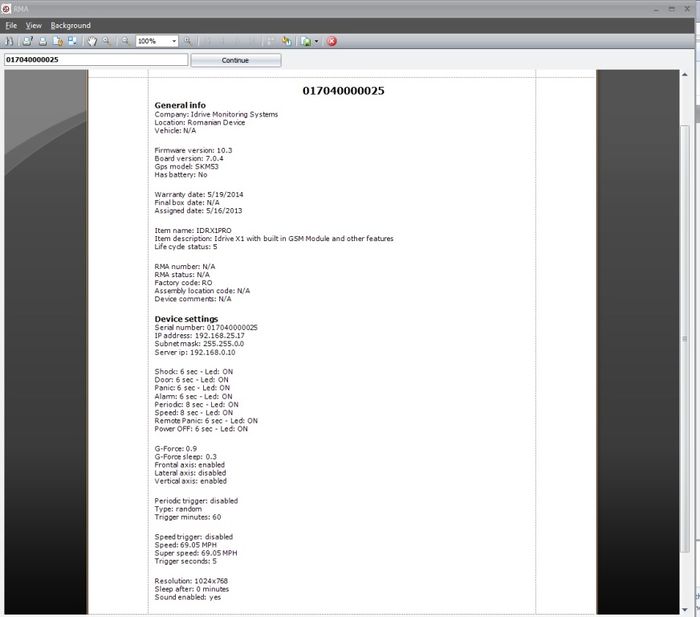
The following form will open displaying information about the device at the time of programming.
Click on the Continue button to proceed
<br\><br\>
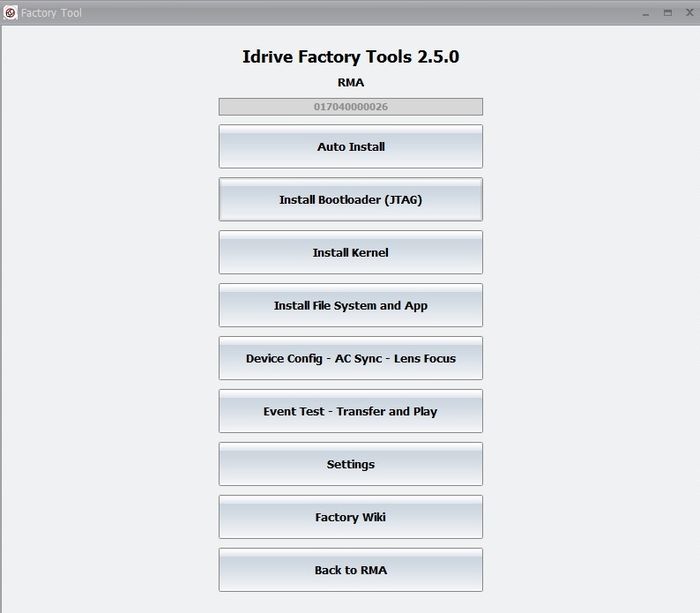
RMA Interface
Auto Install - run all programming steps
Install Boot Loader -(Serial Cable in HDMI)
Install Kernel - (From SD Card)
Install File System and App - (From SD Card)
Device Config - AC Sync - Lens Focus - ( WiFi connection /internet connection to Admin Center)
Event Test - Transfer and Play - (WiFi Connection)
Settings
Back to RMA Return back to enter a new serial number
<br\><br\><br\><br\><br\><br\><br\><br\><br\><br\><br\><br\><br\><br\><br\><br\><br\><br\><br\><br\><br\><br\><br\>
Idrive Development Mode
password protected. the password is: idrive2#dev
<br\><br\>
In Settings->Config and Install
3 options are visible only if you use the Idrive Development Mode
1. Device IP (for non-standard camera IP address)
2. Subnet Mask (for non-standard netmask)
3. Server IP (for non-standard base station IP address))
<br\><br\>
In Settings->Events Test
3 options are visible only if you use the Idrive Development Mode
1. Validate the number of shock events (enabled by default)
2. Validate GPS connection in events (enabled by default)
3. Delete Events folder when form is closed (disabled by default)
<br\><br\>
In Settings->Factory IDs
1.) Factory ID (Manufacturing location)
2.) Station ID (Computer used for programming)
3.) Programmer ID (Programmer board in use)
<br\><br\>
In Settings->Admin Center
1.) MySql host
2.) MySql port (3306)
3.) MySql user (root)
4.) MySql password
5.) MySql database
<br\><br\>
V7 Programmer manual mode
To use the manual switches on the programmer you need to enter manual mode using the following switch sequence:
Power switch -Off
Idrive ON_OFF switch-On
Door switch -On
Test switch-On
all other switches-Off
Power switch -On
The manual switches will now function.
<br\><br\>
Putty modes
View boot messages from idrive DUT
download putty.exe : http://www.chiark.greenend.org.uk/~sgtatham/putty/download.html
-Close factory tool software if it's open
-Connect the USB cable to Programmer ,when you connect the USB cable to PC a USB Serial Port (COM x) will appear in Device Manager -> Ports(COM&LPT)
-Double click on putty.exe and change com number to match the Device Manager one.
Speed needs to be 115200 , open connection.
Put the programmer in manual mode:
-Turn Off all switches including main power (SW1)
-Turn On this switches : Idrive_on_off(SW8),Door(SW3),Test(SW5) leave the other switches off
-Turn On main power switch(SW1)
-Turn Off Door and Test switches
-Turn On Ignition
Now Idrive boot messages can be seen in Putty.
Manual Commands to V7 Programmer
With no idrive device attached you can test commands to the programmer
type in the putty window one of the following commands and enter(you will not see in putty window what you are typing ):
idrive_on
ignition_on
door_on
test_on
alarm_on
panic_on
run install-kernel
run install-filesystem
these commands are case sensitive!
the programmer will confirm command with a beep ,in putty window you should see a confirmation message (ex. idrive_on_done ) and the corresponding LED should be on.
For the off commands use _off instead of _on (ex. idrive_off).
<br\><br\>

