X1 V7 series Main Board Manufacturing and Programming
Important Information
The power supply 12V 1A for the programming board needs to be stabilized type.
Copyright Information
This document contains proprietary information that is protected by copyright. No part of this document may be photocopied, reproduced, or translated to another language without the prior written consent of Idrive Inc.
About This Document
This document contains the information necessary to produce a fully programmed Idrive Main board suitable for building of an Idrive X1 series camera. This includes all programming, testing, focus of lenses and bar code label.
Build Lot Preparation
Purchase all required parts.
Print serialized Bar code Labels, one per board (Need Process for this)
Idrive X1 V7.0.x PCB Assembly Notes
1. SMT Placement - Use the supplied pick and place information supplied by Idrive
2. Through Hole / Hand parts - Document by vendor process
3.BiColor LED Mounting Height requirement is 6.25mm +/- 0.1MM from base of LED to PCB surface
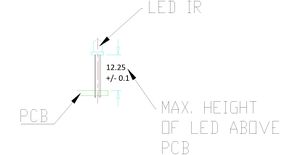
4.IR Leds Mounting Height ( requirement is 12.25mm +/- 0.1MM from base of LED to PCB surface
5. Advance the board to the next Station for Top Level Assembly
Top Level Idrive X1 V7.0.x PCB Assembly
| Top Level X1 V7 PCB Assembly Materials |
|---|
| Idrive X1 V7.0.x PCB |
| SanDisk SD Card (Unlocked, formatted)* |
| Lens Holders (with 2 screws each) |
| Lenses (2 per assembly) |
| Bar code Label with Serial number 22 mm x 10 mm |
When an Idrive X1 main board completes the SMT and hand solder process there are more assembly steps needed.
1. Bar Code Labels - Unique Serial Number Labels will be pre-generated for each Main Board in the work order. Three labels are required for each serial number(one for the main board, one for final camera case, one for the outside of the packing box). The Bar Code Label needs to be max. 22 mm x 10 mm. After SMT Assembly each Main board needs have a serial number label affixed to the SD Card Connector. This serial number will track the main board through all processes and eventually become the camera serial number. It will be difficult and error prone for all three labels to be printed up front. I suggest that one label be printed at this stage and affixed to the Main board. Then when the main board gets put into a camera we rescan the label and print another one at that time. Same with shipping, Scan the label and print it at that station to eliminate lost of mixed up labels.
2. Mounting of the two Lens Holders Mounting to the board.
3. Inserting the lenses in the Lens Holders.(Lenses are glued after programming and focus)
4. Insert SD Card into the SD socket.
5. Advance the Top Level PCB assembly to the Programming Station
* All SD cards need to be unlocked (all SD cards have a lock/unlock switch). It depends on the SD Cards‟ provider whether or not the card needs to be formatted. In all cases if the SD Card needs formatting do not use the quick version.
Idrive X1 V7.0.x PCB Programming
| Idrive X1 V7 Programming & Lens Focus Materials |
|---|
| Idrive X1 V7 PCB Top Assembly |
| Super Glue (for fixing lenses) (Loctite Control, Extra Time) |
Programming Station Initialization
1. Open Factory Tools Application
2. Turn fixture power on (SW1)
3. The Firmware Programming Station is now ready to process idrive X1 boards
Step by Step Programming Idrive X1 Board
Setup Device ~5 seconds
1. Place the Idrive X1 board in to the Programming Fixture.Picture?
2. Scan the Bar Code label with the serial number (if no bar code scanner is available type the serial number from the bar code label on the SD card socket into the serial number input field in the Idrive Factory Tools Application)
3. Connect the Power cable between the Idrive X1 Board and the Programming Fixture.
4. Connect the MINI HDMI cable between the Idrive X1 Board and the Programming Fixture.
Program the board (bootloader, kernel, filesystem, configuration)
1. Insert the SD Card Installer into the X1 board.what is this
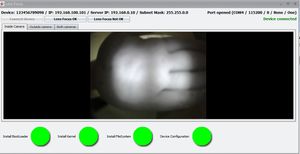
2. Press Start Installation on the Factory Tools App. You will have confirmation status for each step and the application will enter directly into the Focus Lens section if programming and configuration succeed.
Can we add a step here where the program pauses to allow for testing of a shock event?
Lens Focusing
1. Focus camera 1 (Driver Side) (the one on the same side of the camera as the LEDs).
2. Focus camera 2 (Road Side) (the one on the side of the camera without LEDs).
Create Shock Event
1. Pause the program to shake the camera and test the accelerometer(s) How can we do this?
Verify That the IR LEDS are working
1. Use a camera phone or camera and view the IR LEDs and verify that they are all on.
Finish Programming - What is happening here?
1. Press Finish button on the Factory Tools
2. Remove the SD Card Installer - what is this?
3. Disconnect the power cable and the adapter
Secure Lenses
1. Fix the each lens with a drop of super glue.
2. Verify that the lenses can not move.
3. The Top Level Idrive X1 V7 assembly is now ready to be assembled into a camera or to be stocked as a shippable assembly
Appendix
Idrive V7x Programming Station Requirements
The Idrive V7 Programmer Reference
File:Needpichere.jpg DUT holder Frame
File:Completev7fixture.jpg Holder completely assembled, with Idrive PCB in position


