Difference between revisions of "Transfer Point Documentation"
| Line 48: | Line 48: | ||
[[File:tp2.jpg|thumb|400px|]] | [[File:tp2.jpg|thumb|400px|]] | ||
| − | [[File:bottomTP.jpg|thumb| | + | [[File:bottomTP.jpg|thumb|350px|]] |
1)Once the Terminal Point is mounted you'll need to run power to ti.<span style="color: red"> (Mount it how?) | 1)Once the Terminal Point is mounted you'll need to run power to ti.<span style="color: red"> (Mount it how?) | ||
Revision as of 23:00, 18 September 2013
Idrive Transfer Point Documentation
<br\><br\>
Description
The Idrive Transfer Point is used to provide WiFi coverage for remote parking areas to facilitate download of Idrive X1 devices. The downloads are transferred to the Idrive Base Station over a virtual private network (VPN).
<br\><br\>
Options
The basic Transfer Point consists of a Weatherproof enclosure containing VPN Router with a built in WiFi Access point. For additional Wifi coverage the Transfer point can accomodate up to two more Wifi access points
<br\><br\>
Installation
Mounting
The Transfer Point may be mounted to the side of a building, pole or other structure. It should be mounted at a height which allows for line of site to the vehicles which are to be downloaded. (Typically 12 - 20 feet off of the ground)
1)Make sure that all of the requirements for your location are meant.
 a)Power
 b)Internet
 c)Clear-view of coverage area
 d)Remote WiFi Antennas are with in range of PoE
2)There are 4 mounting holes 2 on the top & 2 on the bottom of the Terminal Point. That you can use to secure the Transfer Point to almost anything.
3)Identifying mounting surface so as to secure the proper hardware. If you are not sure of the proper hardware consult local hardware specialist.
4)Measure from the ground to find desired height.
5)Using level and tape measure to mark the location of mounting hols or installation point of other hardware.
6)Mounting the Terminal Point so that it is level is important.
<br\><br\>
Connecting 120V Power
(Note: All power connection should meet all state and local codes!)
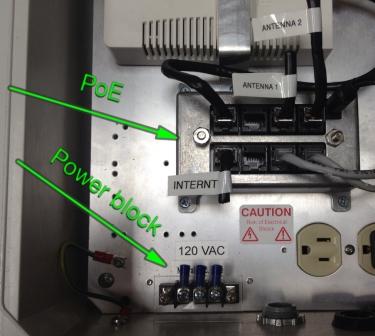
1)Once the Terminal Point is mounted you'll need to run power to ti. (Mount it how?)
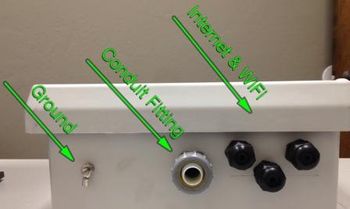
2)There is a Flexible Conduit Fitting in the bottom center of the Terminal Point for.
3)Using Conduit Fitting attach conduit and secure to Terminal Point.
4)pull wire into Terminal Point.
5) You will then find at the bottom of the Terminal Point a terminal block covered by a clear plastic shield.
6)Remove the two screws securing the shield then remove shield.
7)Using supplied connectors on terminal block. Connect the wires left to right (neutral, ground, hot) to terminal block.
8)Replace shield cover.
<br\><br\>
Connecting Internet
(Note: If you are not familiar with the installing ether net cable. That you hire a professional installer.)
1)Bring the ether net cable in to the terminal point needs to be don before installing supplied RJ-45 connector.
2)Trad ether net cable through one of the through wall fittings bottom right side of the terminal point.
3)Connect supplied RJ-45 connector to ether net cable. Then plug it into the PoE slot marked Internet.
<br\><br\>
Connecting Remote WiFi Antennas
(Note: If you are not familiar with the installing ether net cable. That you hire a professional installer.)
1)Bring the shielded ether net cable from remote WiFi antennas in to the terminal point. This needs to be don before installing supplied RJ-45 connector.
2)Trad shielded ether net cable from remote WiFi antennas. Through one of the through wall fittings bottom right side of the terminal point.
3)Connect supplied RJ-45 connector to shielded ether net cable.
4)Then plug it into one of the Poe slot marked antennas.
<br\><br\>
Requirements
120V AC power
Internet Connection with a Fixed IP Address
<br\><br\>
Connections
<br\><br\>
Electrical
<br\><br\>
Network
<br\><br\>
Satellite Access points
<br\><br\>

