Difference between revisions of "New D4M (4/17/19) Initial Configuration and Setup"
| (133 intermediate revisions by 2 users not shown) | |||
| Line 33: | Line 33: | ||
==Install Hard Drive/SSD== | ==Install Hard Drive/SSD== | ||
| − | [[ | + | [[File:SSDinD4.jpg|left|300px|]] |
Use the 4 screws in the plastic bag with the keys to secure the SSD in the carriage | Use the 4 screws in the plastic bag with the keys to secure the SSD in the carriage | ||
| Line 44: | Line 44: | ||
==Setup the D4 for configuration== | ==Setup the D4 for configuration== | ||
| − | [[file:D4M_Front. | + | [[file:D4M_Front.png|left|300px|]] |
| − | [[file: | + | [[file:legend5.png|left|300px|]] |
| − | *Plug in the Power Cable | + | <br> |
| + | |||
| + | [[File:HDMIvsCVBS.JPG|right|450px]] | ||
| + | |||
| + | |||
| + | ::1)*Plug in a Mouse into the USB port on the left hand side of the Front Panel (no Remote Control with the D4M) | ||
| + | |||
| + | <br><br><br><br><br><br> | ||
| + | <div style="text-align: right; direction: ltr; margin-left: 1em;">When plugging in Monitor you can use the provided Composite Video (NTSC output) and connect to the USB Video capture device using AMCAP... <br> or if your monitor has an open HDMI input the image will be full screen and the Mouse will be easier to point on a large Desktop 21" Monitor </div> | ||
| + | |||
| + | <br><br> | ||
| + | |||
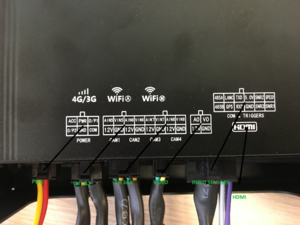
| + | ::In the Rear Panel> | ||
| + | |||
| + | ::1)*Plug in the Power Cable | ||
| + | |||
| + | ::2)*Plug in the Monitor Cable | ||
| − | *Plug in the | + | ::3)*Plug in the Camera Cable |
| − | * | + | ::4)*Turn power supply ON |
| − | * | + | ::5)*Turn Key ON |
| − | * | + | ::6)*Select Main Menu |
| − | + | <br><br><br><br> | |
| − | |||
| + | [[file:Alarmcble5.png|left|px250]] | ||
<br><br> | <br><br> | ||
| + | |||
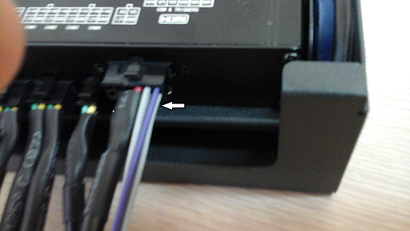
| + | ::1)*Confirm that the Alarm Wire SNR1 (Grey wire below the purple wire on the black Molex plug) triggers Cam Ch#2 to full screen when connecting the Grey wire to 12VDC | ||
| + | |||
| + | [[File:Settings.AlarmSetting.JPG|right]] | ||
| + | |||
| + | |||
| + | |||
| + | '''NOTE: this will only function after the CFG is loaded to the D4M''' | ||
| + | |||
| + | see pic on right after cfg is loaded | ||
| + | |||
| + | <br><br><br><br><br><br><br><br> | ||
| + | <br><br><br><br> | ||
| + | <br><br><br><br> | ||
| + | <br><br><br><br> | ||
===Click the Right Mouse Button For Options=== | ===Click the Right Mouse Button For Options=== | ||
[[file:D4M_Right_Click.jpg|left|100px|]] | [[file:D4M_Right_Click.jpg|left|100px|]] | ||
| + | |||
::1)*[[New_D4M_(4/17/19)_Initial_Configuration_and_Setup#Main Menu|'''Main Menu''']] - DVR Configuration Options | ::1)*[[New_D4M_(4/17/19)_Initial_Configuration_and_Setup#Main Menu|'''Main Menu''']] - DVR Configuration Options | ||
| Line 107: | Line 139: | ||
==Import Idrive Default Configuration== | ==Import Idrive Default Configuration== | ||
| − | * | + | '''*Download the Latest Config File''' [[media:Hidvr.zip|hidvr.zip]] |
*Place the Config File on a SD Card (USB Port is in use for the mouse) | *Place the Config File on a SD Card (USB Port is in use for the mouse) | ||
| Line 113: | Line 145: | ||
*Insert the SD card into the DVR | *Insert the SD card into the DVR | ||
| − | |||
| + | |||
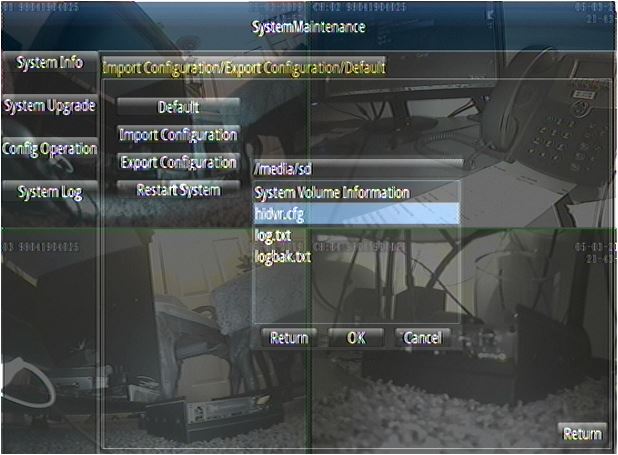
| + | '''Note: if the SD has been used in another Deck it might have 2 additional files... if so only select the Hidvr.cfg''' | ||
| + | [[File:SD CFG.JPG]] | ||
| + | |||
| + | |||
| + | |||
| + | *<span style="color: green"> Main Menu> System> Config Operation> | ||
| + | :<span style="color: green">'''Import Configuration Browse and select file "hidvr.cfg" and click OK''' | ||
| + | |||
| + | |||
| + | '''Note: this will only take a second and may or may not appear to change the screen, but it is finished.''' | ||
| + | |||
| + | |||
| + | Hit return on the bottom to return to the previous menu | ||
| + | |||
| + | [[File:System.Config.Import.SD.hidvr.cfg.jpg]] | ||
<br> | <br> | ||
| + | ==Verify Config and customize Settings== | ||
| − | == | + | *Enter the serial number for the D4M into the “LICENSE ID” |
| + | |||
| + | :<span style="color: green">'''Menu> Mobile> Motor> License ID''' | ||
| + | |||
| + | [[File:Mobile.MotorSetting.JPG ]] | ||
| + | |||
| + | |||
| + | |||
| + | *Set the Customer's Time Zone | ||
| + | :<span style="color: green"> '''Menu> Setting> Date/Time> Timezone''' | ||
| + | *Set the Customer's Time | ||
| + | |||
| + | :<span style="color: green"> '''Menu> Setting> Date/Time> Set Time''' | ||
| + | *Set the Customer's Daylight Savings Time | ||
| + | |||
| + | :<span style="color: green"> Menu> '''Setting> DST Setting> USA''' | ||
| − | + | ::'''Note''' Selecting USA sets DST Correctly | |
| − | + | [[File:Settings.Date.Time.JPG ]] | |
| − | |||
| − | + | '''IMPORTANT! Click on APPLY before leaving screen or restarting''' | |
| − | |||
*Turn Key OFF | *Turn Key OFF | ||
| Line 154: | Line 215: | ||
* Box up unit with serial number on the outside of the box | * Box up unit with serial number on the outside of the box | ||
| − | + | <br><br><br><br> | |
=Main Menu= | =Main Menu= | ||
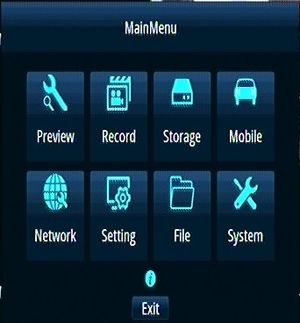
| Line 162: | Line 223: | ||
[[File:D4M_Main_Menu.jpg|left|300px|]] | [[File:D4M_Main_Menu.jpg|left|300px|]] | ||
| − | ::1)*[[New_D4M_(4/17/19)_Initial_Configuration_and_Setup#Preview|'''*Preview''']] - Camera Setting , Motion Setting | + | ::1)*[[New_D4M_(4/17/19)_Initial_Configuration_and_Setup#Preview|'''*Preview''']] - Camera Setting, Motion Setting |
| − | ::2)*[[New_D4M_(4/17/19)_Initial_Configuration_and_Setup#Record|'''*Record''']] - | + | ::2)*[[New_D4M_(4/17/19)_Initial_Configuration_and_Setup#Record|'''*Record''']] - Video program, parameters and related configuration |
| − | ::3)*[[New_D4M_(4/17/19)_Initial_Configuration_and_Setup#Storage|'''*Storage''']] - | + | ::3)*[[New_D4M_(4/17/19)_Initial_Configuration_and_Setup#Storage|'''*Storage''']] - Hard disk information and formatting |
| − | ::4)*[[New_D4M_(4/17/19)_Initial_Configuration_and_Setup#Mobile|'''*Mobile''']] - | + | ::4)*[[New_D4M_(4/17/19)_Initial_Configuration_and_Setup#Mobile|'''*Mobile''']] - Power, motor, GPS, G-sensor etc. |
| − | ::5)*[[New_D4M_(4/17/19)_Initial_Configuration_and_Setup#Network|'''*Network''']] - | + | ::5)*[[New_D4M_(4/17/19)_Initial_Configuration_and_Setup#Network|'''*Network''']] - 3G/4G, LAN, Server related configuration |
| − | ::6)*[[New_D4M_(4/17/19)_Initial_Configuration_and_Setup#Setting|'''*Setting''']] - | + | ::6)*[[New_D4M_(4/17/19)_Initial_Configuration_and_Setup#Setting|'''*Setting''']] - User, alarm system parameters, such as configuration |
| − | ::7)*[[New_D4M_(4/17/19)_Initial_Configuration_and_Setup#Record|'''*File''']] - | + | ::7)*[[New_D4M_(4/17/19)_Initial_Configuration_and_Setup#Record|'''*File''']] - The captured image display and operation |
| − | ::8)*[[New_D4M_(4/17/19)_Initial_Configuration_and_Setup#System|'''*System''']] - | + | ::8)*[[New_D4M_(4/17/19)_Initial_Configuration_and_Setup#System|'''*System''']] - System info, upgrade management, etc. |
| Line 194: | Line 255: | ||
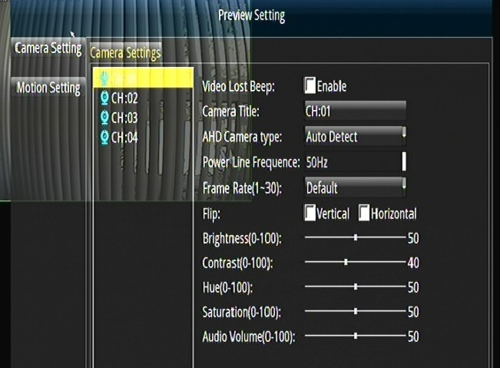
::1)*Video Lost Beep - Enable for beep when video is lost <span style="color: blue"> '''OFF''' | ::1)*Video Lost Beep - Enable for beep when video is lost <span style="color: blue"> '''OFF''' | ||
| − | ::2)* Camera Title - <span style="color: blue"> '''DEFAULT''' | + | ::2)* Camera Title - <span style="color: blue"> '''DEFAULT(CH:0#)?''' |
::3)*AHD Camera Type - <span style="color: blue"> '''AUTO DETECT''' | ::3)*AHD Camera Type - <span style="color: blue"> '''AUTO DETECT''' | ||
| Line 202: | Line 263: | ||
::5)*Frame Rate - <span style="color: blue"> '''DEFAULT (30)''' | ::5)*Frame Rate - <span style="color: blue"> '''DEFAULT (30)''' | ||
| − | ::6)*FLIP - Mirror | + | ::6)*FLIP - Mirror horizontal or vertical <span style="color: blue"> '''OFF,OFF''' |
::7)*Brightness *<span style="color: blue"> '''DEFAULT (50)''' | ::7)*Brightness *<span style="color: blue"> '''DEFAULT (50)''' | ||
| Line 212: | Line 273: | ||
::10)*Saturation - <span style="color: blue"> '''DEFAULT (50)''' | ::10)*Saturation - <span style="color: blue"> '''DEFAULT (50)''' | ||
| − | ::11)*Audio Volume - <span style="color: blue"> '''DEFAULT ( | + | ::11)*Audio Volume - <span style="color: blue"> '''DEFAULT (40)''' |
| − | ::12)*Auto Black-and-White - At night switch to | + | ::12)*Auto Black-and-White - At night switch to Black and White mode <span style="color: blue"> '''OFF''' |
::13)*FrameRate Down - lower frame rate at night<span style="color: blue"> '''OFF''' | ::13)*FrameRate Down - lower frame rate at night<span style="color: blue"> '''OFF''' | ||
| Line 248: | Line 309: | ||
<span style="color: red"> '''Copy To, Apply, Return Buttons''' not shown in AMCAP | <span style="color: red"> '''Copy To, Apply, Return Buttons''' not shown in AMCAP | ||
| − | + | <br><br><br> | |
==Record== | ==Record== | ||
| − | [[File: | + | [[File:Record.RecordDetails.JPG|left|400px|]] |
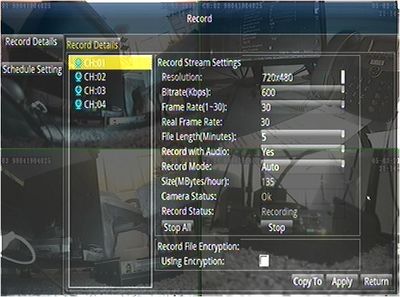
| − | ::1)* Resolution - <span style="color: blue"> '''DEFAULT''' | + | ::1)* Resolution - <span style="color: blue"> '''DEFAULT(BASIC,2/3D1)''' |
| − | ::2)* Bitrate(Kbps) - <span style="color: blue"> '''DEFAULT''' | + | ::2)* Bitrate(Kbps) - <span style="color: blue"> '''DEFAULT(200)''' |
::3)* Frame Rate(1-30) - <span style="color: blue"> '''DEFAULT(30)''' | ::3)* Frame Rate(1-30) - <span style="color: blue"> '''DEFAULT(30)''' | ||
::4)* Real Frame Rate - <span style="color: blue"> '''30''' | ::4)* Real Frame Rate - <span style="color: blue"> '''30''' | ||
| − | ::5)* File Length(Minutes) - <span style="color: blue"> ''' | + | ::5)* File Length(Minutes) - <span style="color: blue"> '''5 (Set 5 on all 4 Channels)''' |
| − | ::6)* Record with Audio - <span style="color: blue"> ''' | + | ::6)* Record with Audio - <span style="color: blue"> '''YES (Set YES on all 4 Channels)''' |
| − | ::7)* Record Mode - <span style="color: blue"> '''DEFAULT''' | + | ::7)* Record Mode - <span style="color: blue"> '''DEFAULT(AUTO)''' |
| − | ::8)* Size(MBytes/hour) - <span style="color: blue"> '''DEFAULT''' | + | ::8)* Size(MBytes/hour) - <span style="color: blue"> '''DEFAULT(710)''' |
| − | ::9)* Camera Status - <span style="color: blue"> '''DEFAULT''' | + | ::9)* Camera Status - <span style="color: blue"> '''DEFAULT (Monitored,OK)''' |
| − | ::10)* Record Status - <span style="color: blue"> '''DEFAULT''' | + | ::10)* Record Status - <span style="color: blue"> '''DEFAULT (Monitored,Recording)''' |
| − | ::11)* Stop All Stop - <span style="color: blue"> '''Do not press''' | + | ::11)* Stop All Stop - <span style="color: blue"> '''Do not press, unless intending to stop recording.''' |
::12)* Record File Encryption - <span style="color: blue"> '''DEFAULT(Blank)''' | ::12)* Record File Encryption - <span style="color: blue"> '''DEFAULT(Blank)''' | ||
<br><br><br> | <br><br><br> | ||
| − | |||
| − | |||
| − | |||
| − | |||
==Record Schedule== | ==Record Schedule== | ||
| Line 285: | Line 342: | ||
| − | + | <br><br> | |
==Storage== | ==Storage== | ||
| − | [[File: | + | [[File:Storage.BaseSetting.JPG|left|400px|]] |
::1)* Overwrite Mode - <span style="color: blue"> '''DEFAULT(Overwrite normal video)''' | ::1)* Overwrite Mode - <span style="color: blue"> '''DEFAULT(Overwrite normal video)''' | ||
| − | ::2)* No disk alarm time(seconds)) - <span style="color: blue"> ''' | + | |
| + | ::2)* No disk alarm time(seconds)) - <span style="color: blue"> '''CFG sets to 60 seconds (ON)''' | ||
| + | |||
| + | ::'''This tells the client that the Disk is not in the unit, or that the HDD has become non-accessible - beeps one time 60 seconds after start up if missing | ||
| + | ''' | ||
| + | |||
::3)* Normal Record Disk - <span style="color: blue"> '''DEFAULT(sata)''' | ::3)* Normal Record Disk - <span style="color: blue"> '''DEFAULT(sata)''' | ||
::4)* Alarm Record Disk - <span style="color: blue"> '''DEFAULT(sata)''' | ::4)* Alarm Record Disk - <span style="color: blue"> '''DEFAULT(sata)''' | ||
| Line 299: | Line 361: | ||
<br><br><br><br><br><br><br><br><br><br> | <br><br><br><br><br><br><br><br><br><br> | ||
| − | |||
| − | + | <br><br><br> | |
| − | |||
==Mobile== | ==Mobile== | ||
| − | [[File: | + | [[File:Mobile.PowerSetting.JPG|left|400px|]] |
==Power== | ==Power== | ||
| Line 312: | Line 372: | ||
[[File:D4M_Mobile_Motor.png|left|400px|]] | [[File:D4M_Mobile_Motor.png|left|400px|]] | ||
| − | ::1)* Ignition Level - <span style="color: blue"> ''' | + | ::1)* Ignition Level - <span style="color: blue"> '''DEFAULT(High)''' |
| − | ::2)* ACC Power Off Delay(seconds)) - <span style="color: blue"> ''' | + | ::2)* ACC Power Off Delay(seconds)) - <span style="color: blue"> '''CFG set to 1 Second''' |
| − | ::3)* Sleep Delay-ACC Off(seconds) - <span style="color: blue"> ''' | + | ::3)* Sleep Delay-ACC Off(seconds) - <span style="color: blue"> '''CFG set to 0''' |
| − | ::4)* Sleep Delay-No Alarm(seconds) - <span style="color: blue"> '''0''' | + | ::4)* Sleep Delay-No Alarm(seconds) - <span style="color: blue"> '''CFG set to 0''' |
::5)* Power On at(HH:MM) - <span style="color: blue"> '''00:00''' | ::5)* Power On at(HH:MM) - <span style="color: blue"> '''00:00''' | ||
::6)* Power Off at (HH:MM) - <span style="color: blue"> '''00:00''' | ::6)* Power Off at (HH:MM) - <span style="color: blue"> '''00:00''' | ||
| − | ::7)* Current Voltage - <span style="color: blue"> '''13. | + | ::7)* Current Voltage - <span style="color: blue"> '''13.3 (monitored)''' |
| − | ::8)* Power Off Threshold Voltage - <span style="color: blue"> ''' | + | ::8)* Power Off Threshold Voltage - <span style="color: blue"> '''Set to 8VDC''' |
| − | ::9)* Power On threshold Voltage - <span style="color: blue"> ''' | + | ::9)* Power On threshold Voltage - <span style="color: blue"> '''Set to 9VDC''' |
| − | |||
| − | |||
| − | |||
<br> | <br> | ||
| Line 343: | Line 400: | ||
<span style="color: red"> ''' Apply, Return Buttons''' not shown in AMCAP | <span style="color: red"> ''' Apply, Return Buttons''' not shown in AMCAP | ||
| + | |||
| + | <br> | ||
==GPS== | ==GPS== | ||
| Line 350: | Line 409: | ||
| − | ::1)* GPS Status - <span style="color: blue"> '''DEFAULT''' | + | ::1)* GPS Status - <span style="color: blue"> '''DEFAULT(Monitored, Not Found)''' |
::2)* GPS OSD - <span style="color: blue"> '''DEFAULT(On)''' | ::2)* GPS OSD - <span style="color: blue"> '''DEFAULT(On)''' | ||
::3)* GPS Baudrate - <span style="color: blue"> '''DEFAULT(9600)''' | ::3)* GPS Baudrate - <span style="color: blue"> '''DEFAULT(9600)''' | ||
| Line 359: | Line 418: | ||
| − | + | <br><br><br> | |
<br><br><br> | <br><br><br> | ||
| Line 366: | Line 425: | ||
[[File:D4M_Mobile_G-Sensor.png|left|400px|]] | [[File:D4M_Mobile_G-Sensor.png|left|400px|]] | ||
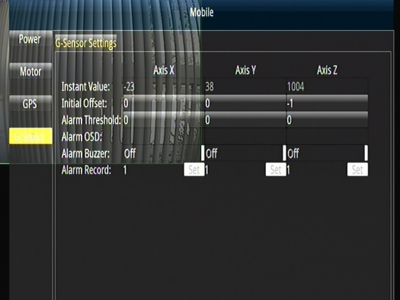
| − | ::1)* Instant Value - <span style="color: blue"> '''DEFAULT''' | + | ::1)* Instant Value - <span style="color: blue"> '''DEFAULT(Monitored)''' |
| − | ::2)* Initial Offset - <span style="color: blue"> '''DEFAULT''' | + | ::2)* Initial Offset - <span style="color: blue"> '''DEFAULT(0,0,-1 TBD)''' |
| − | ::3)* Alarm Threshold - <span style="color: blue"> '''DEFAULT''' | + | ::3)* Alarm Threshold - <span style="color: blue"> '''DEFAULT(0,0,0 TBD)''' |
| − | ::4)* Alarm Buzzer - <span style="color: blue"> '''DEFAULT''' | + | ::4)* Alarm Buzzer - <span style="color: blue"> '''DEFAULT(TBD)''' |
| − | ::5)* Alarm Record - <span style="color: blue"> '''DEFAULT''' | + | ::5)* Alarm Record - <span style="color: blue"> '''DEFAULT(TBD)''' |
<br><br><br> | <br><br><br> | ||
| Line 378: | Line 437: | ||
| − | + | <br><br><br><br> | |
| − | + | <br><br><br><br> | |
==Network== | ==Network== | ||
| Line 385: | Line 444: | ||
[[File:D4M_Network_3G_4G.png|left|400px|]] | [[File:D4M_Network_3G_4G.png|left|400px|]] | ||
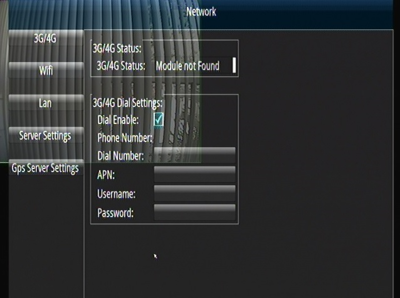
| − | ::3G/4G | + | ::'''3G/4G''' |
| − | ::1)* 3G/4G Status - <span style="color: blue"> '''DEFAULT''' | + | ::1)* 3G/4G Status - <span style="color: blue"> '''DEFAULT(Monitored,Module Not Found) ''' |
::2)* Dial Enable - <span style="color: blue"> '''DEFAULT(Check))''' | ::2)* Dial Enable - <span style="color: blue"> '''DEFAULT(Check))''' | ||
::3)* Dial Number - <span style="color: blue"> '''DEFAULT(Blank)''' | ::3)* Dial Number - <span style="color: blue"> '''DEFAULT(Blank)''' | ||
| − | ::4)* APN - <span style="color: blue"> '''DEFAULT''' | + | ::4)* APN - <span style="color: blue"> '''DEFAULT(Blank)''' |
| − | ::5)* Username - <span style="color: blue"> '''DEFAULT''' | + | ::5)* Username - <span style="color: blue"> '''DEFAULT(Blank)''' |
| − | ::6)* Password - <span style="color: blue"> '''DEFAULT''' | + | ::6)* Password - <span style="color: blue"> '''DEFAULT(Blank)''' |
| Line 403: | Line 462: | ||
<br><br><br><br> | <br><br><br><br> | ||
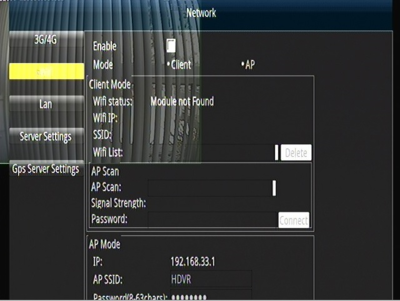
| − | ::WiFi | + | ::'''WiFi''' |
::1)* Enable - <span style="color: blue"> '''DEFAULT(Uncheck)''' | ::1)* Enable - <span style="color: blue"> '''DEFAULT(Uncheck)''' | ||
::2)* Mode - <span style="color: blue"> '''DEFAULT(Do not Select)''' | ::2)* Mode - <span style="color: blue"> '''DEFAULT(Do not Select)''' | ||
| − | ::3)* WiFi Status - <span style="color: blue"> '''Module not found''' | + | ::3)* WiFi Status - <span style="color: blue"> '''Monitored, Module not found''' |
| − | ::4)* WiFi IP - <span style="color: blue"> '''DEFAULT''' | + | ::4)* WiFi IP - <span style="color: blue"> '''DEFAULT(Blank)''' |
| − | ::5)* SSID - <span style="color: blue"> '''DEFAULT''' | + | ::5)* SSID - <span style="color: blue"> '''DEFAULT(Blank)''' |
| − | ::6)* WiFi List - <span style="color: blue"> ''' | + | ::6)* WiFi List - <span style="color: blue"> '''DEFAULT(Blank)''' |
::7)* AP Scan - <span style="color: blue"> '''DEFAULT''' | ::7)* AP Scan - <span style="color: blue"> '''DEFAULT''' | ||
::8)* Signal Strength - <span style="color: blue"> '''DEFAULT''' | ::8)* Signal Strength - <span style="color: blue"> '''DEFAULT''' | ||
::9)* Password - <span style="color: blue"> '''DEFAULT''' | ::9)* Password - <span style="color: blue"> '''DEFAULT''' | ||
| + | ::10)* IP - <span style="color: blue"> '''DEFAULT(192.168.33.1 TBD)''' | ||
| + | ::11)* AP SSID - <span style="color: blue"> '''DEFAULT(HDVR, TBD)''' | ||
| + | ::12)* Password - <span style="color: blue"> '''DEFAULT''' | ||
| Line 423: | Line 485: | ||
<br> | <br> | ||
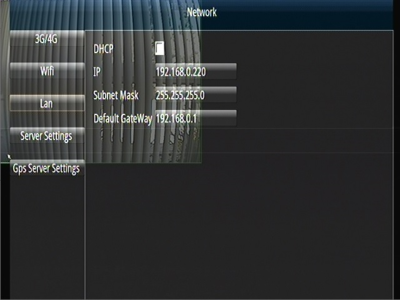
| − | ::LAN | + | ::'''LAN''' |
::1)* DHCP - <span style="color: blue"> '''DEFAULT(Uncheck)''' | ::1)* DHCP - <span style="color: blue"> '''DEFAULT(Uncheck)''' | ||
| Line 440: | Line 502: | ||
<br><br><br><br><br> | <br><br><br><br><br> | ||
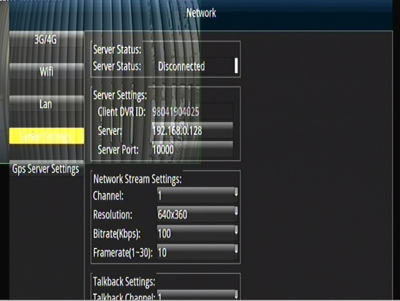
| − | ::Server Settings | + | ::'''Server Settings''' |
| − | ::1)* Server Status - <span style="color: blue"> '''DEFAULT( | + | ::1)* Server Status - <span style="color: blue"> '''DEFAULT(Monitored, Disconnected)''' |
::2)* Client DVR ID - <span style="color: blue"> '''DEFAULT(S/N)''' | ::2)* Client DVR ID - <span style="color: blue"> '''DEFAULT(S/N)''' | ||
::3)* Server - <span style="color: blue"> '''DEFAULT(192.168.0.128)''' | ::3)* Server - <span style="color: blue"> '''DEFAULT(192.168.0.128)''' | ||
| Line 460: | Line 522: | ||
<br><br> | <br><br> | ||
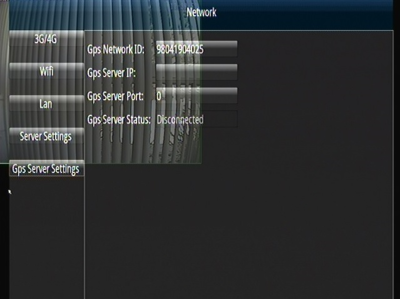
| − | ::GPS Server Settings | + | ::'''GPS Server Settings''' |
::1)* GPS Network ID - <span style="color: blue"> '''DEFAULT(S/N)''' | ::1)* GPS Network ID - <span style="color: blue"> '''DEFAULT(S/N)''' | ||
| − | ::2)* GPS Server IP - <span style="color: blue"> '''DEFAULT | + | ::2)* GPS Server IP - <span style="color: blue"> '''DEFAULT''' |
::3)* GPS Server Port - <span style="color: blue"> '''DEFAULT(0)''' | ::3)* GPS Server Port - <span style="color: blue"> '''DEFAULT(0)''' | ||
| − | ::4)* GPS Server Status - <span style="color: blue"> '''DEFAULT(Disconnected)''' | + | ::4)* GPS Server Status - <span style="color: blue"> '''DEFAULT(Monitored,Disconnected)''' |
| Line 471: | Line 533: | ||
<span style="color: red"> ''' Apply, Return Buttons''' not shown in AMCAP | <span style="color: red"> ''' Apply, Return Buttons''' not shown in AMCAP | ||
| − | + | <br><br><br><br><br><br><br> | |
| − | + | <br><br><br><br><br><br><br> | |
| − | |||
| − | |||
| − | |||
| − | |||
| − | |||
==Setting== | ==Setting== | ||
| Line 483: | Line 540: | ||
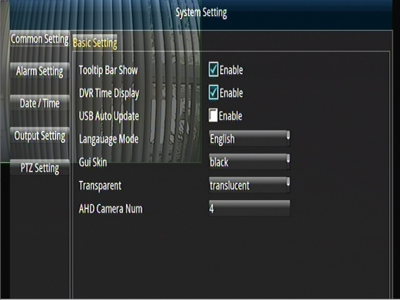
[[File:D4M_Setting_Common_Setting.png|left|400px|]] | [[File:D4M_Setting_Common_Setting.png|left|400px|]] | ||
| − | ::Basic Settings | + | ::'''Basic Settings''' |
| − | ::1)* Toolbartip Bar Show - <span style="color: blue"> ''' | + | ::1)* Toolbartip Bar Show - <span style="color: blue"> '''Enable(Check)''' |
::2)* DVR Time Display - <span style="color: blue"> '''Enable(Check)''' | ::2)* DVR Time Display - <span style="color: blue"> '''Enable(Check)''' | ||
::3)* USB Auto Update - <span style="color: blue"> '''DEFAULT(Not checked)''' | ::3)* USB Auto Update - <span style="color: blue"> '''DEFAULT(Not checked)''' | ||
| Line 497: | Line 554: | ||
| − | + | <br><br><br> | |
| − | [[File: | + | [[File:Settings.AlarmSetting.JPG|left|400px|]] |
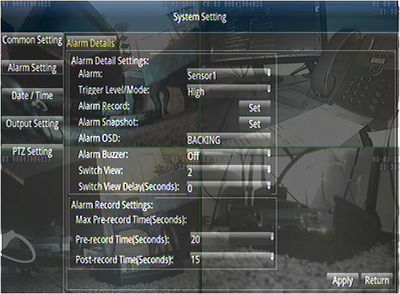
| − | :: Alarm Settings | + | :: '''Alarm Settings''' |
| − | ::1)* Alarm - <span style="color: blue"> '''Sensor1 | + | ::1)* Alarm - <span style="color: blue"> '''Sensor1''' |
::2)* Trigger Level/Mode - <span style="color: blue"> '''High''' | ::2)* Trigger Level/Mode - <span style="color: blue"> '''High''' | ||
::3)* Alarm Record - <span style="color: blue"> '''Set''' | ::3)* Alarm Record - <span style="color: blue"> '''Set''' | ||
::4)* Alarm Snapshot - <span style="color: blue"> '''Set''' | ::4)* Alarm Snapshot - <span style="color: blue"> '''Set''' | ||
| − | ::5)* Alarm OSD - <span style="color: blue"> '''DEFAULT(BACKING) | + | ::5)* Alarm OSD - <span style="color: blue"> '''DEFAULT(BACKING)''' |
| − | ::6)* Alarm Buzzer - <span style="color: blue"> '''DEFAULT( | + | ::6)* Alarm Buzzer - <span style="color: blue"> '''DEFAULT(OFF)''' |
| − | ::7)* Switch View - <span style="color: blue"> '''DEFAULT(2) | + | ::7)* Switch View - <span style="color: blue"> '''DEFAULT(2) - this takes Channel 2 Full Screen when wire in engaged with 12VDC''' |
::8)* Switch View Delay(Seconds) - <span style="color: blue"> '''0''' | ::8)* Switch View Delay(Seconds) - <span style="color: blue"> '''0''' | ||
::9)* Pre-record Time(Seconds) - <span style="color: blue"> '''20''' | ::9)* Pre-record Time(Seconds) - <span style="color: blue"> '''20''' | ||
| − | :: | + | ::10)* Post-record Time(Seconds) - <span style="color: blue"> '''15''' |
| + | |||
| + | |||
| + | |||
| + | |||
| + | |||
| + | |||
| + | [[File:Settings.Date.Time.JPG|left|400px|]] | ||
| + | |||
| + | ::'''DST Settings''' | ||
| + | |||
| + | ::1)* Date Format- <span style="color: blue"> '''mm-dd-yyyy''' | ||
| + | ::2)* DVR Time - <span style="color: blue"> '''DEFAULT''' | ||
| + | |||
| + | '''NOTE: set Time Zone (US Eastern, Central, Mountain or Pacific) and DST USA first before Actual Client Time; ''' | ||
| + | |||
| + | ::3)* Set Time - <span style="color: blue"> '''DEFAULT(Input current date and time)''' | ||
| + | ::4)* Time Zone - <span style="color: blue"> '''(GMT-05:00) Eastern Time.''' | ||
| + | ::5)* Time Offset - <span style="color: blue"> '''0''' | ||
| + | ::6)* DST Period - <span style="color: blue"> '''Yes''' | ||
| + | ::7)* DST Setting - <span style="color: blue"> '''USA''' | ||
| + | ::8)* From - <span style="color: blue"> '''DEFAULT(User Input)''' | ||
| + | ::9)* To - <span style="color: blue"> '''DEFAULT(User Input)''' | ||
| + | |||
| + | <br><br> | ||
| + | |||
| − | |||
| − | [[File: | + | [[File:Settings.Output.JPG|left|400px|]] |
| + | |||
| + | ::'''Output Setting''' | ||
| + | |||
| + | ::1)* Output Device - <span style="color: blue"> '''CVBS NTSC''' | ||
| + | '''NOTE: this will set by the Config File installation to NTSC so you can use AMCAP and USB Video Adapter | ||
| + | |||
| + | '''DO NOT use PAL in the US with 7" US Monitors''' | ||
| + | |||
| + | ::2)* CVBS Output Volume(0-255) - <span style="color: blue"> '''16 ?''' | ||
| + | ::3)* CVBS Output Reduction Value - <span style="color: blue"> '''0''' | ||
| + | ::4)* ScreenSaver Delay(Seconds) - <span style="color: blue"> '''0''' | ||
| + | |||
| + | <br><br> | ||
| + | |||
| − | |||
[[File:D4M_Setting_PTZ_Setting.png|left|400px|]] | [[File:D4M_Setting_PTZ_Setting.png|left|400px|]] | ||
| − | <br><br><br><br><br><br>< | + | <br><br><br><br><br><br> |
| − | + | ||
| − | + | ::'''PTZ Settings''' | |
| − | + | ||
| + | |||
| + | Apply the following to all four channels. | ||
| + | |||
| + | ::1)* CH:01 - <span style="color: blue"> '''Baudrate 9600''' | ||
| + | ::2)* CH:02 - <span style="color: blue"> '''Protocol PELCO-D''' | ||
| + | ::3)* CH:03 - <span style="color: blue"> '''Address 0''' | ||
| + | ::4)* CH:04 - <span style="color: blue"> '''DEFAULT''' | ||
| + | |||
| + | <br><br> | ||
| + | |||
| + | <span style="color: red"> ''' Copy to, apply, Return Buttons''' not shown in AMCAP | ||
| + | |||
| + | |||
| + | |||
| + | |||
| + | |||
| + | <br><br><br><br><br><br><br> | ||
==File== | ==File== | ||
| Line 536: | Line 647: | ||
| − | + | ::'''File''' | |
| + | |||
| + | No Setup needed. | ||
| + | |||
| + | |||
| + | <br><br><br><br><br><br><br><br><br><br><br><br><br><br> | ||
==System== | ==System== | ||
[[File:D4M_System_Info.png|left|400px|]] | [[File:D4M_System_Info.png|left|400px|]] | ||
| + | |||
| + | ::'''System Info''' | ||
| + | |||
| + | ::1)* DVR App Version - <span style="color: blue"> '''V206-2019/4/12-10:11::12-4''' | ||
| + | ::2)* DVR MCU Version - <span style="color: blue"> '''08/04/2018-0d''' | ||
| + | ::3)* Camera1 Version - <span style="color: blue"> '''NTSC''' | ||
| + | |||
| + | <br> | ||
| + | |||
| + | <span style="color: red"> ''' Apply, Return Buttons''' not shown in AMCAP | ||
[[File:D4M_System_Upgrade.png|left|400px|]] | [[File:D4M_System_Upgrade.png|left|400px|]] | ||
| − | [[File: | + | <br><br><br><br><br><br><br><br> |
| + | |||
| + | ::'''System Upgrade''' | ||
| + | |||
| + | |||
| + | ::1)* Current Version - <span style="color: blue"> '''V206-2019/4/12-10:11::12-4''' | ||
| + | ::Confirm Current Version is the latest version; if not, browse available resources for upgrade? | ||
| + | ::2)* Upgrade file - <span style="color: blue"> '''DEFAULT(Browse)''' | ||
| + | |||
| + | <br><br><br><br><br><br> | ||
| + | |||
| + | <span style="color: red"> ''' Upgrade, Return Buttons''' not shown in AMCAP | ||
| + | |||
| + | |||
| + | <br><br><br><br> | ||
| + | |||
| + | |||
| + | [[File:System.Config.Import.SD.hidvr.cfg.jpg|left|400px|]] | ||
| + | |||
| + | <br><br> | ||
| + | |||
| + | Click the link below for D4M Idrive Configuration Downloading and Installation | ||
| + | |||
| + | |||
| + | [[New_D4M_(4/17/19)_Initial_Configuration_and_Setup#Import_Idrive_Default_Configuration|'''Configuration''']] - Download and Install Idrive Client Configuration | ||
| + | |||
| + | <br><br><br><br><br><br><br><br><br><br><br> | ||
| + | |||
| + | |||
[[File:D4M_System_Log.png|left|400px|]] | [[File:D4M_System_Log.png|left|400px|]] | ||
| + | <br><br><br><br><br><br> | ||
| − | < | + | ::'''System Log''' |
| − | < | + | |
| − | + | ::1)* DISPLAYS LOG - <span style="color: blue"> '''DEFAULT(Refresh only if necessary)''' | |
| − | + | ||
| + | <br><br><br><br> | ||
| + | |||
| + | <span style="color: red"> ''' Refresh, Return Buttons''' not shown in AMCAP | ||
| + | |||
| + | <br><br><br><br><br><br><br><br> | ||
Latest revision as of 20:36, 6 May 2019
Idrive D4M Configuration
Record Serial Number
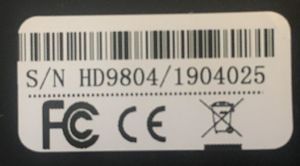
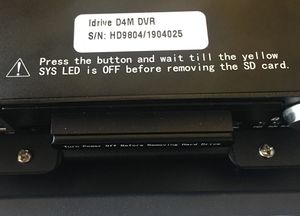
Serial number is located on the bottom of the D4M.
- Remove D4M from the Security Box
- Record Serial number
- Print Label and afix to the top of the D4M
- Enter Serial Number into Admin Center.
- AC> Manufacturing >D4-DVR Production Tab
- Click on ADD and enter the S/N
- Select Item Type IDRDVRD4HD
Install Hard Drive/SSD
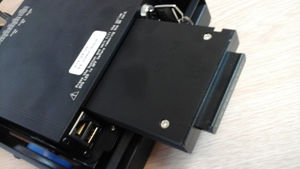
Use the 4 screws in the plastic bag with the keys to secure the SSD in the carriage
Install the Hard Drive Sled into the D4M
Setup the D4 for configuration
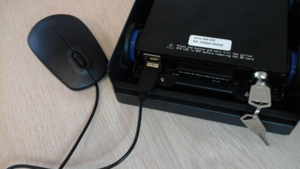
- 1)*Plug in a Mouse into the USB port on the left hand side of the Front Panel (no Remote Control with the D4M)
or if your monitor has an open HDMI input the image will be full screen and the Mouse will be easier to point on a large Desktop 21" Monitor
- In the Rear Panel>
- 1)*Plug in the Power Cable
- 2)*Plug in the Monitor Cable
- 3)*Plug in the Camera Cable
- 4)*Turn power supply ON
- 5)*Turn Key ON
- 6)*Select Main Menu
- 1)*Confirm that the Alarm Wire SNR1 (Grey wire below the purple wire on the black Molex plug) triggers Cam Ch#2 to full screen when connecting the Grey wire to 12VDC
NOTE: this will only function after the CFG is loaded to the D4M
see pic on right after cfg is loaded
Click the Right Mouse Button For Options
- 1)*Main Menu - DVR Configuration Options
- 2)*SingleScreen - Display one Camera on the Monitor
- 3)*MultiScreen - Display all 4 cameras on the monitor
- 4)*UpScreen - Figure it out
- 5)*DownScreen - Figure it out
- 6)*Screen Save - Save the current screen configuration as Default
- 7)*PTZ
Verify Correct Firmware version
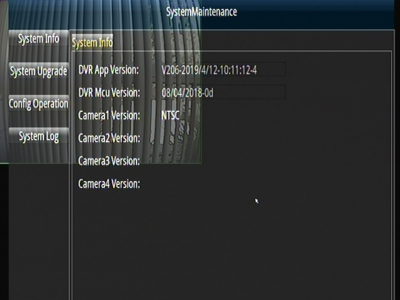
Main Menu> System> System Info
Current Release V206-2019/4/12-10:11:124
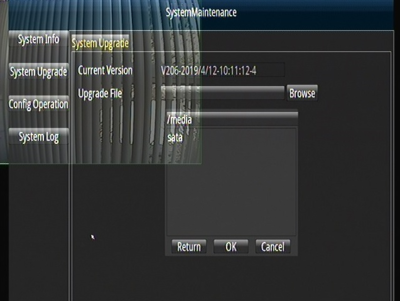
Upgrade Firmware if needed
- Obtain Latest Firmware Version from AdminCenter (if we receive one)
- Place the Firmware on a SD Card (USB Port is in use for the mouse)
- Insert the SD card into the DVR
- Main Menu> System> System Upgrade> Browse and select file and click OK
Import Idrive Default Configuration
*Download the Latest Config File hidvr.zip
- Place the Config File on a SD Card (USB Port is in use for the mouse)
- Insert the SD card into the DVR
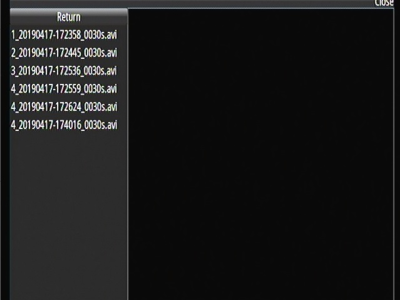
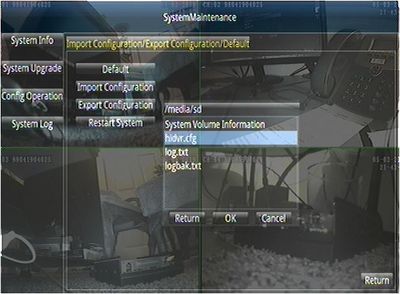
Note: if the SD has been used in another Deck it might have 2 additional files... if so only select the Hidvr.cfg

- Main Menu> System> Config Operation>
- Import Configuration Browse and select file "hidvr.cfg" and click OK
Note: this will only take a second and may or may not appear to change the screen, but it is finished.
Hit return on the bottom to return to the previous menu
Verify Config and customize Settings
- Enter the serial number for the D4M into the “LICENSE ID”
- Menu> Mobile> Motor> License ID
- Set the Customer's Time Zone
- Menu> Setting> Date/Time> Timezone
- Set the Customer's Time
- Menu> Setting> Date/Time> Set Time
- Set the Customer's Daylight Savings Time
- Menu> Setting> DST Setting> USA
- Note Selecting USA sets DST Correctly
IMPORTANT! Click on APPLY before leaving screen or restarting
- Turn Key OFF
- Remove SD Card
Format the SSD / Hard Drive
- Install the hard drive carriage into the D4M
- Turn the key ON
- Format the SSD/Hard Drive Menu> Storage> Disk Info> Format
- The Format Button is at the bottom but does not display in AMCAP
- Push record and verify that it can write to the hard drive.
- Push stop
- Test all camera ports with a working camera to ensure that they all work.
- Turn the Key and Power supply off.
- Box up unit with serial number on the outside of the box
Main Menu
The Main Menu is Displayed by right clicking the USB mouse .
- 1)**Preview - Camera Setting, Motion Setting
- 2)**Record - Video program, parameters and related configuration
- 3)**Storage - Hard disk information and formatting
- 4)**Mobile - Power, motor, GPS, G-sensor etc.
- 5)**Network - 3G/4G, LAN, Server related configuration
- 6)**Setting - User, alarm system parameters, such as configuration
- 7)**File - The captured image display and operation
- 8)**System - System info, upgrade management, etc.
Preview
Camera Settings
Each channel set separately
- 1)*Video Lost Beep - Enable for beep when video is lost OFF
- 2)* Camera Title - DEFAULT(CH:0#)?
- 3)*AHD Camera Type - AUTO DETECT
- 4)*Power Line Frequence - ?
- 5)*Frame Rate - DEFAULT (30)
- 6)*FLIP - Mirror horizontal or vertical OFF,OFF
- 7)*Brightness * DEFAULT (50)
- 8)*Contrast - DEFAULT (40)
- 9)*Hue - DEFAULT (50)
- 10)*Saturation - DEFAULT (50)
- 11)*Audio Volume - DEFAULT (40)
- 12)*Auto Black-and-White - At night switch to Black and White mode OFF
- 13)*FrameRate Down - lower frame rate at night OFF
- 14)*IR LED Light - Only if supported by the camera AUTO
- 15)*LED Status Indicator - OFF
Copy To, Apply, Return Buttons not shown in AMCAP
Motion Settings
Each channel set separately
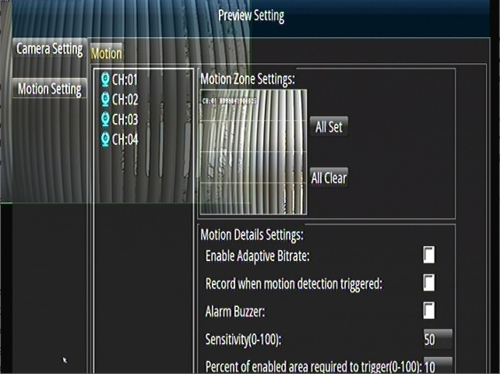
- 1)*Motion Zone Settings All Clear
- 2)* Enable Adaptive Bit rate Default
- 3)* Record when motion detection triggered Default
- 4)* Alarm Buzzer Default
- 5)* Sensitivity(0-100) Default(50)
- 6)* Percent of enabled area required to trigger (0-100) Default(10)
Copy To, Apply, Return Buttons not shown in AMCAP
Record
- 1)* Resolution - DEFAULT(BASIC,2/3D1)
- 2)* Bitrate(Kbps) - DEFAULT(200)
- 3)* Frame Rate(1-30) - DEFAULT(30)
- 4)* Real Frame Rate - 30
- 5)* File Length(Minutes) - 5 (Set 5 on all 4 Channels)
- 6)* Record with Audio - YES (Set YES on all 4 Channels)
- 7)* Record Mode - DEFAULT(AUTO)
- 8)* Size(MBytes/hour) - DEFAULT(710)
- 9)* Camera Status - DEFAULT (Monitored,OK)
- 10)* Record Status - DEFAULT (Monitored,Recording)
- 11)* Stop All Stop - Do not press, unless intending to stop recording.
- 12)* Record File Encryption - DEFAULT(Blank)
Record Schedule
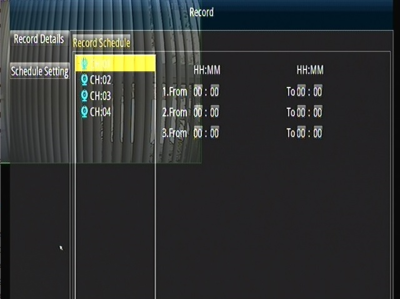
- 1)* HH:MM HH:MM Leave this section blank - DEFAULT
Clear, Copy To, Apply, Return Buttons not shown in AMCAP
Storage
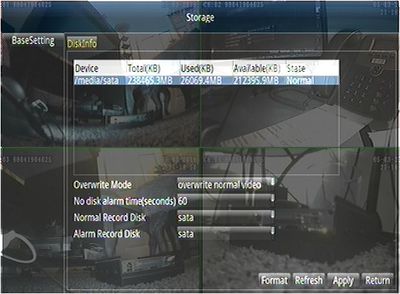
- 1)* Overwrite Mode - DEFAULT(Overwrite normal video)
- 2)* No disk alarm time(seconds)) - CFG sets to 60 seconds (ON)
- This tells the client that the Disk is not in the unit, or that the HDD has become non-accessible - beeps one time 60 seconds after start up if missing
- 3)* Normal Record Disk - DEFAULT(sata)
- 4)* Alarm Record Disk - DEFAULT(sata)
- 5)* Format - Use Format Only at Initialization of SSD
Mobile
Power
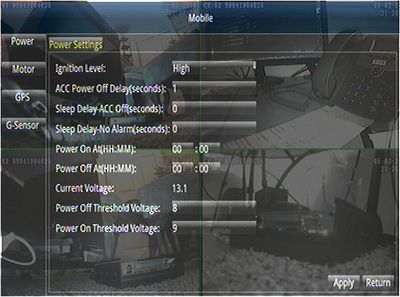
- 1)* Ignition Level - DEFAULT(High)
- 2)* ACC Power Off Delay(seconds)) - CFG set to 1 Second
- 3)* Sleep Delay-ACC Off(seconds) - CFG set to 0
- 4)* Sleep Delay-No Alarm(seconds) - CFG set to 0
- 5)* Power On at(HH:MM) - 00:00
- 6)* Power Off at (HH:MM) - 00:00
- 7)* Current Voltage - 13.3 (monitored)
- 8)* Power Off Threshold Voltage - Set to 8VDC
- 9)* Power On threshold Voltage - Set to 9VDC
Motor
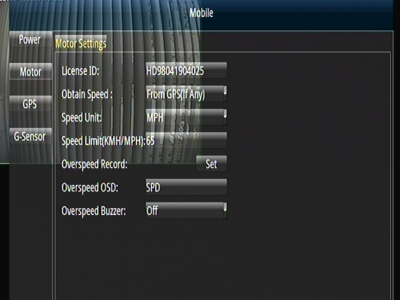
- 1)* License ID - ENTER S/N
- 2)* Obtain Speed - DEFAULT(From GPS(If any))
- 3)* Speed Unit - MPH
- 4)* Speed Limit - 65
- 5)* Overspeed Record - DEFAULT
- 6)* Overspeed OSD - SPD
- 7)* Overspeed buzzer - Off
Apply, Return Buttons not shown in AMCAP
GPS
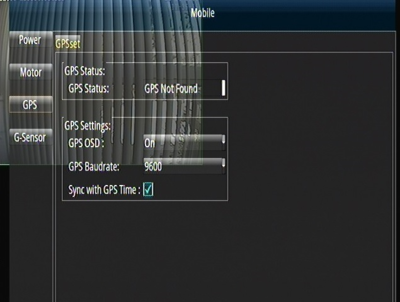
- 1)* GPS Status - DEFAULT(Monitored, Not Found)
- 2)* GPS OSD - DEFAULT(On)
- 3)* GPS Baudrate - DEFAULT(9600)
- 4)* Sync with GPS time - Check
Apply, Return Buttons not shown in AMCAP
G-Sensor
- 1)* Instant Value - DEFAULT(Monitored)
- 2)* Initial Offset - DEFAULT(0,0,-1 TBD)
- 3)* Alarm Threshold - DEFAULT(0,0,0 TBD)
- 4)* Alarm Buzzer - DEFAULT(TBD)
- 5)* Alarm Record - DEFAULT(TBD)
Correction, Refresh, Apply, Return Buttons not shown in AMCAP
Network
- 3G/4G
- 1)* 3G/4G Status - DEFAULT(Monitored,Module Not Found)
- 2)* Dial Enable - DEFAULT(Check))
- 3)* Dial Number - DEFAULT(Blank)
- 4)* APN - DEFAULT(Blank)
- 5)* Username - DEFAULT(Blank)
- 6)* Password - DEFAULT(Blank)
Apply, Return Buttons not shown in AMCAP
- WiFi
- 1)* Enable - DEFAULT(Uncheck)
- 2)* Mode - DEFAULT(Do not Select)
- 3)* WiFi Status - Monitored, Module not found
- 4)* WiFi IP - DEFAULT(Blank)
- 5)* SSID - DEFAULT(Blank)
- 6)* WiFi List - DEFAULT(Blank)
- 7)* AP Scan - DEFAULT
- 8)* Signal Strength - DEFAULT
- 9)* Password - DEFAULT
- 10)* IP - DEFAULT(192.168.33.1 TBD)
- 11)* AP SSID - DEFAULT(HDVR, TBD)
- 12)* Password - DEFAULT
Apply, Refresh, Return Buttons not shown in AMCAP
- LAN
- 1)* DHCP - DEFAULT(Uncheck)
- 2)* IP - DEFAULT(192.168.0.220)
- 3)* Subnet Mask Status - DEFAULT(255.255.255.0)
- 4)* Default Gateway - DEFAULT(192.168.0.1)
Apply, Return Buttons not shown in AMCAP
- Server Settings
- 1)* Server Status - DEFAULT(Monitored, Disconnected)
- 2)* Client DVR ID - DEFAULT(S/N)
- 3)* Server - DEFAULT(192.168.0.128)
- 4)* Server Port - DEFAULT(10000)
- 5)* Channel - DEFAULT(1)
- 6)* Resolution - DEFAULT(640x360)
- 7)* Bitrate(Kbps) - DEFAULT(100)
- 8)* Framerate(1-30) - DEFAULT(10)
- 9)* Talkback Channel- DEFAULT(1)
Apply, Return Buttons not shown in AMCAP
- GPS Server Settings
- 1)* GPS Network ID - DEFAULT(S/N)
- 2)* GPS Server IP - DEFAULT
- 3)* GPS Server Port - DEFAULT(0)
- 4)* GPS Server Status - DEFAULT(Monitored,Disconnected)
Apply, Return Buttons not shown in AMCAP
Setting
- Basic Settings
- 1)* Toolbartip Bar Show - Enable(Check)
- 2)* DVR Time Display - Enable(Check)
- 3)* USB Auto Update - DEFAULT(Not checked)
- 4)* Language Mode - English
- 5)* GUI Skin - Black
- 6)* Transparent - Translucent
- 7)* AHD Camera Num - 4
Apply, Return Buttons not shown in AMCAP
- Alarm Settings
- 1)* Alarm - Sensor1
- 2)* Trigger Level/Mode - High
- 3)* Alarm Record - Set
- 4)* Alarm Snapshot - Set
- 5)* Alarm OSD - DEFAULT(BACKING)
- 6)* Alarm Buzzer - DEFAULT(OFF)
- 7)* Switch View - DEFAULT(2) - this takes Channel 2 Full Screen when wire in engaged with 12VDC
- 8)* Switch View Delay(Seconds) - 0
- 9)* Pre-record Time(Seconds) - 20
- 10)* Post-record Time(Seconds) - 15
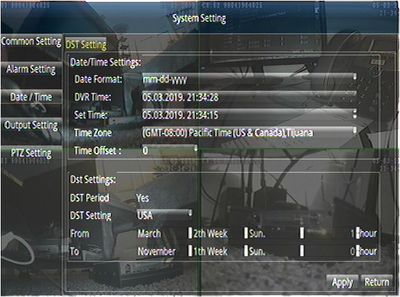
- DST Settings
- 1)* Date Format- mm-dd-yyyy
- 2)* DVR Time - DEFAULT
NOTE: set Time Zone (US Eastern, Central, Mountain or Pacific) and DST USA first before Actual Client Time;
- 3)* Set Time - DEFAULT(Input current date and time)
- 4)* Time Zone - (GMT-05:00) Eastern Time.
- 5)* Time Offset - 0
- 6)* DST Period - Yes
- 7)* DST Setting - USA
- 8)* From - DEFAULT(User Input)
- 9)* To - DEFAULT(User Input)
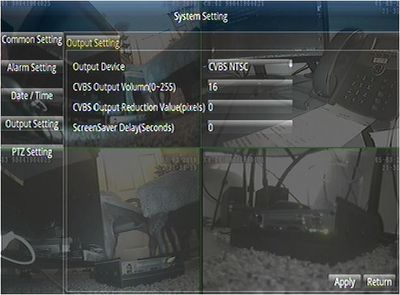
- Output Setting
- 1)* Output Device - CVBS NTSC
NOTE: this will set by the Config File installation to NTSC so you can use AMCAP and USB Video Adapter
DO NOT use PAL in the US with 7" US Monitors
- 2)* CVBS Output Volume(0-255) - 16 ?
- 3)* CVBS Output Reduction Value - 0
- 4)* ScreenSaver Delay(Seconds) - 0
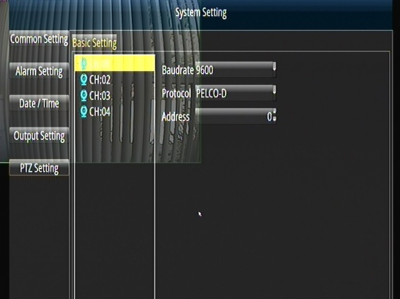
- PTZ Settings
Apply the following to all four channels.
- 1)* CH:01 - Baudrate 9600
- 2)* CH:02 - Protocol PELCO-D
- 3)* CH:03 - Address 0
- 4)* CH:04 - DEFAULT
Copy to, apply, Return Buttons not shown in AMCAP
File
- File
No Setup needed.
System
- System Info
- 1)* DVR App Version - V206-2019/4/12-10:11::12-4
- 2)* DVR MCU Version - 08/04/2018-0d
- 3)* Camera1 Version - NTSC
Apply, Return Buttons not shown in AMCAP
- System Upgrade
- 1)* Current Version - V206-2019/4/12-10:11::12-4
- Confirm Current Version is the latest version; if not, browse available resources for upgrade?
- 2)* Upgrade file - DEFAULT(Browse)
Upgrade, Return Buttons not shown in AMCAP
Click the link below for D4M Idrive Configuration Downloading and Installation
Configuration - Download and Install Idrive Client Configuration
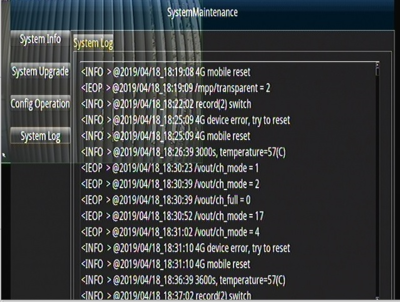
- System Log
- 1)* DISPLAYS LOG - DEFAULT(Refresh only if necessary)
Refresh, Return Buttons not shown in AMCAP
