Difference between revisions of "ICV D8 Initial Configuration and Setup"
(→Setup) |
|||
| Line 5: | Line 5: | ||
===Setup=== | ===Setup=== | ||
| − | Install the Hard Drive | + | ====Install the Hard Drive==== |
| − | + | *Remove tray | |
| − | Plug in the power supply harness <span style="color: red"> '''Power connector's plastic is keyed the same as Easystorage(D4)as well as the VisionMaster D8 and but the pinouts are different!''' | + | *secure hard drive with the 4 supplied screws |
| + | |||
| + | *Insert the tray back into the DVR and turn the DVR on with the Key | ||
| + | |||
| + | *Format the hard drive Tools > Format (an unformatted HDD will show 0MB capacity) | ||
| + | |||
| + | *DVR reboots | ||
| + | |||
| + | ====Install Batteries (not included)in the remote control==== | ||
| + | |||
| + | *requires 2 AAA batteries | ||
| + | |||
| + | ====Plug in the power supply harness==== | ||
| + | |||
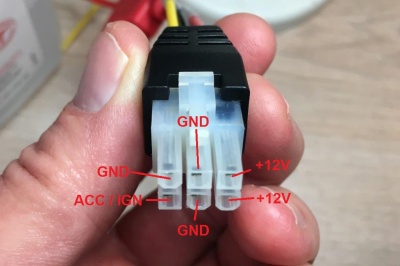
| + | <span style="color: red"> '''Power connector's plastic is keyed the same as Easystorage(D4)as well as the VisionMaster D8 and but the pinouts are different!''' | ||
[[File:icv8_power_conn.jpg|400px|]] | [[File:icv8_power_conn.jpg|400px|]] | ||
| − | Connect the monitor by ?? | + | ====Connect the monitor by ??==== |
| + | |||
| + | |||
<br><br> | <br><br> | ||
| − | + | ===Basic Setup=== | |
Power up the device | Power up the device | ||
| Line 29: | Line 45: | ||
<br><br> | <br><br> | ||
| − | + | ===General Settings=== | |
<br><br> | <br><br> | ||
| − | + | ===Channel Mode=== | |
<br><br> | <br><br> | ||
| − | + | ===Record Settings=== | |
<br><br> | <br><br> | ||
| − | + | ===Alarm Settings=== | |
<br><br> | <br><br> | ||
| − | + | ===Tools Settings=== | |
<br><br> | <br><br> | ||
| − | + | ===Peripherals Settings=== | |
<br><br> | <br><br> | ||
Revision as of 17:20, 18 April 2017
ICARvisions
Setup
Install the Hard Drive
- Remove tray
- secure hard drive with the 4 supplied screws
- Insert the tray back into the DVR and turn the DVR on with the Key
- Format the hard drive Tools > Format (an unformatted HDD will show 0MB capacity)
- DVR reboots
Install Batteries (not included)in the remote control
- requires 2 AAA batteries
Plug in the power supply harness
Power connector's plastic is keyed the same as Easystorage(D4)as well as the VisionMaster D8 and but the pinouts are different!
Connect the monitor by ??
Basic Setup
Power up the device
Press the "Login" Button on the remote
Admin user default passwd 888888
The setup menu has 8 options
General Settings
Channel Mode
Record Settings
Alarm Settings
Tools Settings
Peripherals Settings
Search
System Info
Firmware upgrade with USB Stick
1.Device must switch off power disconnect the power source before upgrading;
2.Extract the rar file, copy the .crc file to a USB flash memory FAT32 format, insert the flash memory to the MDVR USB port.
3.Power on the MDVR(connect the power), it will update automatically once the MDVR starts up. and the monitor will display "upgrading..."
4.Device will automatically restart when the upgrade is complete.
Attention: Upgrade will need about 3-5 minutes. Make sure power connecting all the time during upgrading
Firmware upgrade with SD Card
1.Device must switch off power;
2.Decompress the rar file, copy the .crc file to a SD card, and insert the SD card to the MDVR SD card port.
3.Power on the MDVR, it will update automatically once the MDVR starts up. and the monitor will display "upgrading..."
4.Device will automatically restart when the upgrade is complete.
Note: upgrade will need about 3 minutes. Make sure power connecting all the time during upgrading.
