Difference between revisions of "Fleet Manager"
| (2 intermediate revisions by the same user not shown) | |||
| Line 9: | Line 9: | ||
==Technical Development== | ==Technical Development== | ||
| − | To get to Fleet Manager | + | To get to Fleet Manager just go to Configure -> Face Recognition |
You can: | You can: | ||
| Line 102: | Line 102: | ||
'''Default Settings''' will be: | '''Default Settings''' will be: | ||
*General setup: No sleep period, sound enabled, inside camera enabled, G-force Threshold Optimal, Overdue for more than 7 days; | *General setup: No sleep period, sound enabled, inside camera enabled, G-force Threshold Optimal, Overdue for more than 7 days; | ||
| − | *Events Settings | + | *Events Settings -> Length: 8 seconds for almost all the events, except for: shock – 16 seconds, continuous recording – 2 minutes, blue wire / panic – 20 seconds; |
| − | *Events Settings | + | *Events Settings -> Display ON for almost all the events, except for: periodic, speed and face recognition; |
*Continuous recording: video storage - 20%, video length – 2 minutes and it cannot be changed | *Continuous recording: video storage - 20%, video length – 2 minutes and it cannot be changed | ||
*Periodic: trigger every 60 minutes; | *Periodic: trigger every 60 minutes; | ||
| Line 315: | Line 315: | ||
'''The clients can not take actions in here. They can view the services, but the activation is still going to happen in Admin Center, by us.''' | '''The clients can not take actions in here. They can view the services, but the activation is still going to happen in Admin Center, by us.''' | ||
| + | |||
| + | =Profile Settings= | ||
| + | |||
| + | ==Concept description== | ||
| + | |||
| + | This module refers to a set of settings that you can create, depending on your company’s needs and use later on, when you want to configure multiple vehicles with the same type of settings. | ||
| + | You can create a profile of settings for your location, for example, so all your vehicles from that location have the same settings, without making the same configuration for each vehicle -> just assign the profile accordingly. | ||
| + | |||
| + | ==Technical development== | ||
| + | |||
| + | You can: | ||
| + | |||
| + | *Create settings profile for your company / location / department | ||
| + | *Move one profile from one entity to another (from company to location, from location to department etc.) | ||
| + | |||
| + | You cannot: | ||
| + | |||
| + | *Edit Default profile (default settings established by idrive with thresholds based on your vehicle’s category); | ||
| + | *Edit an already created profile settings – just the name and the category. If you want to get rid of the profile, you just can delete it; | ||
| + | *See the name of the assigned profile to vehicle in vehicle’s view page, just the set of settings related to it. | ||
| + | |||
| + | ==Design== | ||
| + | |||
| + | It looks like configure page, due to the fact that it contains the same settings as in configure. | ||
| + | |||
| + | Additional, it contains: | ||
| + | |||
| + | [[File:EditProfile_details_ProfileSettings.jpg]] | ||
| + | |||
| + | You can attach a profile to multiple locations / departments. If you select category – company, the only option is the company of the user logged in. (if you are logged in as client / logged in as iris@idriveglobal.com and select another company from the drop-down, the option will be the company’s name you try to change settings to). | ||
| + | |||
| + | '''Add new profile''' | ||
| + | |||
| + | Go to Configure -> Profile Settings -> Add profile | ||
| + | |||
| + | [[File:Profile_settings.jpg]] | ||
| + | |||
| + | In the list, you will always find a default profile (with the default settings). It cannot be deleted / modified. | ||
| + | |||
| + | Default Settings will be: | ||
| + | |||
| + | *General setup: 30 min sleep period, sound enabled, inside camera enabled, G-force Threshold Optimal, Overdue for more than 7 days; | ||
| + | *Events Settings Length: 8 seconds for almost all the events, except for: shock – 24 seconds, continuous recording – 2 minutes, blue wire / panic – 20 seconds; | ||
| + | *Events Settings Display ON for almost all the events, except for periodic, speed and face recognition; | ||
| + | *Periodic Event: trigger disabled, trigger every 10min; | ||
| + | *Continuous recording: video storage - 20%, video length – 2 minutes and it cannot be changed; | ||
| + | *Periodic: trigger every 60 minutes; | ||
| + | *Face recognition: trigger disabled, display off; | ||
| + | *Safe Distance Warning: trigger disabled, display on; | ||
| + | *Distraction Event: trigger disabled, display on, Buzzer off; | ||
| + | *Seatbelt: trigger disabled, display on; | ||
| + | *Buzzer: disabled; | ||
| + | *Speed: Trigger after - 20 seconds, trigger speed – 55 mi/h, trigger super speed – 81 mi/h; | ||
| + | *For cellular transferred events, default length is 8 seconds (only when transferred via wi-fi will have the length configured from fleet manager. | ||
| + | |||
| + | After you click on ‘Add profile’, it will take you to the same interface as configure (in which you can change settings as you wish), with additional info: | ||
| + | |||
| + | [[File:EditProfile_details_ProfileSettings.jpg]] | ||
| + | |||
| + | After you hit ‘Save’, your profile will appear in the list and it will be visible for those vehicles assigned to locations / departments / company you selected under the ‘category’ label. | ||
| + | |||
| + | '''Edit profile''' | ||
| + | |||
| + | If you click on ‘edit’, only ‘Details’ section will be editable. So, on edit, you can just move a profile to one entity to another | ||
| + | (from company to location, from location to department etc.) and the name of the profile. | ||
| + | |||
| + | [[File:EditProfile_details_ProfileSettings.jpg]] | ||
| + | |||
| + | The reason why these settings cannot be changed after the profile has been created is that, when you assign a profile to a vehicle and the vehicle gets the settings, changing the profile settings will not automatically change the settings on the vehicle. It will have the old settings and the profile will have the new settings and it will be no longer accurate. | ||
| + | You just can delete the profile entirely. | ||
| + | |||
| + | '''Assign profile to a vehicle''' | ||
| + | |||
| + | Go to Vehicle -> Configure -> Edit -> Select Profile from drop-down. | ||
| + | |||
| + | [[File:Assign_profile.jpg]] | ||
| + | |||
| + | After you select a profile from the list, the page will be populated with the settings according to the profile. | ||
| + | Hit ‘Save’ and that’s it. | ||
Latest revision as of 10:05, 26 February 2020
Vehicles and Personnel
Concept Description
- A cloud-based platform that let you manage your fleet and configure idrive system;
- A Control Center on cloud, that perfectly synchronizes with Control Center from desktop;
- It contains these modules: Vehicles and Personnel.
Technical Development
To get to Fleet Manager just go to Configure -> Face Recognition You can:
- Add vehicles and personnel in the system;
- Assign device to a vehicle and configure the settings;
- See for each driver the Assigned Face Recognition Profiles (if the client has Face Recognition feature).
Vehicles List
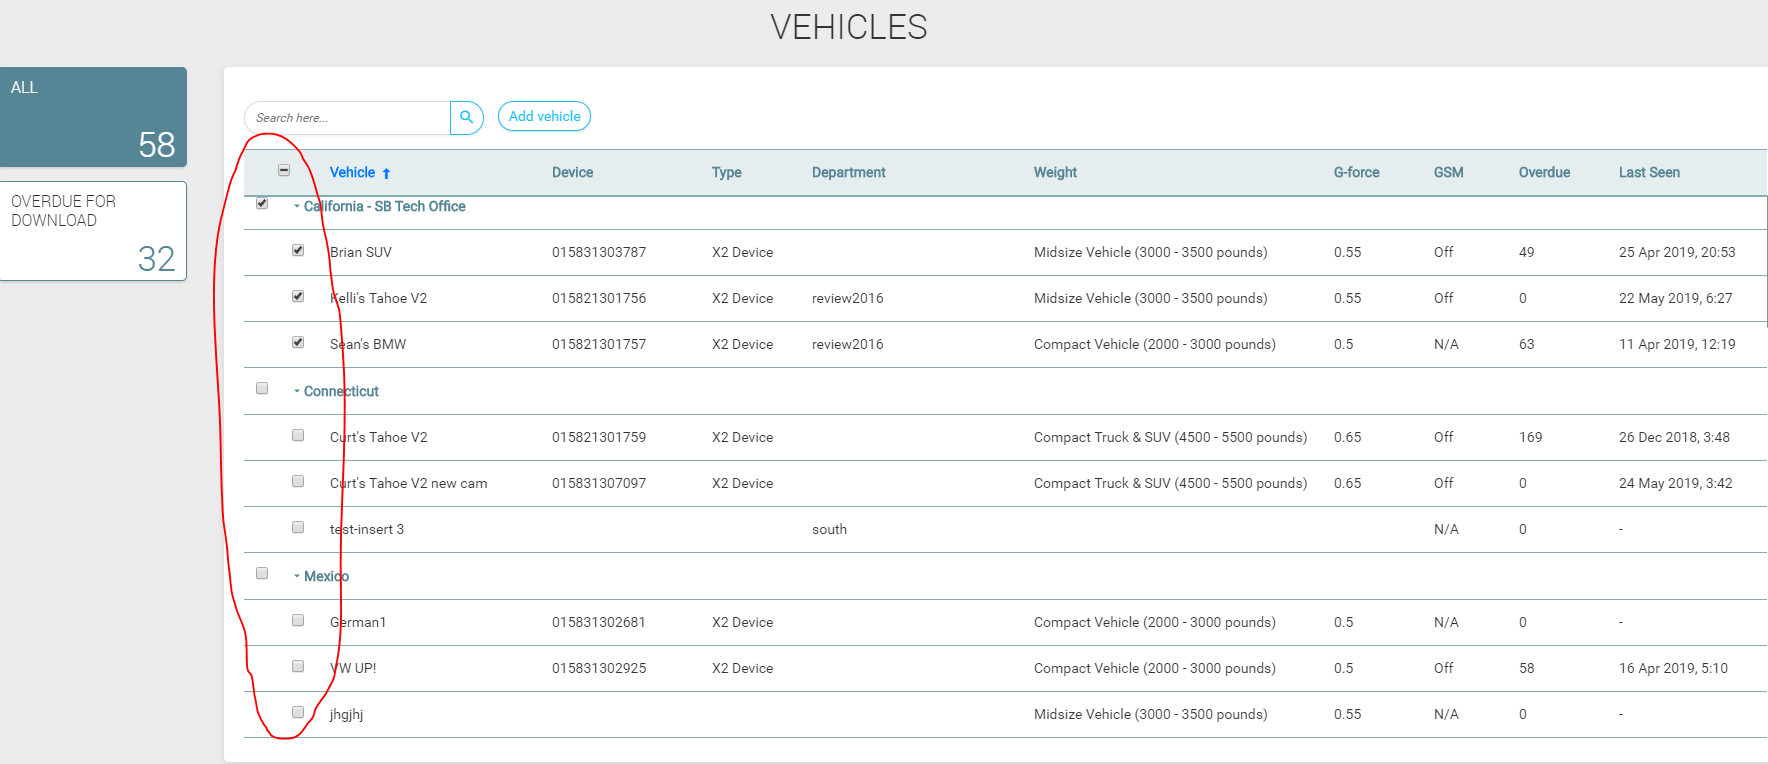
- You can see that vehicles are grouped by locations;
- The list is ordered descended by last connection – last seen column (the last time the device connected to server), but you can eventually sort the list by every column;
- The checkboxes are not functionable yet. They can be usable when we will implement Mass Edit feature – so we can edit multiple vehicles (details, settings etc.);
- Search bar can be used to search by any column;
- You can add a new vehicle by clicking ‘Add vehicle’ button;
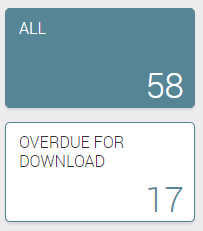
- There are, for now, just 2 filters for the list: All and Overdue for Download.
Vehicles (Add/Edit/Delete)
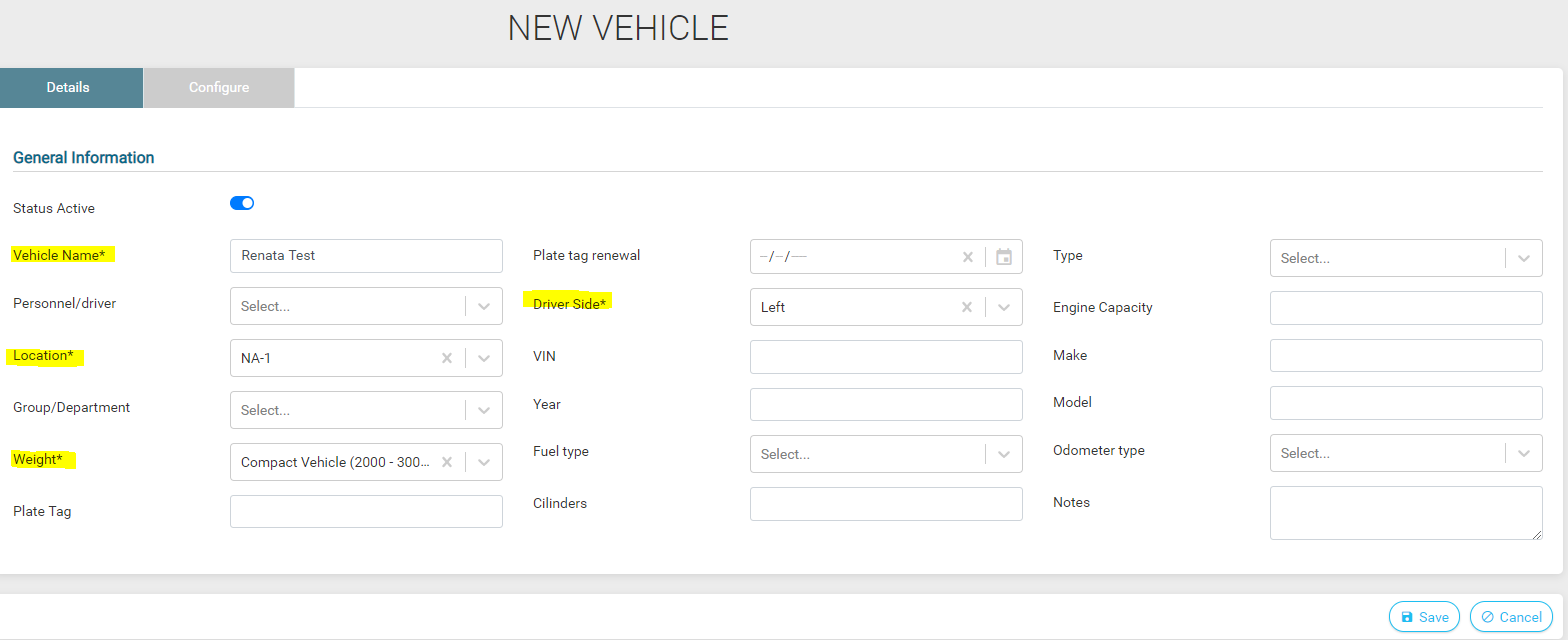
- We split vehicle’s profile into 2 parts: DETAILS (in which you can add general information about the vehicle: name, location, vehicle’s specifications etc.) and CONFIGURE (in which you can configure all the settings).
Details
- To create a new vehicle, you need to fill in 4 mandatory fields: Vehicle Name, Location, Weight and Driver Side. After you click save, it will get you to the second part -> Configure;
- Vehicle’s status: Active / Inactive (Inactive = Out of service). If you delete a vehicle, it won’t appear anymore in the list;
- Create new group / department by starting to type a new name in the dropdown;
- Or you just select from the drop-down if there are any departments created;
- If you delete a vehicle, it will not appear in the lists anymore;
- It can be assigned only 1 driver to a vehicle;
Configure
- There will be no Devices List page -> all devices settings (events settings, g-force thresholds will be configurable from vehicle’s page and assigned per vehicle). So, the assigned device will have the same settings as the vehicle, not otherwise;
- If you created a new vehicle and you want to assign a device, go to Configure tab and click Edit;
- The page will be empty if you don’t have any device assigned -> there are no settings to show;
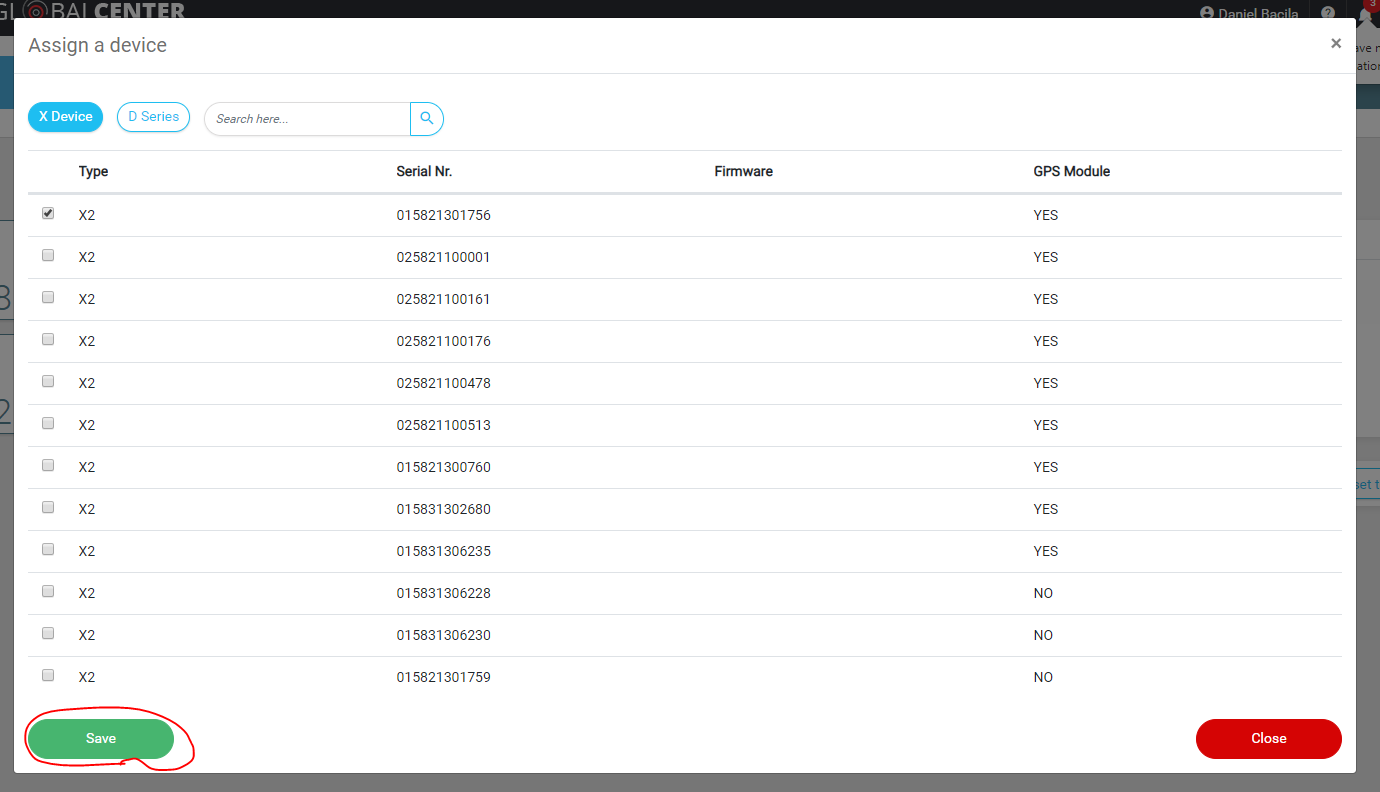
- Click Assign device and it will appear a pop-up with a list of available (unassigned) X devices and D series (if necessary). Select a device and click Save;
- After that, in the interface will appear a DEFAULT set / profile of settings (with optimal thresholds and settings for the vehicle’s category);
Major Sections
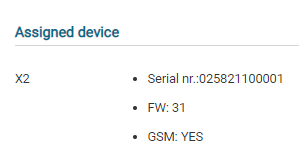
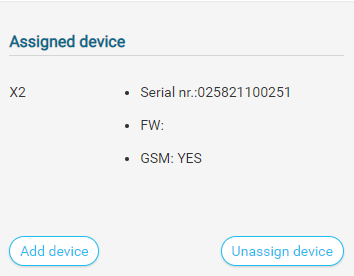
Assigned Device
General info about the assigned device - it cannot be modified.
- If you want to unassign a device, click ‘Edit’ button and then ‘Unassign device’. Or you can add another device, but it will be possible just DVRs, if you already have assigned an X Device.
General Setup
- Transfer threshold period will be the same for cellular only devices. If a client has cellular only, his vehicles will be overdue ‘after 7 days’, only if he doesn’t modify otherwise.
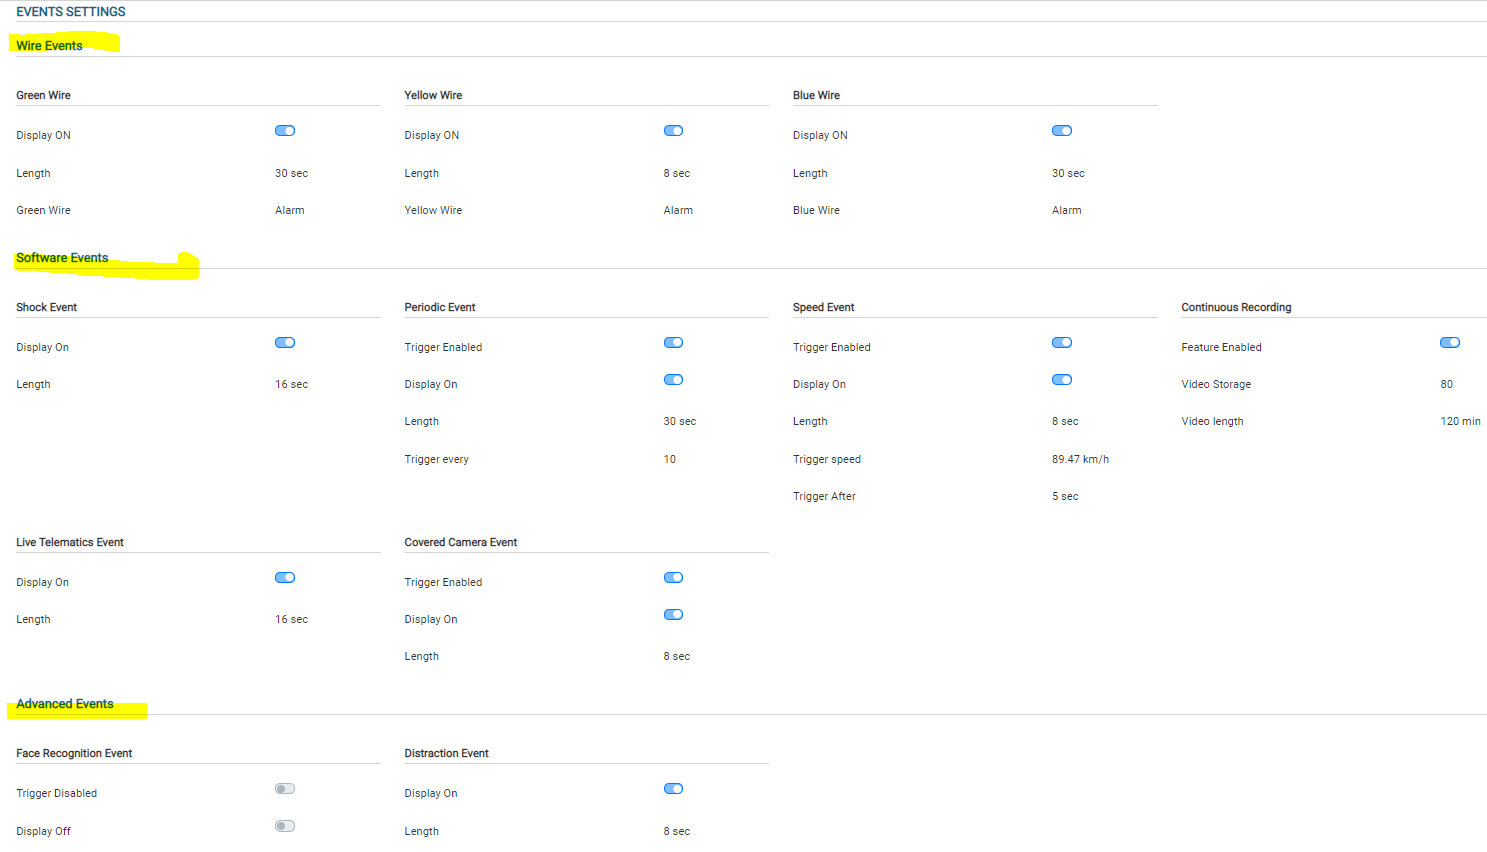
Events Settings
We grouped this section in 3 parts: wire events, software events and advanced events -> licensed based events: face recognition ev, distraction ev, sdw etc.).
- Display ON/OFF has a double function: Led ON/OFF for X2 devices and Display ON/OFF for X3 devices;
- Once you click save, the device will take over the vehicle’s settings;
- Whenever you Unassign a device, the settings you already configured will still be saved on the vehicle -> if you assign another device on the same vehicle, that device will take over the last settings configured on that vehicle;
- Advanced Events – this section will appear only if you have a license assigned on vehicle (face recognition / sdw / dad / seat belt license);
- When you edit a vehicle, there is also a ‘Reset to Default Settings’ button, that you can use to erase all your changes and show the default settings for that vehicle’s category:
Default Settings will be:
- General setup: No sleep period, sound enabled, inside camera enabled, G-force Threshold Optimal, Overdue for more than 7 days;
- Events Settings -> Length: 8 seconds for almost all the events, except for: shock – 16 seconds, continuous recording – 2 minutes, blue wire / panic – 20 seconds;
- Events Settings -> Display ON for almost all the events, except for: periodic, speed and face recognition;
- Continuous recording: video storage - 20%, video length – 2 minutes and it cannot be changed
- Periodic: trigger every 60 minutes;
- Face recognition: trigger disabled;
- Speed: Trigger after - 20 seconds, trigger speed – 55 mi/h, trigger super speed – 81 mi/h.
Personnel List
- The list is ordered alphabetically, first by location and then by Driver’s First Name (but you can also sort by each column);
- When a driver doesn’t have a location assigned, it will appear in a ‘No Location’ drop-down, at the bottom of the list.
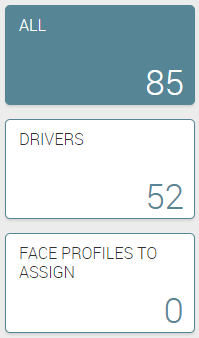
- There are only 2 filters for Personnel list: All, Drivers. The last one, Face Profiles to Assign are just for those clients that have Face Recognition feature;
- Face Profiles to Assign will take you to the old Face Recognition Driver Assignment Interface:
Personnel (Add/Edit/Delete)
- We grouped Personnel’s profile into 3 sections: DETAILS (in which you can add general information about the driver/ personnel), USER ACCOUNT (in which you can create a user for the personnel and define the user’s account type);
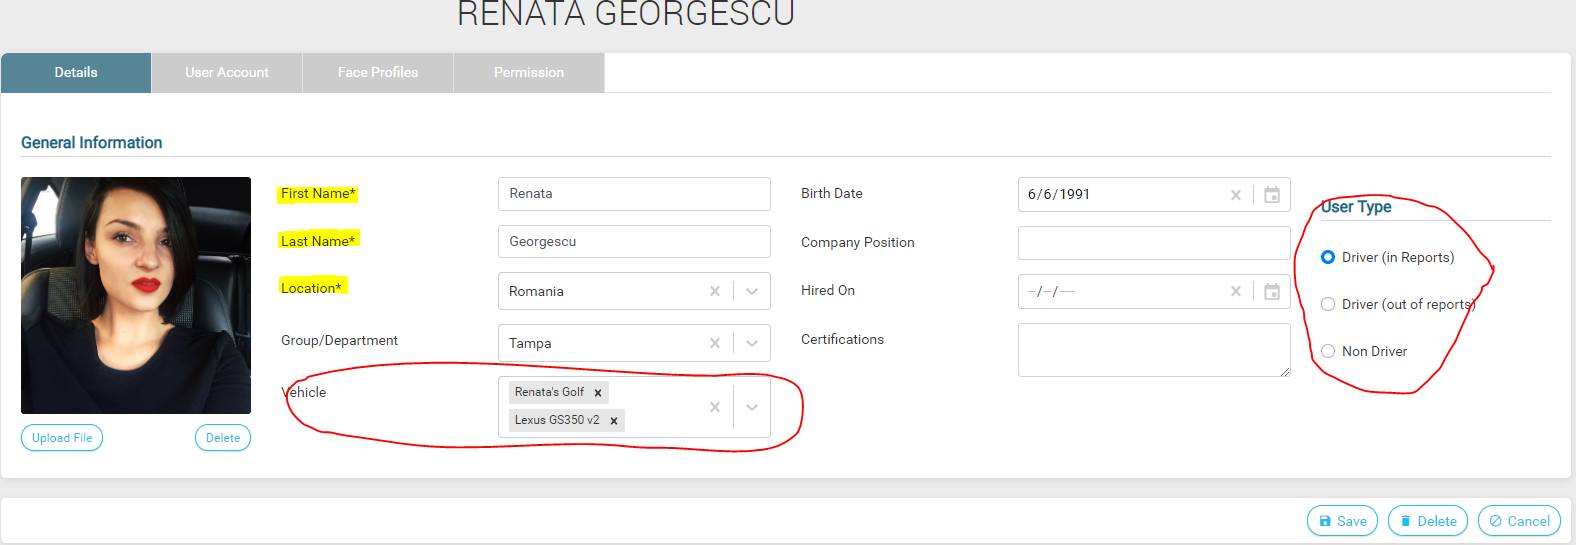
- In DETAILS, there are 3 mandatory types of input: First Name, Last Name and Location. After you click ‘Save’, it will get you to next section, ‘User Account’;
- You can assign multiple vehicles on a driver;
- User Type section you can choose for your driver to be analyzed in reports or not;
- In USER ACCOUNT you can establish the type of account the user will have, therefore his / her permissions;
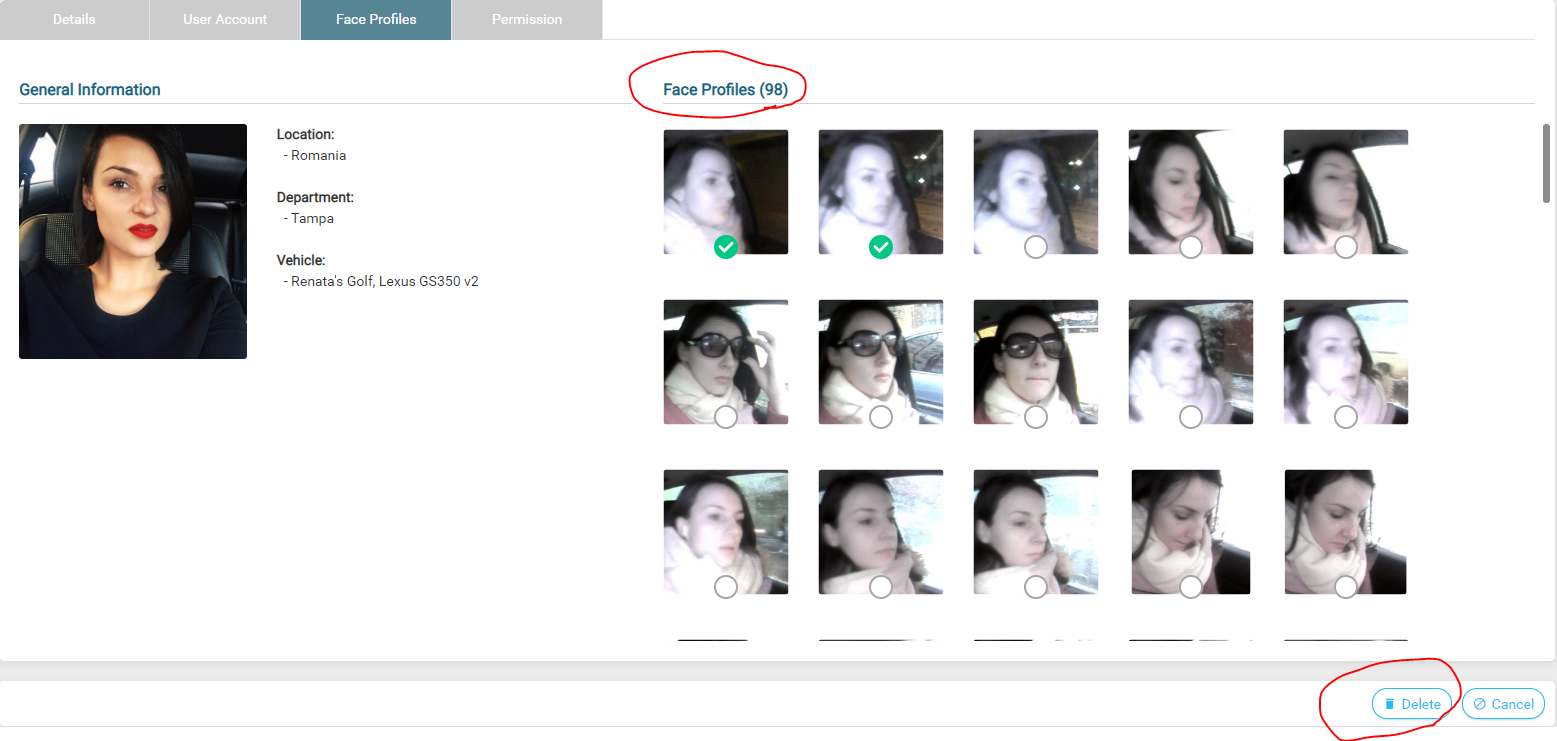
- In Face PROFILES, you can see those Face Recognition Profiles that where already assigned for this driver;
- You can see the total number of the profiles and you can delete them you have permission to write.
Alerts
Concept Description
- This is the same module that you can find in GPS Tracking -> Operations -> Alert Type
- It contains not only Geofence / DVR / Possible Accident Alerts, you can also add Event Alerts (for each type of event that the vehicle has configured)
Alert types:
- Geofence:
   - Inside area;
   - Outside area.
- DVR: (only if the client has DVRs)
   - DVR camera disconnected;
   - DVR not recording;
   - DVR camera reconnected.
- Possible Accident
- Events:
   - Shock;
   - Panic;
   - Speed;
   - Super Speed;
   - SDW;
   - Fatigue/Distract;
   - Face Recognized;
   - Live Telematics;
   - Covered Camera;
   - Seatbelt;
   - + other types of events that the vehicle has enabled (wire events etc.).
- If you create an alert for Face Recognized event and the vehicle assigned doesn’t have enabled this event, even though the alert was created and added an email notification, the users will not receive the email -> no event = no alert.
Technical Develepment
You can:
- Create alerts for one or more vehicles from the same place;
- Delete multiple alerts based on permissions the logged user has (you need to have full permission / admin).
Alerts List
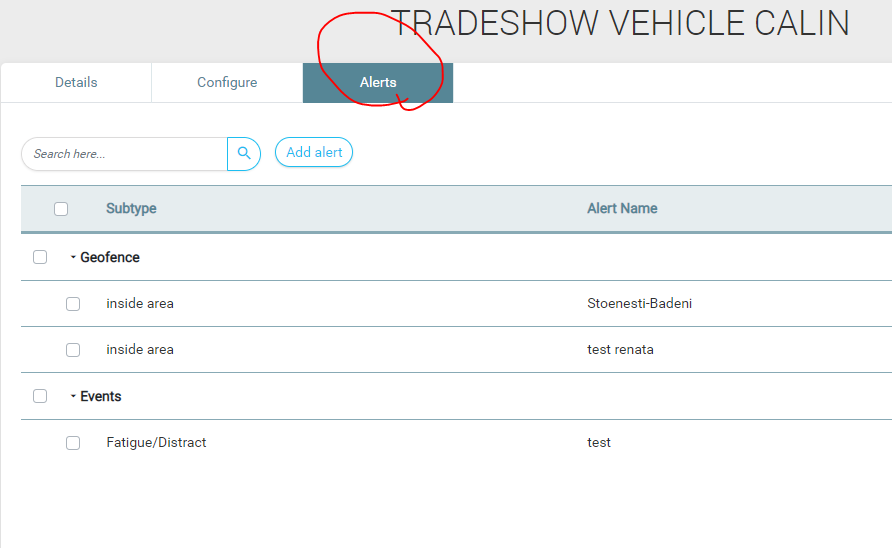
- You can find the list going to a vehicle Alerts (to see alerts for a specific vehicle);
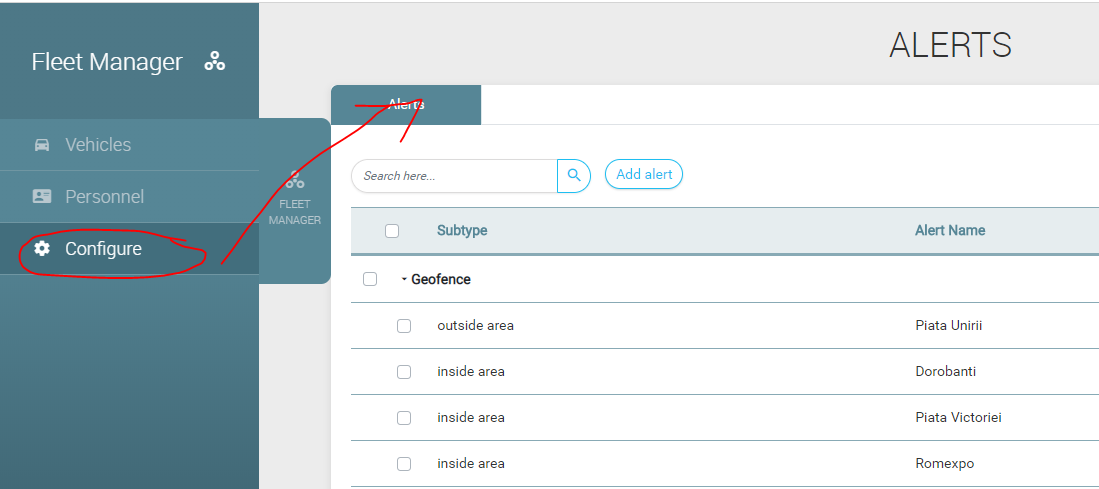
- Or by going to Configure -> Alerts (to see all alerts);
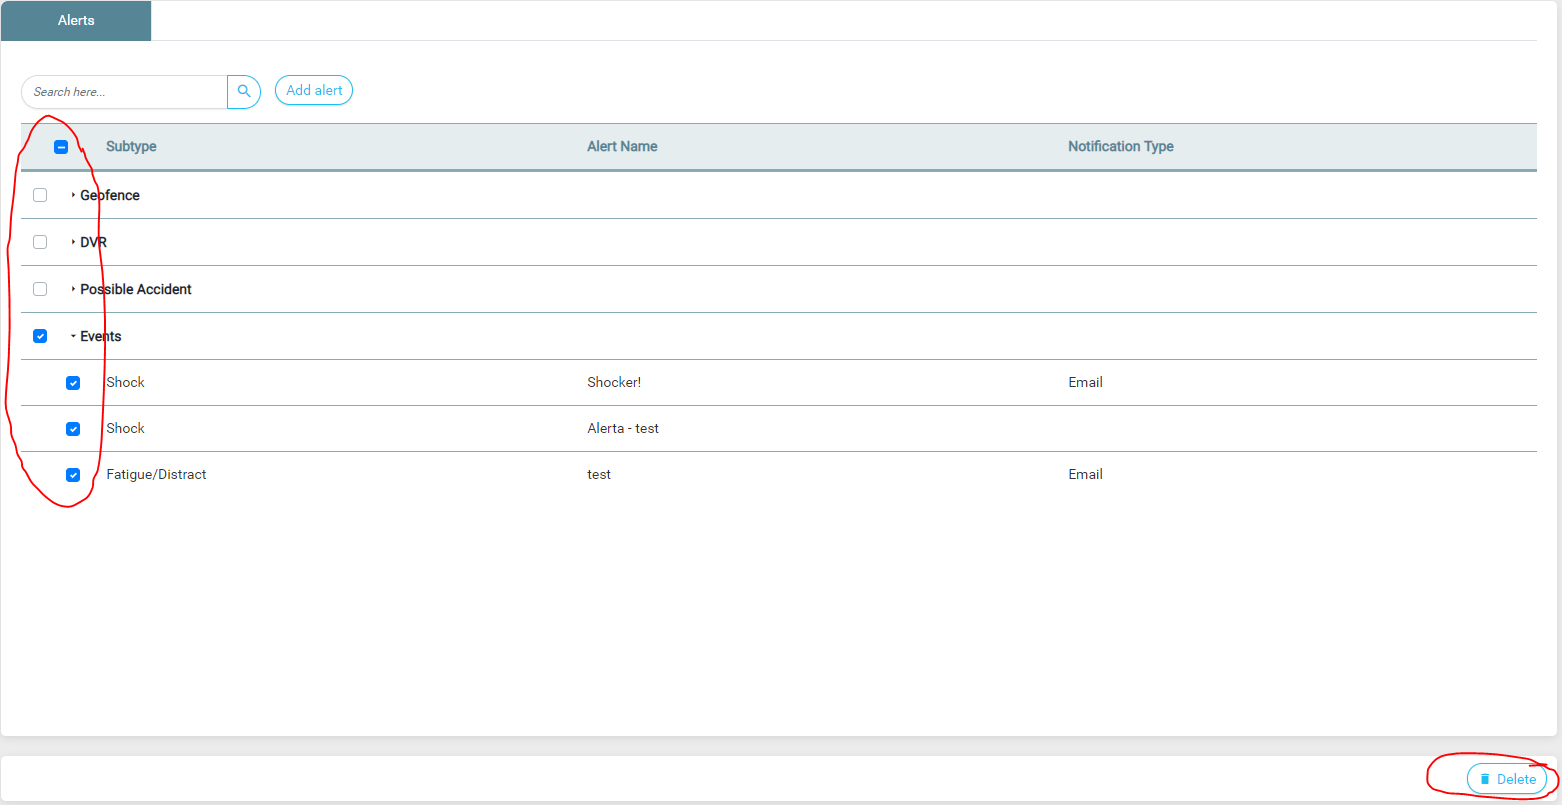
- You can delete all alerts from a single type, for example Events, or all alerts for all types (you need to have full permissions for this).
Alert View/Edit
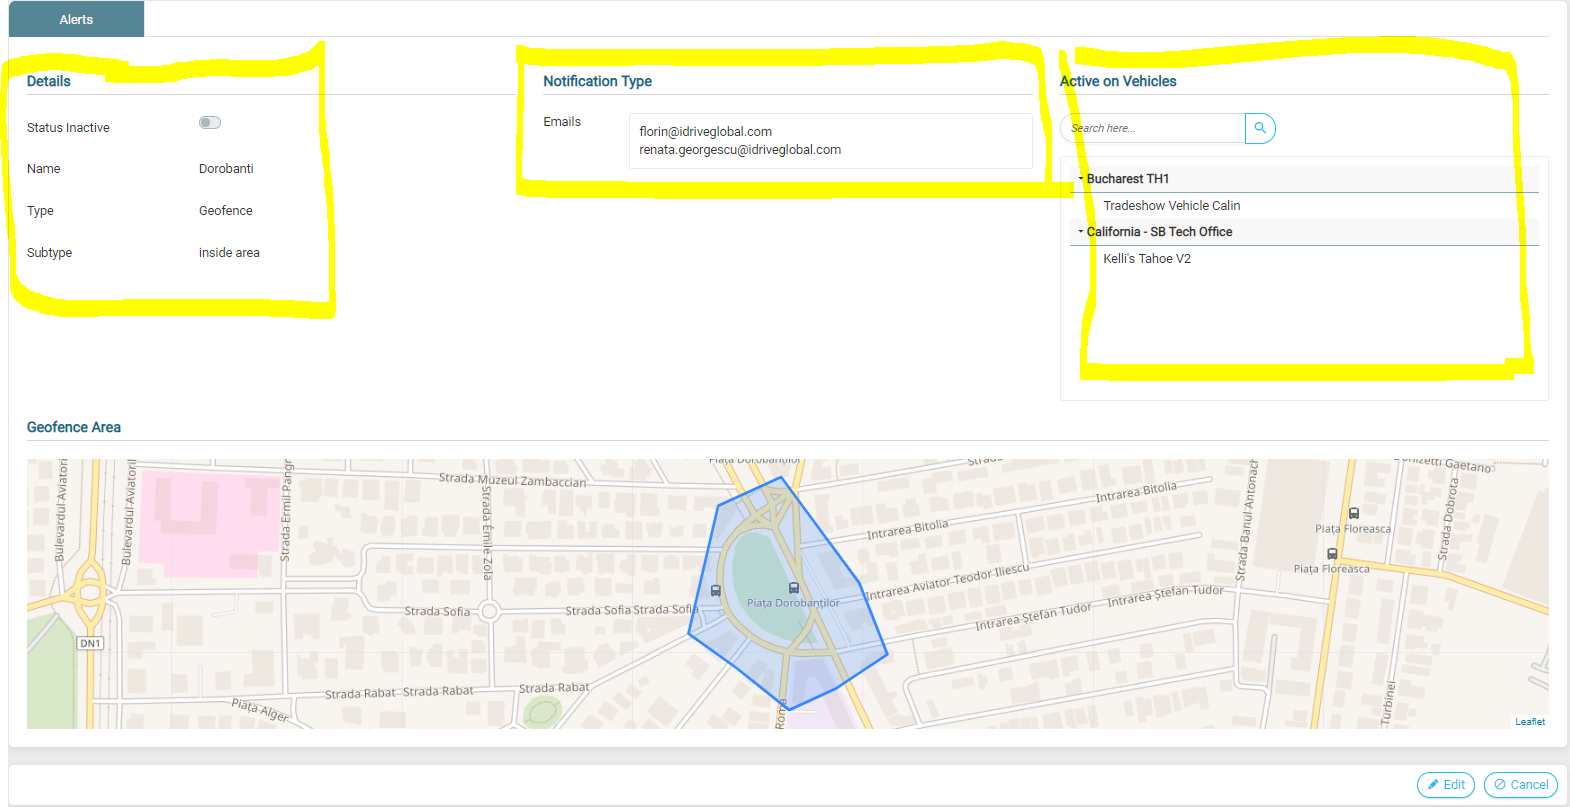
- From Configure -> Alerts -> Select one alert, we have the alert view (3 sections with details about the alert, notification type and the vehicles that were added this alert on + geofence area, if there is the case);
- For now, there is just one notification type: email;
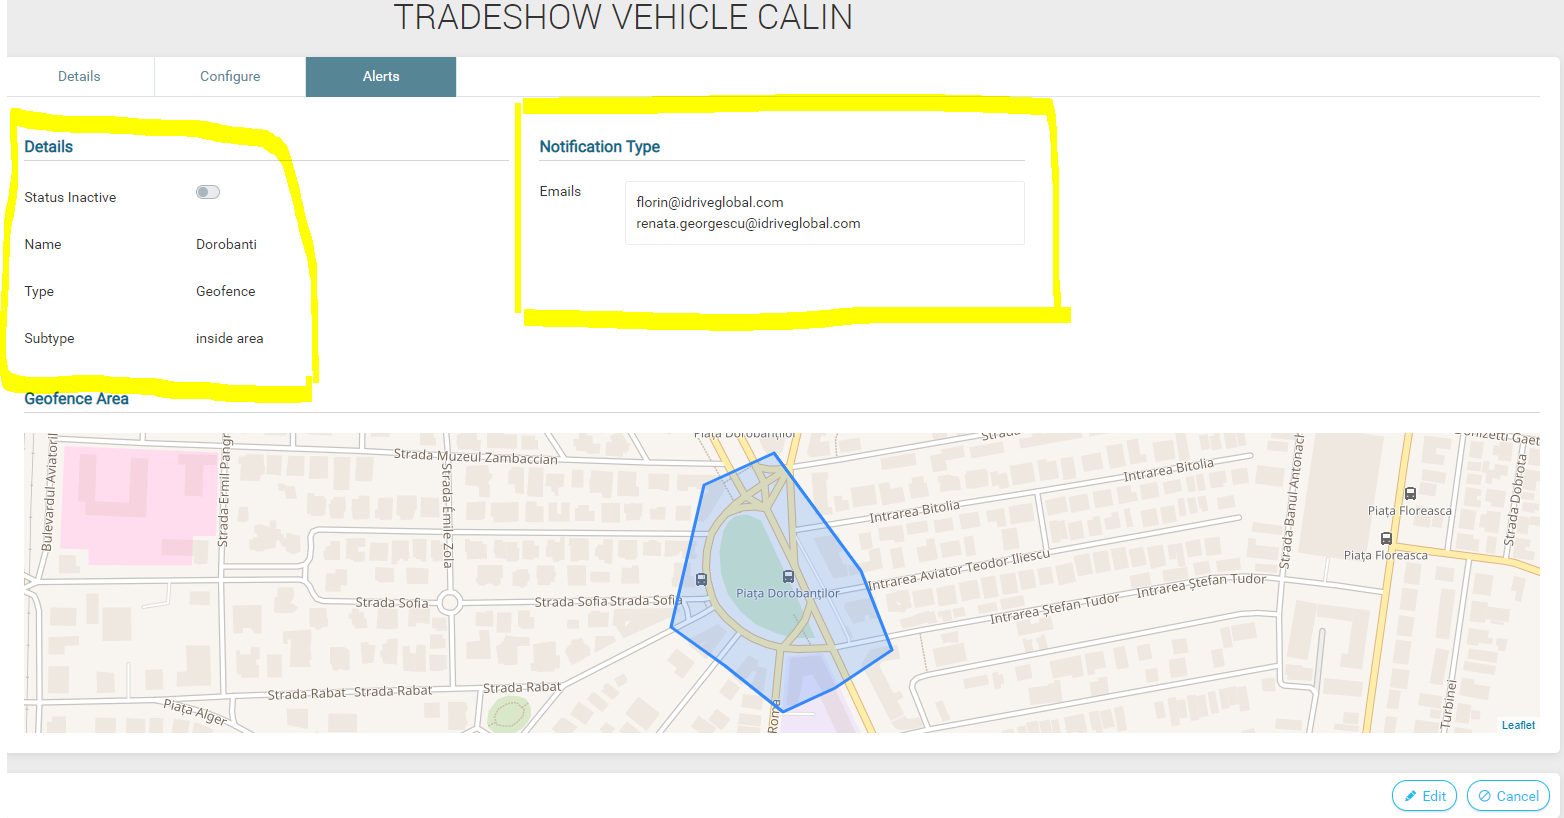
- From Vehicles -> click on a vehicle -> Alerts list -> click on an alert, you can see the alert for that specific vehicle;
- There are only 2 sections: Details and Notification type (+ geofence area, when there is a geofence alert);
- You can edit every input from alerts, EXCEPT for alert type. Ex: if you want to edit a geofence alert, you can not change it from Geofence to Possible Accident, you can only change if there is an inside or outside area;
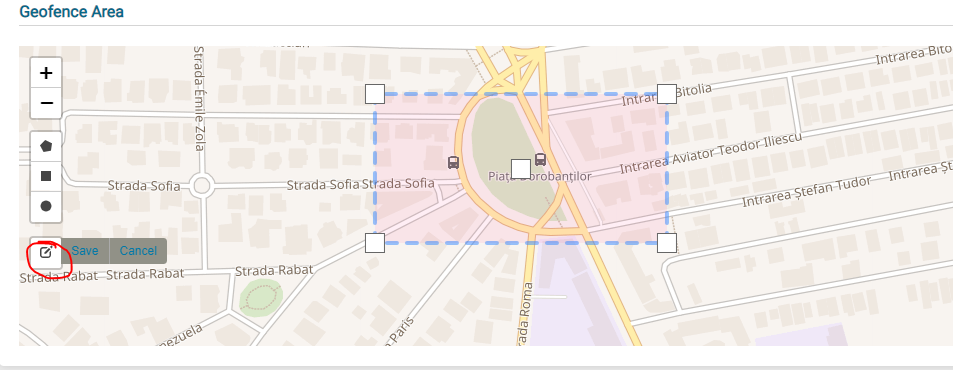
- Geofence area -> After you select a shape and draw it, you can edit it if you click on this icon and then hit SAVE (otherwise it won’t save the coordinates).
Permissions
Concept Description
- This module contains permissions for all the sections of iris and Control Center;
- It perfectly synchronizes with the permissions for iris to keep the compatibility between the 2 systems;
- It allows clients to limit access to some users in iris, depending on the company’s policy / internal rules.
Technical Development
You can:
- Create / modify permissions for each user within your company;
- Create custom permissions, depending on your needs.
Create Personnel
Step 1 -> Add personnel -> Fill in 'Details' -> Save; STEP 2 -> Go to ‘User Account’ -> Choose type of permissions and add email and password; STEP 3 -> Modify Permissions if needed.
iris sections
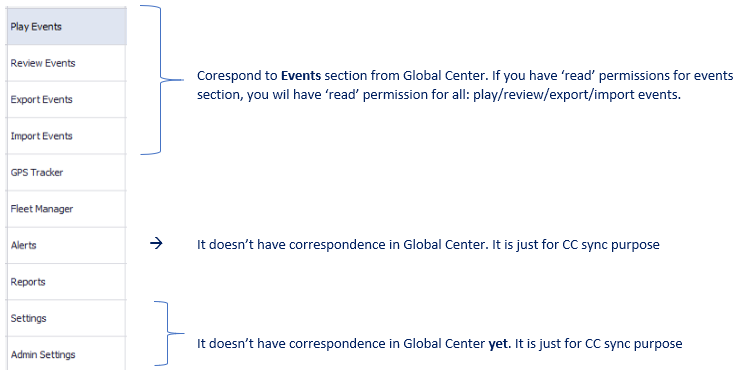
Control Center sections
Legend
- F = Full Access (Read/Write/Delete/Add/Edit); - W = Read/Write(edit); - R = Read; - N = No Access. (The same as in Control Center)
So, the main difference is between full access and write. In order to create any entity (vehicle / personnel / alert), you need to have full permission For now, None and Driver have the same permissions, meaning they don’t have access to Global Center. In the next release, we will implement Driver permissions (In Control Center, if you driver permission, you are able to see your own events in the platform)
- After you create a user, go to User Account, and select the type of permissions that user will have and create login credentials for Global Center:
- Based on the selection (None / Admin / Location / Department / Driver), in the Permissions tab it will be populated accordingly. If you you want to change permissions, go to Permissions tab and click Edit button;
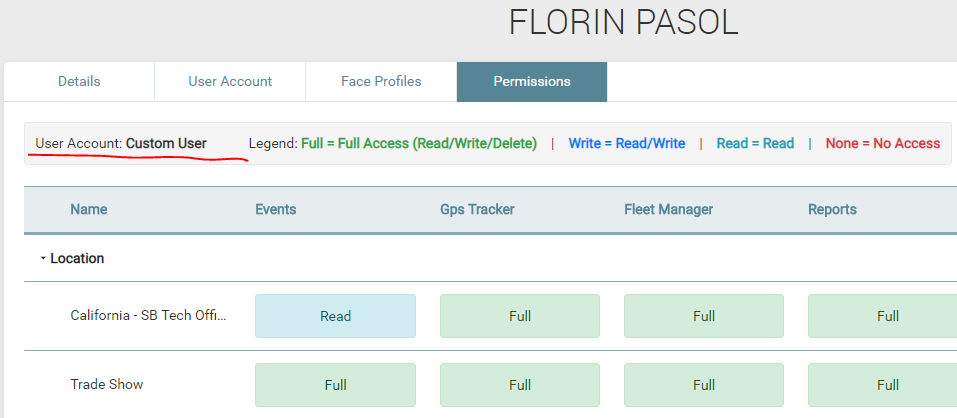
If you modify some permissions from this tab and click Save, the user will become custom user.
Custom permissions are read only, meaning that you can not choose from options to be a custom user, it will become custom after you modify the permissions from Permission tab:
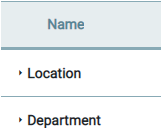
Permissions are grouped by Location and Department:
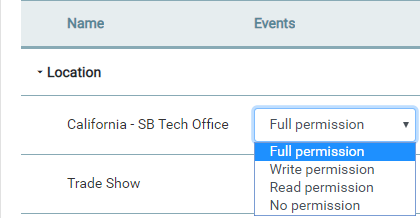
- By location, you can have 4 types of permission:
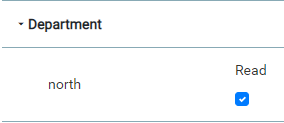
- By department, you can have just read / view permission:
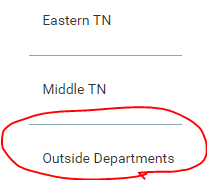
There is a special category under departments, called Outside departments. This category refers to all entities (vehicles / personnel/alerts etc.) that don’t have any department assigned (don’t belong to any department). When you create a user, by default, it will have permission to see entities from outside departments. We kept this category to replicate Control Center’s behavior.
Ex: If you have permission just for 1 location, Romania for example, you will see just vehicles / personnel from that location. You can only add vehicles / personnel within your location and, when creating alerts, you can only add vehicles that belongs to Romania. So, every entity is filtered according to permissions.
In alerts, everyone can see them (geofence, events alerts, possible accident etc.), but just users with full permission cand add an alert: Admin and Location admin. You can not edit your own permissions just others.
Services
Concept Description
- This module contains services (license-based features that client pays for on a monthly / quarterly basis);
- For now, we have Face Recognition, Drowsy and Distracted Driving and Safe Distance Warning.
Technical Development
You can:
- See your features / services grouped by location;
- See the lists of vehicles that have these features enabled.
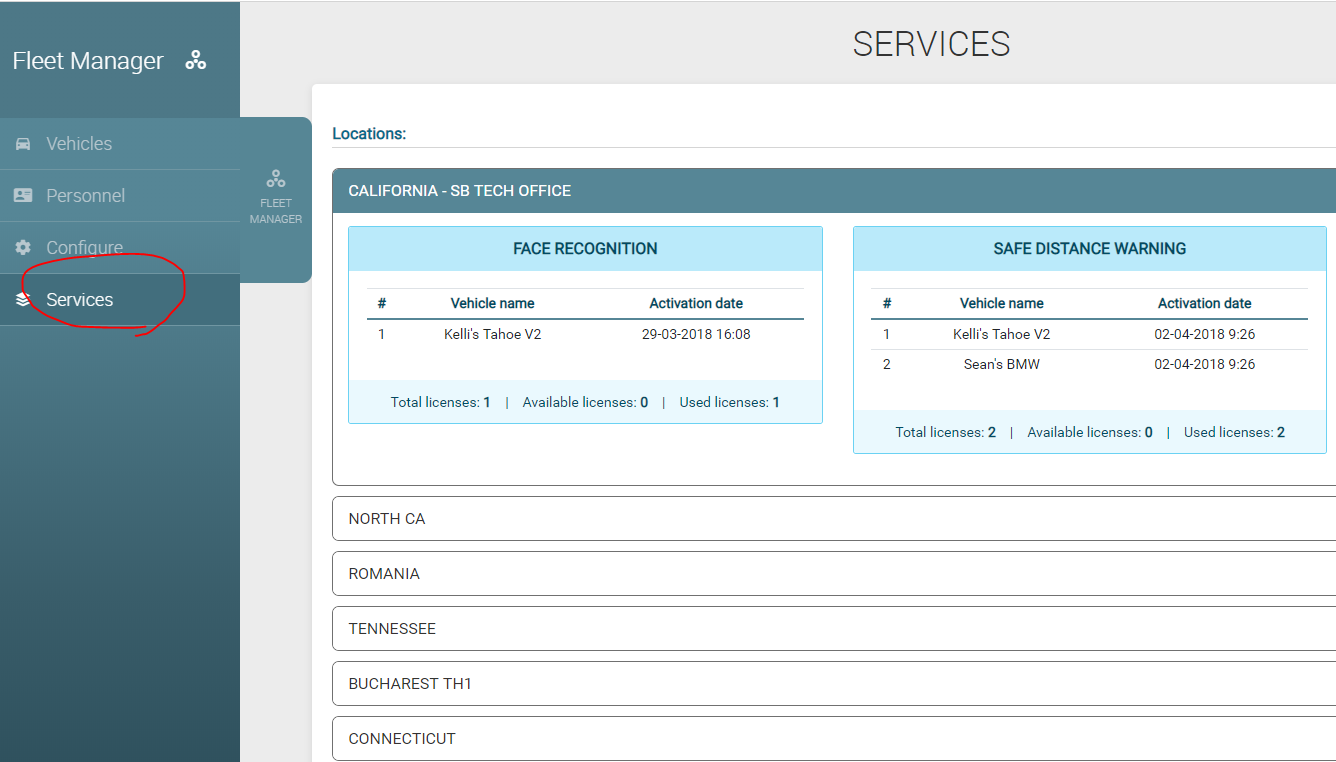
You can find services in the left panel, under Services page.
- The information you can find in here is:
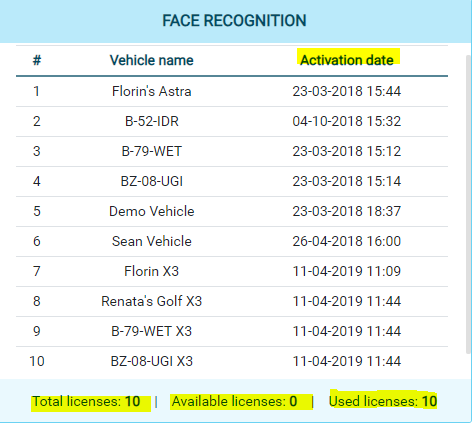
   - Nr. Of Total licenses;
   - Nr. Of Available licenses;
   - Nr. Of Used licenses;
   - An infinite scroll list of vehicles that have these features activated (the licenses have been activated on vehicle – the moment we start billing the service -> even though the vehicle didn’t transferred / connect to the server) ;
   - When the licenses have been activated.
The clients can not take actions in here. They can view the services, but the activation is still going to happen in Admin Center, by us.
Profile Settings
Concept description
This module refers to a set of settings that you can create, depending on your company’s needs and use later on, when you want to configure multiple vehicles with the same type of settings. You can create a profile of settings for your location, for example, so all your vehicles from that location have the same settings, without making the same configuration for each vehicle -> just assign the profile accordingly.
Technical development
You can:
- Create settings profile for your company / location / department
- Move one profile from one entity to another (from company to location, from location to department etc.)
You cannot:
- Edit Default profile (default settings established by idrive with thresholds based on your vehicle’s category);
- Edit an already created profile settings – just the name and the category. If you want to get rid of the profile, you just can delete it;
- See the name of the assigned profile to vehicle in vehicle’s view page, just the set of settings related to it.
Design
It looks like configure page, due to the fact that it contains the same settings as in configure.
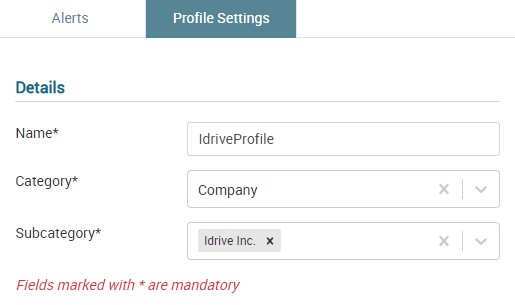
Additional, it contains:
You can attach a profile to multiple locations / departments. If you select category – company, the only option is the company of the user logged in. (if you are logged in as client / logged in as iris@idriveglobal.com and select another company from the drop-down, the option will be the company’s name you try to change settings to).
Add new profile
Go to Configure -> Profile Settings -> Add profile
In the list, you will always find a default profile (with the default settings). It cannot be deleted / modified.
Default Settings will be:
- General setup: 30 min sleep period, sound enabled, inside camera enabled, G-force Threshold Optimal, Overdue for more than 7 days;
- Events Settings Length: 8 seconds for almost all the events, except for: shock – 24 seconds, continuous recording – 2 minutes, blue wire / panic – 20 seconds;
- Events Settings Display ON for almost all the events, except for periodic, speed and face recognition;
- Periodic Event: trigger disabled, trigger every 10min;
- Continuous recording: video storage - 20%, video length – 2 minutes and it cannot be changed;
- Periodic: trigger every 60 minutes;
- Face recognition: trigger disabled, display off;
- Safe Distance Warning: trigger disabled, display on;
- Distraction Event: trigger disabled, display on, Buzzer off;
- Seatbelt: trigger disabled, display on;
- Buzzer: disabled;
- Speed: Trigger after - 20 seconds, trigger speed – 55 mi/h, trigger super speed – 81 mi/h;
- For cellular transferred events, default length is 8 seconds (only when transferred via wi-fi will have the length configured from fleet manager.
After you click on ‘Add profile’, it will take you to the same interface as configure (in which you can change settings as you wish), with additional info:
After you hit ‘Save’, your profile will appear in the list and it will be visible for those vehicles assigned to locations / departments / company you selected under the ‘category’ label.
Edit profile
If you click on ‘edit’, only ‘Details’ section will be editable. So, on edit, you can just move a profile to one entity to another (from company to location, from location to department etc.) and the name of the profile.
The reason why these settings cannot be changed after the profile has been created is that, when you assign a profile to a vehicle and the vehicle gets the settings, changing the profile settings will not automatically change the settings on the vehicle. It will have the old settings and the profile will have the new settings and it will be no longer accurate. You just can delete the profile entirely.
Assign profile to a vehicle
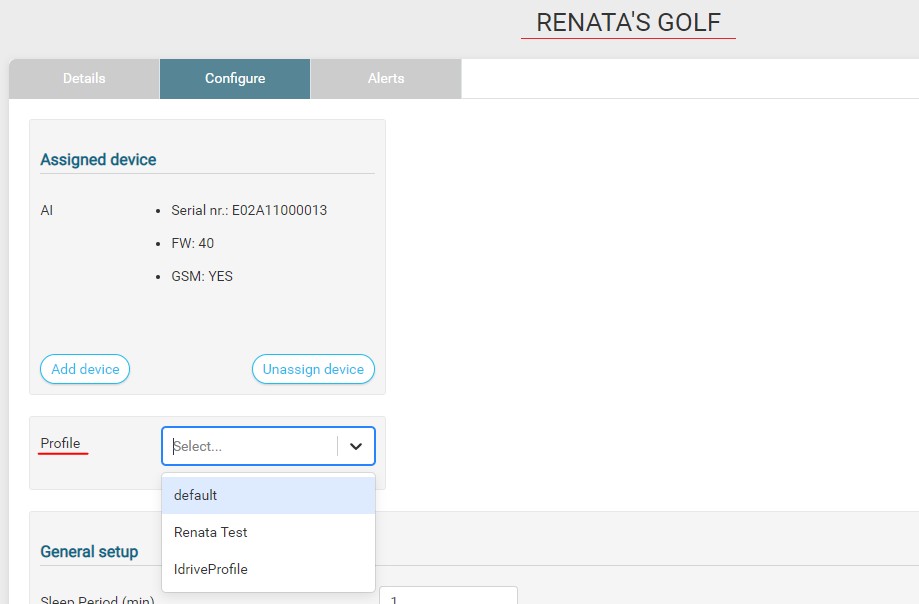
Go to Vehicle -> Configure -> Edit -> Select Profile from drop-down.
After you select a profile from the list, the page will be populated with the settings according to the profile. Hit ‘Save’ and that’s it.
